Cisco G1 Installation Guide - Page 2
Preparing for an Upgrade - router
 |
UPC - 746320679488
View all Cisco G1 manuals
Add to My Manuals
Save this manual to your list of manuals |
Page 2 highlights
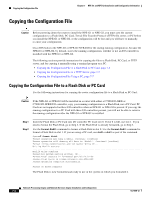
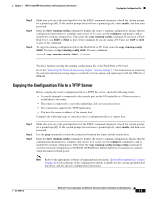
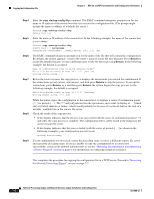
Preparing for an Upgrade Chapter 7 NPE-G1 and NPE-G2 Installation and Configuration Information Tip Before you begin any removal or installation procedure, read Chapter 8, "Preparation for Installation." Also, for the NPE-G1, see the NPE-G1 Read Me First document, at the following URL: http://www.cisco.com/en/US/products/hw/routers/ps341/prod_installation_guide09186a00805e396a.ht ml For the Cisco uBR7200-NPE-G1, see the Cisco uBR7200-NPE-G1 Read Me First document, at the following URL: http://www.cisco.com/en/US/products/hw/cable/ps2217/prod_pre_installation_guide09186a008017bde 6.html Preparing for an Upgrade Note Cisco IOS Release 12.2 changed the behavior of the ROM monitor (ROMmon) during the bootup sequence. See the "Boot Changes in Cisco IOS Release 12.2" section on page 10-2 for more information. Upgrading to the NPE-G1 or NPE-G2 is a different procedure than previous processor upgrades because of the following considerations: • The NPE-G1 and NPE-G2 contain an I/O controller, which includes the bootflash and NVRAM memory. After you install the NPE-G1 or NPE-G2 in a chassis, you can no longer access the bootflash and NVRAM on the I/O controller. You therefore must make the existing Cisco IOS software image and configuration files available to the NPE-G1 or NPE-G2, either by putting these files on a CompactFlash Disk or on a TFTP server. • The NPE-G1 and NPE-G2 include three Gigabit Ethernet interfaces. If you want to use these interfaces to replace the Ethernet or Fast Ethernet interfaces on the existing I/O controller, you must configure the new interfaces before they can be used to access the network. If you are also removing the existing I/O controller, you must remove the configuration for its Ethernet or Fast Ethernet interfaces. Note The NPE-G2 provides a Fast Ethernet Management port, as well as three RJ-45 Gigabit Ethernet ports. • The NPE-G1 and NPE-G2 use Type 1 CompactFlash Disk memory instead of the Type 2 Flash Disk memory used in existing I/O controllers. You must transfer any information currently saved on Flash Disks to CompactFlash Disks so that it can be used after the upgrade to the NPE-G1 or NPE-G2. Note If you are upgrading to an NPE-G2 from an NPE-G1, you do not need to perform the following procedure. To ensure a smooth upgrade, perform the following procedure only if you are upgrading to an NPE-G1 or NPE-G2 from an NPE-400 or earlier network processing engine. Network Processing Engine and Network Services Engine Installation and Configuration 7-2 OL-4448-12
-
 1
1 -
 2
2 -
 3
3 -
 4
4 -
 5
5 -
 6
6 -
 7
7 -
 8
8 -
9
-
10
-
11
-
12
-
13
-
14
-
15
-
16
-
17
-
18
-
19
-
20
-
21
-
22
-
23
-
24
-
25
-
26
-
27
-
28
-
29
-
30
-
31
-
32
-
33
-
34
-
35
-
36
-
37
-
38
-
39
-
40
-
41
-
42
-
43
-
44
-
45
-
46
-
47
-
48
-
49
-
50
-
51
-
52
-
53
-
54
-
55
-
56
-
57
-
58
-
59
-
60
-
61
-
62
-
63
-
64
-
65
-
66
-
67
-
68
 |
 |
