Epson EPL-N2000 User Manual - Page 88
Secure the screw and the cover that you removed when, Connect any interface cables that you removed.
 |
View all Epson EPL-N2000 manuals
Add to My Manuals
Save this manual to your list of manuals |
Page 88 highlights
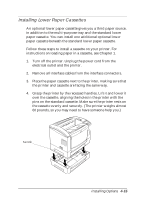
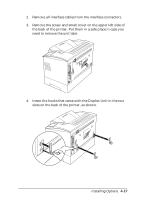
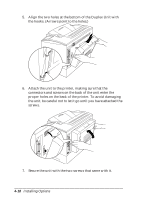
4. Carefully pull the unit straight out, then up. 5. Remove the two hooks from the back of the printer. Put them in a safe place in case you need to reinstall the unit later. 6. Secure the screw and the cover that you removed when installing the unit. 7. Connect any interface cables that you removed. 4-20 Installing Options
-
 1
1 -
2
-
3
-
4
-
5
-
6
-
7
-
8
-
9
-
10
-
11
-
12
-
13
-
14
-
15
-
16
-
17
-
18
-
19
-
20
-
21
-
22
-
23
-
24
-
25
-
26
-
27
-
28
-
29
-
30
-
31
-
32
-
33
-
34
-
35
-
36
-
37
-
38
-
39
-
40
-
41
-
42
-
43
-
44
-
45
-
46
-
47
-
48
-
49
-
50
-
51
-
52
-
53
-
54
-
55
-
56
-
57
-
58
-
59
-
60
-
61
-
62
-
63
-
64
-
65
-
66
-
67
-
68
-
69
-
70
-
71
-
72
-
73
-
74
-
75
-
76
-
77
-
78
-
79
-
80
-
81
-
82
-
 83
83 -
 84
84 -
 85
85 -
 86
86 -
 87
87 -
 88
88 -
 89
89 -
 90
90 -
 91
91 -
 92
92 -
 93
93 -
94
-
95
-
96
-
97
-
98
-
99
-
100
-
101
-
102
-
103
-
104
-
105
-
106
-
107
-
108
-
109
-
110
-
111
-
112
-
113
-
114
-
115
-
116
-
117
-
118
-
119
-
120
-
121
-
122
-
123
-
124
-
125
-
126
-
127
-
128
-
129
-
130
-
131
-
132
-
133
-
134
-
135
-
136
-
137
-
138
-
139
-
140
-
141
-
142
-
143
-
144
-
145
 |
 |

4-20
Installing Options
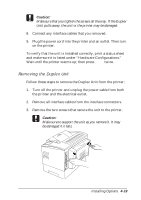
4.
Carefully pull the unit straight out, then up.
5.
Remove the two hooks from the back of the printer. Put
them in a safe place in case you need to reinstall the unit
later.
6.
Secure the screw and the cover that you removed when
installing the unit.
7.
Connect any interface cables that you removed.