Epson EPL-N2000 User Manual - Page 92
Ready, On Line, Enter, of memory is listed under Hardware Configurations. If
 |
View all Epson EPL-N2000 manuals
Add to My Manuals
Save this manual to your list of manuals |
Page 92 highlights
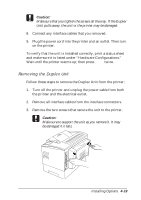
7. Align the SIMM pins marked either 1 or 72 with the corresponding pin position marked on the slot. 8. Press the module in firmly until it clicks into place. Do not apply too much force. 9. Replace the printer's side cover and secure the three screws that you loosened earlier. 10. Gently press down on the printer cover until it clicks shut. To verify that the module(s) is working properly, print a status sheet. If you have added memory, make sure the correct amount of memory is listed under "Hardware Configurations." If you have added an EPSONScript Level 2 module, it should be listed. To print a status sheet, wait until the printer warms up (Ready appears on the control panel display and the On Line light is on); then press the Enter button twice. 4-24 Installing Options
-
 1
1 -
2
-
3
-
4
-
5
-
6
-
7
-
8
-
9
-
10
-
11
-
12
-
13
-
14
-
15
-
16
-
17
-
18
-
19
-
20
-
21
-
22
-
23
-
24
-
25
-
26
-
27
-
28
-
29
-
30
-
31
-
32
-
33
-
34
-
35
-
36
-
37
-
38
-
39
-
40
-
41
-
42
-
43
-
44
-
45
-
46
-
47
-
48
-
49
-
50
-
51
-
52
-
53
-
54
-
55
-
56
-
57
-
58
-
59
-
60
-
61
-
62
-
63
-
64
-
65
-
66
-
67
-
68
-
69
-
70
-
71
-
72
-
73
-
74
-
75
-
76
-
77
-
78
-
79
-
80
-
81
-
82
-
83
-
84
-
85
-
86
-
 87
87 -
 88
88 -
 89
89 -
 90
90 -
 91
91 -
 92
92 -
 93
93 -
 94
94 -
 95
95 -
 96
96 -
 97
97 -
98
-
99
-
100
-
101
-
102
-
103
-
104
-
105
-
106
-
107
-
108
-
109
-
110
-
111
-
112
-
113
-
114
-
115
-
116
-
117
-
118
-
119
-
120
-
121
-
122
-
123
-
124
-
125
-
126
-
127
-
128
-
129
-
130
-
131
-
132
-
133
-
134
-
135
-
136
-
137
-
138
-
139
-
140
-
141
-
142
-
143
-
144
-
145
 |
 |
