Garmin Map 60 Owner's Manual - Page 46
With the Track Log displayed and the Track Log On, press
 |
UPC - 689076190107
View all Garmin Map 60 manuals
Add to My Manuals
Save this manual to your list of manuals |
Page 46 highlights
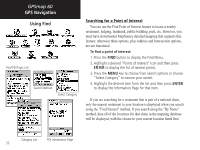
GPSmap 60 GPS Navigation Using Tracks Saved Track Page Area Calculation Option Saved Track on the Map Page Start Calculation Stop Calculation Save Calculated Track 36 4. The Saved Track Page allows you to rename the track, view the track distance, view the calculated area encompassed by the track (an area is defined even if the track is open ended) and specify a color for the track when displayed on the map page (Show On Map). On-screen buttons at the bottom of the page allow you to Save the track (OK), delete, view it on the Map, and navigate the track back to any point along the track (TracBack). To view a Track on the Map: 1. With the Saved Tracks Page for the track or the Track Log displayed, highlight the Map button and press ENTER to display the Map Page. 2. A map showing the entire track appears with Begin and End markers. Any User Waypoints added to the Track will be displayed as well. To calculate the area of a Track: 1. With the Track Log Page displayed and the Track Log On, press the MENU key, highlight the Area Calculation option and press ENTER. 2. Press ENTER to start the calculation as you begin to move and define the area's boundaries. The page now displays a Stop button. 3. When you have completed defining the area, press ENTER to display the page with a Save button. 4. Press ENTER again to save the new track to the Saved Tracks List.
-
 1
1 -
2
-
3
-
4
-
5
-
6
-
7
-
8
-
9
-
10
-
11
-
12
-
13
-
14
-
15
-
16
-
17
-
18
-
19
-
20
-
21
-
22
-
23
-
24
-
25
-
26
-
27
-
28
-
29
-
30
-
31
-
32
-
33
-
34
-
35
-
36
-
37
-
38
-
39
-
40
-
 41
41 -
 42
42 -
 43
43 -
 44
44 -
 45
45 -
 46
46 -
 47
47 -
 48
48 -
 49
49 -
 50
50 -
 51
51 -
52
-
53
-
54
-
55
-
56
-
57
-
58
-
59
-
60
-
61
-
62
-
63
-
64
-
65
-
66
-
67
-
68
-
69
-
70
-
71
-
72
-
73
-
74
-
75
-
76
-
77
-
78
-
79
-
80
-
81
-
82
-
83
-
84
-
85
-
86
-
87
-
88
-
89
-
90
-
91
-
92
-
93
-
94
 |
 |
