Gateway DX4320 Hardware Installation Guide
Gateway DX4320 Manual
 |
View all Gateway DX4320 manuals
Add to My Manuals
Save this manual to your list of manuals |
Gateway DX4320 manual content summary:
- Gateway DX4320 | Hardware Installation Guide - Page 1
Your Gateway Computer componentguide Hard Drive Installation Installing Configuring - Gateway DX4320 | Hardware Installation Guide - Page 2
- Gateway DX4320 | Hardware Installation Guide - Page 3
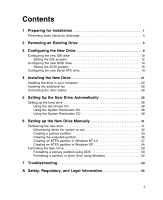
Configuring the new Serial ATA drive 19 4 Installing the New Drive 21 Installing the drive in your computer 22 Installing the additional fan 26 Connecting the drive cables 28 5 Setting Up the New Drive Automatically 35 Setting up the hard drive 36 Using the red Drivers CD 36 Using the System - Gateway DX4320 | Hardware Installation Guide - Page 4
ii - Gateway DX4320 | Hardware Installation Guide - Page 5
information you need to install a replacement or new hard drive. This guide covers SCSI and IDE hard drives. Installing a hard drive is a process consisting of seven procedures that must be done in sequence: 1 Prepare for installation. 2 Remove an existing drive (if applicable). 3 Set the jumpers - Gateway DX4320 | Hardware Installation Guide - Page 6
Chapter 1: Preparing for Installation This guide also has a troubleshooting section that provides hard drive installation troubleshooting tips. See the documentation that came with your computer for information about opening and closing your computer case. Important The illustrations in this - Gateway DX4320 | Hardware Installation Guide - Page 7
.gateway.com) and print the appropriate document before starting the installation procedure. 3 If you are replacing a working hard drive, back up any files that you want to save. 4 Determine which operating system your computer uses by right-clicking the My Computer icon (located on the Desktop - Gateway DX4320 | Hardware Installation Guide - Page 8
to a bare metal part of your computer. Warning To prevent risk of electric shock, do not insert any object into the vent holes of the power supply. ■ Touch a bare metal surface on the back of your computer. ■ Unplug the power cord and modem cable. Before working with computer components, follow - Gateway DX4320 | Hardware Installation Guide - Page 9
procedure only if you are replacing an existing hard drive. If you are adding a new hard drive, go to "Configuring the New Drive" on page 9. Warning Avoid exposure to dangerous electrical voltages and moving parts by turning off your computer and unplugging the power cord and modem cable before - Gateway DX4320 | Hardware Installation Guide - Page 10
for instructions on removing your computer case cover. 2 Following the static electricity precautions on page 4, remove your computer case cover.s 3 Remove the data ribbon cable (IDE or SCSI drives) or signal cable (Serial ATA drive) and power cable from the back of the hard drive. 6 www.gateway - Gateway DX4320 | Hardware Installation Guide - Page 11
4 If the drive is mounted to a removable cage or brackets, remove the cage or brackets from your computer case, then remove the drive from the cage or brackets. - OR - www.gateway.com 7 - Gateway DX4320 | Hardware Installation Guide - Page 12
Removing an Existing Drive If the drive is attached to a fixed cage, slide the release lever, then remove the drive. 5 If this drive is a replacement for a failed drive, carefully pack the failed drive and follow the instructions on the return form to send your drive back to Gateway for credit. Go - Gateway DX4320 | Hardware Installation Guide - Page 13
3 Configuring the New Drive Read this chapter to learn about: ■ Cabling and configuring IDE drives for master or slave ■ Cabling and configuring SCSI drives for ID and termination ■ Cabling and configuring Serial ATA drives 9 - Gateway DX4320 | Hardware Installation Guide - Page 14
" on page 14. If your new drive is a Serial ATA drive, go to "Configuring the new Serial ATA drive" on page 19. Your system board may contain as many as three controllers (where the wide ribbon cables attach to the main system board or a host adapter add-in card). One controller is for the diskette - Gateway DX4320 | Hardware Installation Guide - Page 15
the drive as a master or slave drive based on its position on the IDE cable. If both drives on the IDE data cable are configured as cable select, the middle drive is the slave and the end drive is the master. The drive and the IDE data cable must support cable select to use this option. www.gateway - Gateway DX4320 | Hardware Installation Guide - Page 16
configures the drive as a master or slave drive based on its position on the IDE cable. If both drives on the IDE data cable are configured as cable select, the middle drive is the slave and the end drive is the master. The drive and the IDE data cable must support cable select. 12 www.gateway.com - Gateway DX4320 | Hardware Installation Guide - Page 17
Usually, if you are installing the new drive as a replacement drive, configure the new drive settings so they match your old drive settings. If your old drive was set as a master drive, set the new drive as a master drive. However, in order to maintain the same configuration (master, slave, or cable - Gateway DX4320 | Hardware Installation Guide - Page 18
new Serial ATA drive" on page 19. If your computer contains SCSI devices, they are connected to a SCSI host adapter add-in card. All devices on a SCSI data ribbon cable connect to form a chain. This chain contains a SCSI host adapter and your other SCSI devices such as the hard drive and tape backup - Gateway DX4320 | Hardware Installation Guide - Page 19
new SCSI drive Termination Each Off (for devices in the middle of the chain). Generally, your computer's SCSI host adapter is at one end of the chain and a terminated device is at SCSI) other than 7, which is the factory preset for the host adapter. The ID number, or address, is set on most SCSI - Gateway DX4320 | Hardware Installation Guide - Page 20
. The jumper block is typically located on the rear of the drive, although it may be located on the top or the bottom of the drive. On SCSI drives, a jumper is placed over two of the pins to configure the SCSI drive's termination setting. Other jumpers are placed over additional sets of pins to - Gateway DX4320 | Hardware Installation Guide - Page 21
) SCSI hard drive (termination enabled) Example B: SCSI Termination in a computer with three internal SCSI devices. SCSI Host Adapter (termination enabled) SCSI tape drive (termination disabled) SCSI CD/DVD drive (termination disabled) SCSI hard drive (termination enabled) www.gateway.com 17 - Gateway DX4320 | Hardware Installation Guide - Page 22
the only device on the cable, as shown in Example A, make sure that a jumper is installed on the SCSI termination jumper pins. - OR - If your drive will be in the middle of a SCSI chain, as shown in Example B, remove the termination jumper. Make sure that the last SCSI device on the - Gateway DX4320 | Hardware Installation Guide - Page 23
) your computer. Serial ATA drives are designed for easy installation with no jumpers, terminators, or other settings. The jumper block adjacent to the signal connector is for factory use only. Serial ATA drives (both are master devices) Serial ATA signal cables Host adapter www.gateway.com 19 - Gateway DX4320 | Hardware Installation Guide - Page 24
Chapter 3: Configuring the New Drive 20 www.gateway.com - Gateway DX4320 | Hardware Installation Guide - Page 25
your configuration and may include options you did not purchase. However, they are similar enough to your computer that they should help you install your drive successfully. Tips & Tricks See the documentation that came with your computer for more information about your specific computer case. 21 - Gateway DX4320 | Hardware Installation Guide - Page 26
on page 4, remove your computer case cover. See the documentation that came with your computer for instructions on removing your computer case cover. 3 If you are installing the drive in a 5.25-inch drive bay, attach the hard drive expansion brackets to the sides of the drive. 22 www.gateway.com - Gateway DX4320 | Hardware Installation Guide - Page 27
computer 4 If you are adding a half-height SCSI hard drive to a computer that already has a half-height SCSI hard drive installed in it, install the second drive into the drive cage upside down. First drive installed in top bay Drive cage Second drive installed upside down in lower bay www.gateway - Gateway DX4320 | Hardware Installation Guide - Page 28
the cage or brackets to the inside of your computer case with the screws removed earlier. Make sure that the drive is positioned so you can connect the cables to the connectors on the back of the drive. For more information, see "Connecting the drive cables" on page 28. - OR - 24 www.gateway.com - Gateway DX4320 | Hardware Installation Guide - Page 29
Installing the drive in your computer If the drive was attached to a fixed cage, make sure that the release lever is in the unlocked position, install the drive, then slide the release lever to the locked position. Make sure that the drive is positioned so you can connect the cables to the - Gateway DX4320 | Hardware Installation Guide - Page 30
additional fan If you are adding a drive that is not a half-height SCSI hard drive, or if you are replacing a hard drive, go to "To connect the drive cables:" on page 28. You only need to perform this procedure if you are installing a new half-height SCSI hard drive into a tower case. To install the - Gateway DX4320 | Hardware Installation Guide - Page 31
one end of the fan power cable adapter to the fan power cable connector. 3 Attach the other end of the fan power cable adapter to an available four-color power cable connector. If you do not have enough power connectors, place the Y-adapter power cable that came with the new drive on the end of the - Gateway DX4320 | Hardware Installation Guide - Page 32
Chapter 4: Installing the New Drive Connecting the drive cables To connect the drive cables: 1 Connect an unused four-color power cable to the power supply connector on each drive. The power supply connector varies between drive types. If the drive uses a Serial ATA power cable, you may need to - Gateway DX4320 | Hardware Installation Guide - Page 33
to the back of the drive. Warning If you are connecting a data ribbon cable, make sure that you align the red-striped edge of the cable toward the Pin 1 end of the data cable connector. Usually, this is the end of the connector that is nearest the power supply connector. PIN 1 is usually - Gateway DX4320 | Hardware Installation Guide - Page 34
to the slave drive and connect the end cable connector to the master (boot) drive. End connector Middle connector Master Slave - OR - If you are connecting two Serial ATA drives, connect a signal cable to each of the drive signal connectors. Signal cable Signal cable 30 www.gateway.com Master - Gateway DX4320 | Hardware Installation Guide - Page 35
cables 3 Follow the data ribbon cable from the connector on the drive to the other end of the cable. Make sure that it is connected HDD1, or IDE1 on the system board. - OR - If you have an IDE controller card, connect the data ribbon cable to the primary controller connector on the IDE controller - Gateway DX4320 | Hardware Installation Guide - Page 36
If you are installing a SCSI drive, connect the data ribbon cable to the corresponding connector on the SCSI adapter card. If you have not installed the SCSI adapter card in your computer, see the documentation that came with the SCSI adapter card for installation instructions. - OR - 32 www - Gateway DX4320 | Hardware Installation Guide - Page 37
with your computer for instructions on replacing your computer case cover. 2 Reconnect the external cables, then plug in the power cord. 3 Turn on your computer. 4 If you replaced the master (boot) drive and the Windows® desktop appears after restarting your computer, the hard drive installation - Gateway DX4320 | Hardware Installation Guide - Page 38
reinstall the drivers. Tips & Tricks If you do not have your original system CDs, go to www.support.gateway.com to download any drivers you need. If your computer does not recognize the new hard drive or if the new hard drive does not seem to be working correctly, go to "Troubleshooting" on page - Gateway DX4320 | Hardware Installation Guide - Page 39
Setting Up the New Drive Automatically If you replaced a master (boot) drive and you do not see the Windows desktop when you start your computer, go to "Setting up the hard drive" on page 36. If you replaced or added an additional slave drive, go to "Setting up the New Drive Manually" on page 41. 35 - Gateway DX4320 | Hardware Installation Guide - Page 40
on page 39. Tips & Tricks If you do not have your original system CDs, go to www.support.gateway.com to download any drivers you need. Using the red Drivers CD To set up a hard drive automatically using the red Drivers CD: 1 Insert the red Drivers into the CD or DVD drive. 2 Restart your computer - Gateway DX4320 | Hardware Installation Guide - Page 41
controllers. If your computer includes a hard drive that requires a special hard drive driver, for example, a Serial ATA drive, then select this option. 12 When prompted, remove the red Drivers CD and insert the blue Operating System CD into the CD or DVD drive, then press any key to continue. 13 - Gateway DX4320 | Hardware Installation Guide - Page 42
must disable Gateway GoBack, press D. A warning tells you that Gateway GoBack will be disabled. Press D again. Gateway GoBack is disabled and your computer restarts. 5 Follow the on-screen instructions. The on-screen instructions step you through the operating system and device drivers installation - Gateway DX4320 | Hardware Installation Guide - Page 43
CD into your CD or DVD drive. 2 Restart your computer. The Gateway System Restoration CD Boot Menu opens. 3 Select 2. Boot from CD-ROM, then press ENTER. 4 If the restore utility detects that the hard drive does not have a partition, the Partitioning Options screen opens. Go to the next step - Gateway DX4320 | Hardware Installation Guide - Page 44
Chapter 5: Setting Up the New Drive Automatically 40 www.gateway.com - Gateway DX4320 | Hardware Installation Guide - Page 45
up the New Drive Manually Partitioning the new drive Follow the instructions in this chapter only if you want to manually customize the partitions on your new hard drive. If you are not sure which operating system your computer uses, right-click the My Computer icon (located on the Desktop or the - Gateway DX4320 | Hardware Installation Guide - Page 46
hard drive: ■ File Allocation Table (FAT)16 lets your computer address 2.1 GB of drive space per partition. ■ FAT32 lets your computer address up to 1 TB (1 terabyte) of drive a boot drive and your operating drive and use NTFS to create the extended partition. ** If you are creating a boot drive - Gateway DX4320 | Hardware Installation Guide - Page 47
Type N. Large disk support is disabled. 6 If you have only one hard drive in your computer, go to Step 8. - OR - If you have more than one hard drive in your computer type 5, then press ENTER. The Change Current Fixed Disk Drive menu opens showing drive availability and status. www.gateway.com 43 - Gateway DX4320 | Hardware Installation Guide - Page 48
Y. Large disk support is enabled. 6 If you have only one hard drive in your computer, go to Step 8. - OR - If you have more than one hard drive in your computer type 5, then press ENTER. The Change Current Fixed Disk Drive window appears showing drive availability and status. 44 www.gateway.com - Gateway DX4320 | Hardware Installation Guide - Page 49
The Create Primary DOS Partition screen appears and your computer verifies the drive integrity. 11 Type Y, then press ENTER. The message Primary DOS Partition created, drive letters changed or added appears. an extended DOS partition, go to "Formatting the New Drive" on page 50. www.gateway.com 45 - Gateway DX4320 | Hardware Installation Guide - Page 50
NT 4.0 users) Important The FDISK program is not available in Windows XP. A primary partition is created when Windows XP is installed on the hard drive. During the Windows XP installation process, you can also select the size and type of other partitions. If you leave any part of the hard drive - Gateway DX4320 | Hardware Installation Guide - Page 51
DOS Drive is selected. 2 Type 2, then press ENTER. The Create Extended DOS Partition screen appears and your computer verifies the drive integrity you replaced a failed drive and have Windows NT 4.0 on your computer, Gateway has formatted the primary partition (2.1 GB) of the new hard drive using - Gateway DX4320 | Hardware Installation Guide - Page 52
Creating an NTFS partition in Windows XP If you replaced a hard drive and have Windows XP on your computer, it is not necessary to partition a hard drive that is running NTFS. However, you may want to create an extended partition so logical drives can be assigned. To create an extended partition - Gateway DX4320 | Hardware Installation Guide - Page 53
click free space (available hard drive space) on an extended partition, then click New Logical Drive. 6 Follow the on-screen instructions to complete the New Partition Wizard. When prompted for a partition type, click Logical drive. 7 Go to "Formatting the New Drive" on page 50. www.gateway.com 49 - Gateway DX4320 | Hardware Installation Guide - Page 54
up the New Drive Manually Formatting the New Drive If you replaced your master (boot) drive, follow the instructions in this section only if you want to format a primary or extended partition on the hard drive. If you replaced or added an additional slave drive, follow the instructions in this - Gateway DX4320 | Hardware Installation Guide - Page 55
, use the red Drivers CD, the Gateway System Restoration Kit, or the Gateway System Restoration CD that originally came with your computer to reinstall the drivers. Tips & Tricks If you do not have your original system CDs, go to www.support.gateway.com to download any drivers you need. www - Gateway DX4320 | Hardware Installation Guide - Page 56
icon on your desktop. The My Computer window opens. - OR- Click Start, then click My Computer. The My Computer window opens. 2 Right-click the hard drive you want to format. 3 Click Format. The Format Local Disk window opens. 4 Select the drive format options, then click Start. 52 www.gateway.com - Gateway DX4320 | Hardware Installation Guide - Page 57
If your computer does not recognize the new hard drive, try these troubleshooting tips before calling Gateway Technical Support: ■ Review the installation procedures. Make sure that you did not skip any of the steps. ■ Disconnect, then reconnect the hard drive power cable. ■ Disconnect - Gateway DX4320 | Hardware Installation Guide - Page 58
your computer does not support LBA, enter the following drive settings in the BIOS Setup utility: Cyl. 1024 Heads 16 Sectors LZ 63 0 Write Precomp None ■ If your new hard drive came with Windows already installed and Windows does not work correctly, use the red Drivers CD, the Gateway System - Gateway DX4320 | Hardware Installation Guide - Page 59
United States of America Federal Communications Commission (FCC) Unintentional emitter per FCC Part 15 This device has been tested and found to comply with the limits for a Class B digital device, pursuant to Part 15 of the FCC rules. These limits are designed to provide reasonable protection - Gateway DX4320 | Hardware Installation Guide - Page 60
used in accordance with the instructions, may cause harmful interference to turning the equipment off and on, the user is encouraged to try to correct the TV technician for help. Compliance Accessories: The accessories associated with this equipment are: shielded video cable when an external monitor - Gateway DX4320 | Hardware Installation Guide - Page 61
safety statement All Gateway systems equipped with CD and DVD drives comply with the appropriate safety standards, including IEC 825. The laser devices in these components are classified as "Class 1 Laser Products" under a US Department of Health and Human Services (DHHS) Radiation Performance - Gateway DX4320 | Hardware Installation Guide - Page 62
Micro Server, Gateway Money:)Ware, Gateway Music:)Ware, Gateway Networking Solutions, Gateway Online Network (O.N.) solution, Gateway Photo:)Ware, Gateway Professional PCs, Gateway Profile, Gateway Solo, green stylized GATEWAY, green stylized Gateway logo, Gateway Teacher:)Ware, Gateway Video:)Ware - Gateway DX4320 | Hardware Installation Guide - Page 63
- Gateway DX4320 | Hardware Installation Guide - Page 64
MAN HDD US ALL MODE L INS T R 5 4/03
-
 1
1 -
 2
2 -
 3
3 -
 4
4 -
 5
5 -
 6
6 -
 7
7 -
8
-
9
-
10
-
11
-
12
-
13
-
14
-
15
-
16
-
17
-
18
-
19
-
20
-
21
-
22
-
23
-
24
-
25
-
26
-
27
-
28
-
29
-
30
-
31
-
32
-
33
-
34
-
35
-
36
-
37
-
38
-
39
-
40
-
41
-
42
-
43
-
44
-
45
-
46
-
47
-
48
-
49
-
50
-
51
-
52
-
53
-
54
-
55
-
56
-
57
-
58
-
59
-
60
-
61
-
62
-
63
-
64
 |
 |

component
guide
Hard Drive Installation
Installing
Configuring
Your Gateway Computer