Gateway DX4320 Hardware Installation Guide - Page 17
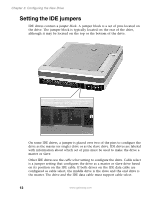
To set the jumpers for an IDE drive:
 |
View all Gateway DX4320 manuals
Add to My Manuals
Save this manual to your list of manuals |
Page 17 highlights
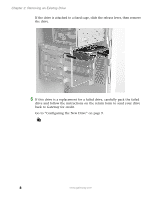
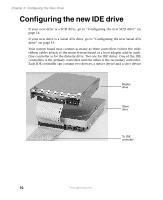
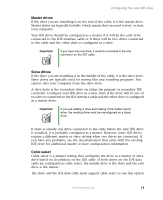
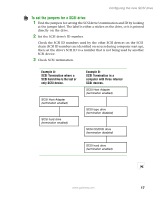
Configuring the new IDE drive Usually, if you are installing the new drive as a replacement drive, configure the new drive settings so they match your old drive settings. If your old drive was set as a master drive, set the new drive as a master drive. However, in order to maintain the same configuration (master, slave, or cable select), your new drive may require different jumper settings than your current drive. Check the label on your drive for the correct settings. To set the jumpers for an IDE drive: 1 Find the jumpers for setting a master, a slave, or a cable select drive by looking at the jumper label. The label is either a sticker on the drive, or it is printed directly on the drive. 2 If both of the drives and the IDE data cable support cable select, set the jumpers for the drives as cable select. IDE data cables that support cable select should be labeled CS. Cable select makes the drive in the middle of the cable the slave and the drive at the end of the cable the master. Go to "Installing the New Drive" on page 21. - OR - If either the drives or the IDE data cable do not support cable select, go to the next step. 3 If the drive is in the middle of the IDE data cable and you are going to configure your drive as the slave drive, set the jumpers as Slave A. If Slave A is not an option, set the jumpers as Slave. Go to "Installing the New Drive" on page 21. - OR - If the drive is at the end of the IDE data cable and you are going to configure your drive as the master drive, set the jumpers as Master A. If Master A is not an option, set the jumpers as Master. Go to "Installing the New Drive" on page 21. www.gateway.com 13
-
 1
1 -
2
-
3
-
4
-
5
-
6
-
7
-
8
-
9
-
10
-
11
-
 12
12 -
 13
13 -
 14
14 -
 15
15 -
 16
16 -
 17
17 -
 18
18 -
 19
19 -
 20
20 -
 21
21 -
 22
22 -
23
-
24
-
25
-
26
-
27
-
28
-
29
-
30
-
31
-
32
-
33
-
34
-
35
-
36
-
37
-
38
-
39
-
40
-
41
-
42
-
43
-
44
-
45
-
46
-
47
-
48
-
49
-
50
-
51
-
52
-
53
-
54
-
55
-
56
-
57
-
58
-
59
-
60
-
61
-
62
-
63
-
64
 |
 |