Gateway DX4320 Hardware Installation Guide - Page 57
Troubleshooting
 |
View all Gateway DX4320 manuals
Add to My Manuals
Save this manual to your list of manuals |
Page 57 highlights
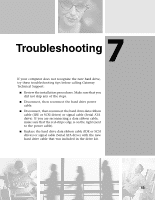
7 Troubleshooting If your computer does not recognize the new hard drive, try these troubleshooting tips before calling Gateway Technical Support: ■ Review the installation procedures. Make sure that you did not skip any of the steps. ■ Disconnect, then reconnect the hard drive power cable. ■ Disconnect, then reconnect the hard drive data ribbon cable (IDE or SCSI drives) or signal cable (Serial ATA drive). If you are reconnecting a data ribbon cable, make sure that the red-stripe edge is on the right (next to the power cable). ■ Replace the hard drive data ribbon cable (IDE or SCSI drives) or signal cable (Serial ATA drive) with the new hard drive cable that was included in the drive kit. 53
-
 1
1 -
2
-
3
-
4
-
5
-
6
-
7
-
8
-
9
-
10
-
11
-
12
-
13
-
14
-
15
-
16
-
17
-
18
-
19
-
20
-
21
-
22
-
23
-
24
-
25
-
26
-
27
-
28
-
29
-
30
-
31
-
32
-
33
-
34
-
35
-
36
-
37
-
38
-
39
-
40
-
41
-
42
-
43
-
44
-
45
-
46
-
47
-
48
-
49
-
50
-
51
-
 52
52 -
 53
53 -
 54
54 -
 55
55 -
 56
56 -
 57
57 -
 58
58 -
 59
59 -
 60
60 -
 61
61 -
 62
62 -
63
-
64
 |
 |

7
53
Troubleshooting
If your computer does not recognize the new hard drive,
try these troubleshooting tips before calling Gateway
Technical Support:
■
Review the installation procedures. Make sure that you
did not skip any of the steps.
■
Disconnect, then reconnect the hard drive power
cable.
■
Disconnect, then reconnect the hard drive data ribbon
cable (IDE or SCSI drives) or signal cable (Serial ATA
drive). If you are reconnecting a data ribbon cable,
make sure that the red-stripe edge is on the right (next
to the power cable).
■
Replace the hard drive data ribbon cable (IDE or SCSI
drives) or signal cable (Serial ATA drive) with the new
hard drive cable that was included in the drive kit.