HP 4200n HP LaserJet 4200 and 4300 series printer - User Guide - Page 175
Installing EIO cards or mass storage devices
 |
UPC - 808736313971
View all HP 4200n manuals
Add to My Manuals
Save this manual to your list of manuals |
Page 175 highlights
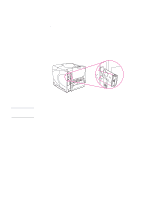
Installing EIO cards or mass storage devices Follow this procedure to install an EIO card or mass storage device (optional hard disk). To install EIO cards or mass storage devices 1 Turn the printer power off. 2 Remove the two screws and cover plate from the EIO 1 or EIO 2 slot on the back of the printer. 3 Install the EIO card or mass storage device in the EIO slot and tighten the screws. See the figure below for orientation of the EIO card. Note 4 Turn the printer power on and print a configuration page to verify that the new EIO device is recognized. (See "Configuration page" on page 83.) For information about connecting an EIO card to a network and installing the network software, see "Software for networks" on page 33, the getting started (start) guide that came with the printer, and also the HP Jetdirect Print Server Administrator's Guide. To remove an installed EIO card or mass storage device (optional hard disk) 1 Turn the printer power off. 2 Remove the EIO card or mass storage device from the EIO slot. 3 Place the cover plate from the EIO 1 or EIO 2 slot onto the back of the printer. Insert and tighten the two screws. 4 Turn the printer power on. Use Device Storage Manager in HP Web Jetadmin to manage fonts on a mass storage device. For more information, see the Help in HP Web Jetadmin. HP is constantly introducing new software tools for use with your printer and accessories. These tools are available on the Internet free of charge. See "Contacting HP" on page 144 for more information. ENWW Installing EIO cards or mass storage devices 173
-
 1
1 -
2
-
3
-
4
-
5
-
6
-
7
-
8
-
9
-
10
-
11
-
12
-
13
-
14
-
15
-
16
-
17
-
18
-
19
-
20
-
21
-
22
-
23
-
24
-
25
-
26
-
27
-
28
-
29
-
30
-
31
-
32
-
33
-
34
-
35
-
36
-
37
-
38
-
39
-
40
-
41
-
42
-
43
-
44
-
45
-
46
-
47
-
48
-
49
-
50
-
51
-
52
-
53
-
54
-
55
-
56
-
57
-
58
-
59
-
60
-
61
-
62
-
63
-
64
-
65
-
66
-
67
-
68
-
69
-
70
-
71
-
72
-
73
-
74
-
75
-
76
-
77
-
78
-
79
-
80
-
81
-
82
-
83
-
84
-
85
-
86
-
87
-
88
-
89
-
90
-
91
-
92
-
93
-
94
-
95
-
96
-
97
-
98
-
99
-
100
-
101
-
102
-
103
-
104
-
105
-
106
-
107
-
108
-
109
-
110
-
111
-
112
-
113
-
114
-
115
-
116
-
117
-
118
-
119
-
120
-
121
-
122
-
123
-
124
-
125
-
126
-
127
-
128
-
129
-
130
-
131
-
132
-
133
-
134
-
135
-
136
-
137
-
138
-
139
-
140
-
141
-
142
-
143
-
144
-
145
-
146
-
147
-
148
-
149
-
150
-
151
-
152
-
153
-
154
-
155
-
156
-
157
-
158
-
159
-
160
-
161
-
162
-
163
-
164
-
165
-
166
-
167
-
168
-
169
-
 170
170 -
 171
171 -
 172
172 -
 173
173 -
 174
174 -
 175
175 -
 176
176 -
 177
177 -
 178
178 -
 179
179 -
 180
180 -
181
-
182
-
183
-
184
-
185
-
186
-
187
-
188
-
189
-
190
-
191
-
192
-
193
-
194
-
195
-
196
-
197
-
198
-
199
-
200
-
201
-
202
-
203
-
204
-
205
-
206
-
207
-
208
-
209
-
210
-
211
-
212
-
213
-
214
-
215
-
216
-
217
-
218
 |
 |
