HP 4200n HP LaserJet 4200 and 4300 series printer - User Guide - Page 95
unit into the stapler/stacker., Rotate the stapler unit toward the rear of the printer until the unit
 |
UPC - 808736313971
View all HP 4200n manuals
Add to My Manuals
Save this manual to your list of manuals |
Page 95 highlights
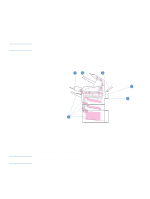
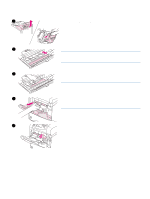
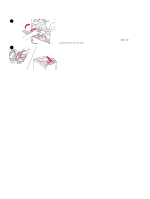
6 6 Remove the new stapler unit from its packaging. 7 Connect the cable on the new stapler unit to the stapler/stacker. 8 Place the peg located on the bottom of the new stapler unit into the hole in the stapler/stacker. 9 Press down on the tab at the top of the stapler unit and push the unit into the stapler/stacker. 10 Rotate the stapler unit toward the rear of the printer until the unit 7 clicks into place. 11 If the stapler cartridge is not installed in the stapler unit, install it now. (See "To load staples" on page 41.) 8 9 10 ENWW Replacing the stapler unit 93
-
 1
1 -
2
-
3
-
4
-
5
-
6
-
7
-
8
-
9
-
10
-
11
-
12
-
13
-
14
-
15
-
16
-
17
-
18
-
19
-
20
-
21
-
22
-
23
-
24
-
25
-
26
-
27
-
28
-
29
-
30
-
31
-
32
-
33
-
34
-
35
-
36
-
37
-
38
-
39
-
40
-
41
-
42
-
43
-
44
-
45
-
46
-
47
-
48
-
49
-
50
-
51
-
52
-
53
-
54
-
55
-
56
-
57
-
58
-
59
-
60
-
61
-
62
-
63
-
64
-
65
-
66
-
67
-
68
-
69
-
70
-
71
-
72
-
73
-
74
-
75
-
76
-
77
-
78
-
79
-
80
-
81
-
82
-
83
-
84
-
85
-
86
-
87
-
88
-
89
-
 90
90 -
 91
91 -
 92
92 -
 93
93 -
 94
94 -
 95
95 -
 96
96 -
 97
97 -
 98
98 -
 99
99 -
 100
100 -
101
-
102
-
103
-
104
-
105
-
106
-
107
-
108
-
109
-
110
-
111
-
112
-
113
-
114
-
115
-
116
-
117
-
118
-
119
-
120
-
121
-
122
-
123
-
124
-
125
-
126
-
127
-
128
-
129
-
130
-
131
-
132
-
133
-
134
-
135
-
136
-
137
-
138
-
139
-
140
-
141
-
142
-
143
-
144
-
145
-
146
-
147
-
148
-
149
-
150
-
151
-
152
-
153
-
154
-
155
-
156
-
157
-
158
-
159
-
160
-
161
-
162
-
163
-
164
-
165
-
166
-
167
-
168
-
169
-
170
-
171
-
172
-
173
-
174
-
175
-
176
-
177
-
178
-
179
-
180
-
181
-
182
-
183
-
184
-
185
-
186
-
187
-
188
-
189
-
190
-
191
-
192
-
193
-
194
-
195
-
196
-
197
-
198
-
199
-
200
-
201
-
202
-
203
-
204
-
205
-
206
-
207
-
208
-
209
-
210
-
211
-
212
-
213
-
214
-
215
-
216
-
217
-
218
 |
 |

ENWW
Replacing the stapler unit
93
6
Remove the new stapler unit from its packaging.
7
Connect the cable on the new stapler unit to the stapler/stacker.
8
Place the peg located on the bottom of the new stapler unit into the
hole in the stapler/stacker.
9
Press down on the tab at the top of the stapler unit and push the
unit into the stapler/stacker.
10
Rotate the stapler unit toward the rear of the printer until the unit
clicks into place.
11
If the stapler cartridge is not installed in the stapler unit, install it
now. (See
“To load staples” on page 41
.)
6
7
8
9
10