HP 4200n HP LaserJet 4200 and 4300 series printer - User Guide - Page 44
Loading trays - change paper speeds
 |
UPC - 808736313971
View all HP 4200n manuals
Add to My Manuals
Save this manual to your list of manuals |
Page 44 highlights
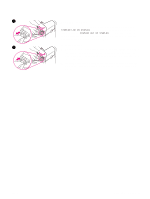
Loading trays This section describes how to load the standard and optional printer trays. 1 Loading tray 1 Tray 1 is a multipurpose tray that holds up to 100 sheets of paper, 10 envelopes, or 20 index cards. The printer default is to pull paper from tray 1 first, if it is loaded. To change this behavior, see "Customizing tray 1 operation" on page 47. Tray 1 provides a convenient way to print envelopes, transparencies, custom-size paper, or other types of media without having to unload the 2 other trays. It can also be used just as a convenient additional tray. For supported sizes of paper, see "Supported sizes and weights of paper" on page 183. If an optional stapler/stacker is installed, the printer automatically rotates the printed images 180° on all paper sizes, even if the job is not stapled. If you are printing on paper that requires a specific orientation (such as letterhead, preprinted paper, prepunched paper, and paper with watermarks), make sure that the paper is loaded correctly in the 3 tray. (See "Orientation of paper when a stapler is installed" on page 38.) Note The printer might print at a slower speed when using tray 1. CAUTION To avoid paper jams, do not load trays while the printer is printing. 4 Do not fan the paper. Fanning can cause misfeeds. To load tray 1 1 Open tray 1. 2 Pull out the tray extension. 3 Set the side guides to the correct width. 5 4 Load paper in the tray. Make sure that the paper fits under the tabs and below the maximum-height indicators. Note Load paper with the front side facing up and the top, short edge toward the printer. For information about loading special paper, see "Printing special paper" on page 57. 5 Adjust the side guides so that they lightly touch the paper stack but do not bend the paper. 42 2 Printing tasks ENWW
-
 1
1 -
2
-
3
-
4
-
5
-
6
-
7
-
8
-
9
-
10
-
11
-
12
-
13
-
14
-
15
-
16
-
17
-
18
-
19
-
20
-
21
-
22
-
23
-
24
-
25
-
26
-
27
-
28
-
29
-
30
-
31
-
32
-
33
-
34
-
35
-
36
-
37
-
38
-
 39
39 -
 40
40 -
 41
41 -
 42
42 -
 43
43 -
 44
44 -
 45
45 -
 46
46 -
 47
47 -
 48
48 -
 49
49 -
50
-
51
-
52
-
53
-
54
-
55
-
56
-
57
-
58
-
59
-
60
-
61
-
62
-
63
-
64
-
65
-
66
-
67
-
68
-
69
-
70
-
71
-
72
-
73
-
74
-
75
-
76
-
77
-
78
-
79
-
80
-
81
-
82
-
83
-
84
-
85
-
86
-
87
-
88
-
89
-
90
-
91
-
92
-
93
-
94
-
95
-
96
-
97
-
98
-
99
-
100
-
101
-
102
-
103
-
104
-
105
-
106
-
107
-
108
-
109
-
110
-
111
-
112
-
113
-
114
-
115
-
116
-
117
-
118
-
119
-
120
-
121
-
122
-
123
-
124
-
125
-
126
-
127
-
128
-
129
-
130
-
131
-
132
-
133
-
134
-
135
-
136
-
137
-
138
-
139
-
140
-
141
-
142
-
143
-
144
-
145
-
146
-
147
-
148
-
149
-
150
-
151
-
152
-
153
-
154
-
155
-
156
-
157
-
158
-
159
-
160
-
161
-
162
-
163
-
164
-
165
-
166
-
167
-
168
-
169
-
170
-
171
-
172
-
173
-
174
-
175
-
176
-
177
-
178
-
179
-
180
-
181
-
182
-
183
-
184
-
185
-
186
-
187
-
188
-
189
-
190
-
191
-
192
-
193
-
194
-
195
-
196
-
197
-
198
-
199
-
200
-
201
-
202
-
203
-
204
-
205
-
206
-
207
-
208
-
209
-
210
-
211
-
212
-
213
-
214
-
215
-
216
-
217
-
218
 |
 |
