HP CP6015dn HP Color LaserJet CP6015 Series Printers - Software Technical Refe - Page 101
Share Name, Printer Name
 |
UPC - 883585363018
View all HP CP6015dn manuals
Add to My Manuals
Save this manual to your list of manuals |
Page 101 highlights
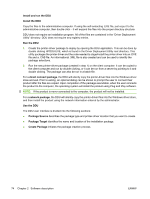
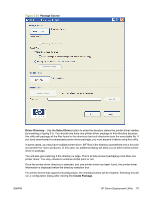
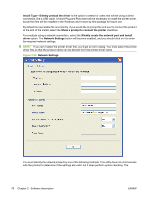
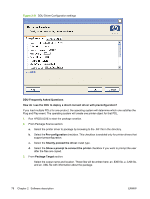
administrator is responsible for identifying the product using either the correct IP address, the Hardware address, or the Hostname. ● IP Address - enter the IPv4 or IPv6 address of the product. ● Hardware Address - enter the hardware address of the product. ● Hostname - enter the hostname of the product. The following network settings are additional. You may accept the default values pre-entered or change any of them. ● Port Name: This is the network port name that will be created. If the name already exists, a number will be appended to make it unique. ● Printer Name: This is the product name that will appear in the printers' folder. If the name already exists, a number will be appended to make it unique. ● Set this printer as default: ◦ Yes - will make this product the default when printing from other applications. ◦ No - will retain the current default, unless this is the only product installed. ● Share this printer: Yes - will allow others to use this product. ● Share Name: Share name for the product. Only enabled if 'Share this printer' is Yes. If the name already exists, a number will be appended to make it unique. To exit the Network Settings dialog without saving, use the Windows close button in the upper corner. Package Target Use the Save as button to enter the name and location for the output package by browsing or typing it in. The utility will create the package in the temp directory and then move it to the final location. Create Package Click the Create Package button when you have entered all the above information. This button will be disabled until you have entered the required information. Once it is clicked, the Cancel button and Progress bar will be enabled. To stop the package creation, click the Cancel button. The executablefile will run silently, unless a user prompt was requested for a direct connect product. If an error is encountered during execution, an error dialog will appear. To suppress the error dialog, select the Suppress all end user error messages checkbox. If you selected the Pre-configure this driver checkbox, the printer driver configuration dialog will open when you click the Create Package button. Once you have configured the printer driver, select OK to save the new configuration settings and continue creating the package. Clicking Cancel will cancel the entire package creation process. ENWW HP Driver Deployment Utility 77
-
 1
1 -
2
-
3
-
4
-
5
-
6
-
7
-
8
-
9
-
10
-
11
-
12
-
13
-
14
-
15
-
16
-
17
-
18
-
19
-
20
-
21
-
22
-
23
-
24
-
25
-
26
-
27
-
28
-
29
-
30
-
31
-
32
-
33
-
34
-
35
-
36
-
37
-
38
-
39
-
40
-
41
-
42
-
43
-
44
-
45
-
46
-
47
-
48
-
49
-
50
-
51
-
52
-
53
-
54
-
55
-
56
-
57
-
58
-
59
-
60
-
61
-
62
-
63
-
64
-
65
-
66
-
67
-
68
-
69
-
70
-
71
-
72
-
73
-
74
-
75
-
76
-
77
-
78
-
79
-
80
-
81
-
82
-
83
-
84
-
85
-
86
-
87
-
88
-
89
-
90
-
91
-
92
-
93
-
94
-
95
-
 96
96 -
 97
97 -
 98
98 -
 99
99 -
 100
100 -
 101
101 -
 102
102 -
 103
103 -
 104
104 -
 105
105 -
 106
106 -
107
-
108
-
109
-
110
-
111
-
112
-
113
-
114
-
115
-
116
-
117
-
118
-
119
-
120
-
121
-
122
-
123
-
124
-
125
-
126
-
127
-
128
-
129
-
130
-
131
-
132
-
133
-
134
-
135
-
136
-
137
-
138
-
139
-
140
-
141
-
142
-
143
-
144
-
145
-
146
-
147
-
148
-
149
-
150
-
151
-
152
-
153
-
154
-
155
-
156
-
157
-
158
-
159
-
160
-
161
-
162
-
163
-
164
-
165
-
166
-
167
-
168
-
169
-
170
-
171
-
172
-
173
-
174
-
175
-
176
-
177
-
178
-
179
-
180
-
181
-
182
-
183
-
184
-
185
-
186
-
187
-
188
-
189
-
190
-
191
-
192
-
193
-
194
-
195
-
196
-
197
-
198
-
199
-
200
-
201
-
202
-
203
-
204
-
205
-
206
-
207
-
208
-
209
-
210
-
211
-
212
-
213
-
214
-
215
-
216
-
217
-
218
-
219
-
220
-
221
-
222
-
223
-
224
-
225
-
226
-
227
-
228
-
229
-
230
-
231
-
232
-
233
-
234
-
235
-
236
-
237
-
238
-
239
-
240
-
241
-
242
-
243
-
244
-
245
-
246
-
247
-
248
-
249
-
250
-
251
-
252
-
253
-
254
-
255
-
256
-
257
-
258
-
259
-
260
-
261
-
262
-
263
-
264
-
265
-
266
-
267
-
268
-
269
-
270
-
271
-
272
-
273
-
274
-
275
-
276
-
277
-
278
-
279
-
280
-
281
-
282
-
283
-
284
-
285
-
286
-
287
-
288
-
289
-
290
-
291
-
292
-
293
-
294
-
295
-
296
-
297
-
298
-
299
-
300
-
301
-
302
-
303
-
304
-
305
-
306
-
307
-
308
-
309
-
310
-
311
-
312
-
313
-
314
-
315
-
316
-
317
-
318
-
319
-
320
-
321
-
322
-
323
-
324
-
325
-
326
-
327
-
328
-
329
-
330
-
331
-
332
-
333
-
334
-
335
-
336
-
337
-
338
-
339
-
340
-
341
-
342
-
343
-
344
-
345
-
346
-
347
-
348
-
349
-
350
-
351
-
352
-
353
-
354
-
355
-
356
-
357
-
358
-
359
-
360
-
361
-
362
-
363
-
364
-
365
-
366
-
367
-
368
-
369
-
370
-
371
-
372
-
373
-
374
-
375
-
376
-
377
-
378
 |
 |