HP CP6015dn HP Color LaserJet CP6015 Series Printers - Software Technical Refe - Page 350
Remote firmware update for UNIX systems, Remote firmware update by using the LPR command
 |
UPC - 883585363018
View all HP CP6015dn manuals
Add to My Manuals
Save this manual to your list of manuals |
Page 350 highlights
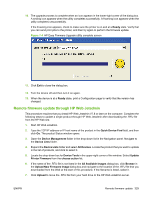
NOTE: The product automatically turns off and then on again to activate the update; this can happen more than once. At the end of the update process, the READY message appears on the control panel. Do not turn off the product or interfere with the update until you see this message. 4. Print a configuration page and verify that the firmware revision number matches the revision of the current update. Remote firmware update for UNIX systems For UNIX systems, any command method that delivers the .TAR file to the product is acceptable, including the following: 1. At the command prompt, type cp /home/yourmachine/FILENAME /dev/parallel>, where is the location of the .TAR file. 2. The download process begins and the firmware is updated on the product. This can take several minutes. Let the process finish without further interaction with the product or the computer. The messages described in the section Printer messages during the firmware update on page 319 appear on the control panel. NOTE: The product automatically turns off and then on again to activate the update; this can happen more than once. At the end of the update process, the READY message appears on the control panel. Do not turn off the product or interfere with the update until you see this message. 3. Print a configuration page and verify that the firmware revision number matches the revision of the current update. Remote firmware update by using the LPR command NOTE: This remote firmware update method is for use in Windows 2000, Windows XP, and Windows Server 2003. Complete the following steps to update the firmware by using the LPR command. 1. From a command window, type lpr -P -S -o l -OR- lpr -S -Pbinps , where can be either the TCP/IP address or the hostname of the product, and where is the filename of the .RFU file. NOTE: The parameter (-o l) consists of a lowercase "O", not a zero, and a lowercase "L", not the numeral 1. This parameter sets the transport protocol to binary mode. 2. Press Enter on the keyboard. The messages described in the section Printer messages during the firmware update on page 319 appear on the control panel. 3. The download process begins and the firmware is updated on the product. This can take several minutes. Let the process finish without further interaction with the product or the computer. The messages described in the section Printer messages during the firmware update on page 319 appear on the control panel. NOTE: The product automatically turns off and then on again to activate the update; this can happen more than once. At the end of the update process, the READY message appears on the control panel. Do not turn off the product or interfere with the update until you see this message. 326 Chapter 7 Engineering Details ENWW
-
 1
1 -
2
-
3
-
4
-
5
-
6
-
7
-
8
-
9
-
10
-
11
-
12
-
13
-
14
-
15
-
16
-
17
-
18
-
19
-
20
-
21
-
22
-
23
-
24
-
25
-
26
-
27
-
28
-
29
-
30
-
31
-
32
-
33
-
34
-
35
-
36
-
37
-
38
-
39
-
40
-
41
-
42
-
43
-
44
-
45
-
46
-
47
-
48
-
49
-
50
-
51
-
52
-
53
-
54
-
55
-
56
-
57
-
58
-
59
-
60
-
61
-
62
-
63
-
64
-
65
-
66
-
67
-
68
-
69
-
70
-
71
-
72
-
73
-
74
-
75
-
76
-
77
-
78
-
79
-
80
-
81
-
82
-
83
-
84
-
85
-
86
-
87
-
88
-
89
-
90
-
91
-
92
-
93
-
94
-
95
-
96
-
97
-
98
-
99
-
100
-
101
-
102
-
103
-
104
-
105
-
106
-
107
-
108
-
109
-
110
-
111
-
112
-
113
-
114
-
115
-
116
-
117
-
118
-
119
-
120
-
121
-
122
-
123
-
124
-
125
-
126
-
127
-
128
-
129
-
130
-
131
-
132
-
133
-
134
-
135
-
136
-
137
-
138
-
139
-
140
-
141
-
142
-
143
-
144
-
145
-
146
-
147
-
148
-
149
-
150
-
151
-
152
-
153
-
154
-
155
-
156
-
157
-
158
-
159
-
160
-
161
-
162
-
163
-
164
-
165
-
166
-
167
-
168
-
169
-
170
-
171
-
172
-
173
-
174
-
175
-
176
-
177
-
178
-
179
-
180
-
181
-
182
-
183
-
184
-
185
-
186
-
187
-
188
-
189
-
190
-
191
-
192
-
193
-
194
-
195
-
196
-
197
-
198
-
199
-
200
-
201
-
202
-
203
-
204
-
205
-
206
-
207
-
208
-
209
-
210
-
211
-
212
-
213
-
214
-
215
-
216
-
217
-
218
-
219
-
220
-
221
-
222
-
223
-
224
-
225
-
226
-
227
-
228
-
229
-
230
-
231
-
232
-
233
-
234
-
235
-
236
-
237
-
238
-
239
-
240
-
241
-
242
-
243
-
244
-
245
-
246
-
247
-
248
-
249
-
250
-
251
-
252
-
253
-
254
-
255
-
256
-
257
-
258
-
259
-
260
-
261
-
262
-
263
-
264
-
265
-
266
-
267
-
268
-
269
-
270
-
271
-
272
-
273
-
274
-
275
-
276
-
277
-
278
-
279
-
280
-
281
-
282
-
283
-
284
-
285
-
286
-
287
-
288
-
289
-
290
-
291
-
292
-
293
-
294
-
295
-
296
-
297
-
298
-
299
-
300
-
301
-
302
-
303
-
304
-
305
-
306
-
307
-
308
-
309
-
310
-
311
-
312
-
313
-
314
-
315
-
316
-
317
-
318
-
319
-
320
-
321
-
322
-
323
-
324
-
325
-
326
-
327
-
328
-
329
-
330
-
331
-
332
-
333
-
334
-
335
-
336
-
337
-
338
-
339
-
340
-
341
-
342
-
343
-
344
-
 345
345 -
 346
346 -
 347
347 -
 348
348 -
 349
349 -
 350
350 -
 351
351 -
 352
352 -
 353
353 -
 354
354 -
 355
355 -
356
-
357
-
358
-
359
-
360
-
361
-
362
-
363
-
364
-
365
-
366
-
367
-
368
-
369
-
370
-
371
-
372
-
373
-
374
-
375
-
376
-
377
-
378
 |
 |