HP CP6015dn HP Color LaserJet CP6015 Series Printers - Software Technical Refe - Page 299
Remove external fonts, PS Universal Print Driver Device Settings, Available PostScript Memory
 |
UPC - 883585363018
View all HP CP6015dn manuals
Add to My Manuals
Save this manual to your list of manuals |
Page 299 highlights
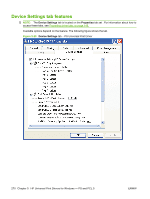
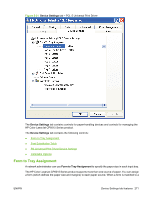
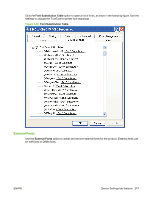
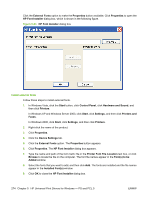
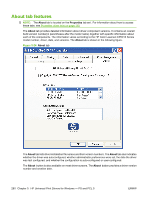
Remove external fonts 1. In Windows Vista, click the Start button, click Control Panel, click Hardware and Sound, and then click Printers. In Windows XP and Windows Server 2003, click Start, click Settings, and then click Printers and Faxes. In Windows 2000, click Start, click Settings, and then click Printers. 2. Right-click the name of the product. 3. Click Properties. 4. Click the Device Settings tab. 5. Click the External Fonts option. The Properties button appears. 6. Click Properties. The HP Font Installer dialog box appears. The external fonts that are installed appear in the Installed Fonts window. 7. Select the fonts that you want to remove, and then click Remove. The fonts are removed. 8. Click OK to close the HP Font Installer dialog box. PS Universal Print Driver Device Settings The following controls are available and appear only in the PS Universal Print Driver Device Settings tab. Available PostScript Memory This control specifies the amount of available postscript memory and provides a spin box for changing this value. The available postscript memory is a subset of the product total physical memory. It is usually best to set the postscript memory to match what is shown on the configuration page. To print a configuration page from the product control panel, follow these steps: Print a configuration page 1. Press the select button to open the menus. 2. Press the up arrow or the down arrow to scroll to INFORMATION, and then press select . 3. Press the up arrow or the down arrow to scroll to PRINT CONFIGURATION. 4. Press select to print the configuration page. Output Protocol This control specifies the protocol that the product uses for print jobs. The following options are available: ● ASCII (default) ● TBCP ● Binary When you click ASCII, data is sent in ASCII format (7-bit), which might take longer to print but can be sent through any I/O channel, such as a serial, parallel, or network port. ENWW Device Settings tab features 275
-
 1
1 -
2
-
3
-
4
-
5
-
6
-
7
-
8
-
9
-
10
-
11
-
12
-
13
-
14
-
15
-
16
-
17
-
18
-
19
-
20
-
21
-
22
-
23
-
24
-
25
-
26
-
27
-
28
-
29
-
30
-
31
-
32
-
33
-
34
-
35
-
36
-
37
-
38
-
39
-
40
-
41
-
42
-
43
-
44
-
45
-
46
-
47
-
48
-
49
-
50
-
51
-
52
-
53
-
54
-
55
-
56
-
57
-
58
-
59
-
60
-
61
-
62
-
63
-
64
-
65
-
66
-
67
-
68
-
69
-
70
-
71
-
72
-
73
-
74
-
75
-
76
-
77
-
78
-
79
-
80
-
81
-
82
-
83
-
84
-
85
-
86
-
87
-
88
-
89
-
90
-
91
-
92
-
93
-
94
-
95
-
96
-
97
-
98
-
99
-
100
-
101
-
102
-
103
-
104
-
105
-
106
-
107
-
108
-
109
-
110
-
111
-
112
-
113
-
114
-
115
-
116
-
117
-
118
-
119
-
120
-
121
-
122
-
123
-
124
-
125
-
126
-
127
-
128
-
129
-
130
-
131
-
132
-
133
-
134
-
135
-
136
-
137
-
138
-
139
-
140
-
141
-
142
-
143
-
144
-
145
-
146
-
147
-
148
-
149
-
150
-
151
-
152
-
153
-
154
-
155
-
156
-
157
-
158
-
159
-
160
-
161
-
162
-
163
-
164
-
165
-
166
-
167
-
168
-
169
-
170
-
171
-
172
-
173
-
174
-
175
-
176
-
177
-
178
-
179
-
180
-
181
-
182
-
183
-
184
-
185
-
186
-
187
-
188
-
189
-
190
-
191
-
192
-
193
-
194
-
195
-
196
-
197
-
198
-
199
-
200
-
201
-
202
-
203
-
204
-
205
-
206
-
207
-
208
-
209
-
210
-
211
-
212
-
213
-
214
-
215
-
216
-
217
-
218
-
219
-
220
-
221
-
222
-
223
-
224
-
225
-
226
-
227
-
228
-
229
-
230
-
231
-
232
-
233
-
234
-
235
-
236
-
237
-
238
-
239
-
240
-
241
-
242
-
243
-
244
-
245
-
246
-
247
-
248
-
249
-
250
-
251
-
252
-
253
-
254
-
255
-
256
-
257
-
258
-
259
-
260
-
261
-
262
-
263
-
264
-
265
-
266
-
267
-
268
-
269
-
270
-
271
-
272
-
273
-
274
-
275
-
276
-
277
-
278
-
279
-
280
-
281
-
282
-
283
-
284
-
285
-
286
-
287
-
288
-
289
-
290
-
291
-
292
-
293
-
 294
294 -
 295
295 -
 296
296 -
 297
297 -
 298
298 -
 299
299 -
 300
300 -
 301
301 -
 302
302 -
 303
303 -
 304
304 -
305
-
306
-
307
-
308
-
309
-
310
-
311
-
312
-
313
-
314
-
315
-
316
-
317
-
318
-
319
-
320
-
321
-
322
-
323
-
324
-
325
-
326
-
327
-
328
-
329
-
330
-
331
-
332
-
333
-
334
-
335
-
336
-
337
-
338
-
339
-
340
-
341
-
342
-
343
-
344
-
345
-
346
-
347
-
348
-
349
-
350
-
351
-
352
-
353
-
354
-
355
-
356
-
357
-
358
-
359
-
360
-
361
-
362
-
363
-
364
-
365
-
366
-
367
-
368
-
369
-
370
-
371
-
372
-
373
-
374
-
375
-
376
-
377
-
378
 |
 |