HP Photosmart Premium Fax All-in-One Printer - C309 Basics Guide - Page 9
Wireless Network Properties Connection, Network name SSID
 |
View all HP Photosmart Premium Fax All-in-One Printer - C309 manuals
Add to My Manuals
Save this manual to your list of manuals |
Page 9 highlights
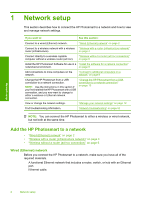
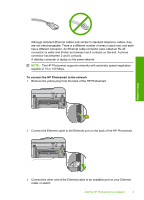
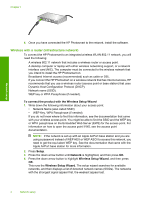
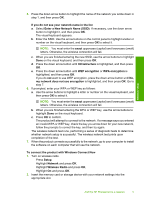
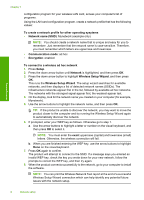
Network setup To create a network profile for a Windows XP computer NOTE: The product comes configured with a network profile with hpsetup as the network name (SSID). However, for security and privacy HP recommends you create a new network profile on your computer as described here. 1. In the Control Panel, double-click Network Connections. 2. On the Network Connections window, right-click the Wireless Network Connection. If you see Enable on the pop-up menu, select it. Otherwise, if you see Disable on the menu, the wireless connection is already enabled. 3. Right-click the Wireless Network Connection icon, and then click Properties. 4. Click the Wireless Networks tab. 5. Select the Use Windows to configure my wireless network settings check box. 6. Click Add, and then do the following: a. In Network name (SSID) box, type in a unique network name of your choice. NOTE: The network name is case sensitive, so it is important to remember any uppercase (capital) and lowercase (small) letters. b. If there is a Network Authentication list, select Open. Otherwise, go to the next step. c. In the Data encryption list, select WEP. NOTE: It is possible to create a network that does not use a WEP key. However, HP recommends using a WEP key in order to secure your network. d. Make sure that the check box is not selected next to The key is provided for me automatically. If it is selected, click the check box to clear it. e. In the Network key box, type a WEP key that has exactly 5 or exactly 13 alphanumeric (ASCII) characters. For example, if you enter 5 characters, you might enter ABCDE or 12345. Or, if you enter 13 characters, you might enter ABCDEF1234567. (12345 and ABCDE are examples only. Select a combination of your choosing.) Alternatively, you can use HEX (hexadecimal) characters for the WEP key. A HEX WEP key must be 10 characters for 40 bit encryption, or 26 characters for 128 bit encryption. f. In the Confirm network key box, type the same WEP key you typed in the previous step. NOTE: You must remember the exact uppercase (capital) and lowercase (small) letters. If you enter your WEP key incorrectly on the product, the wireless connection will fail. g. Write down the WEP key exactly as you typed it, including uppercase and lowercase letters. h. Select the check box for This is a computer-to-computer (ad hoc) network; wireless access points are not used. i. Click OK to close the Wireless network properties window, and then click OK again. j. Click OK again to close the Wireless Network Properties Connection window. If you have an operating system other than Windows XP, HP recommends that you use the configuration program that came with your wireless LAN card. To find the Add the HP Photosmart to a network 7
-
 1
1 -
2
-
3
-
 4
4 -
 5
5 -
 6
6 -
 7
7 -
 8
8 -
 9
9 -
 10
10 -
 11
11 -
 12
12 -
 13
13 -
 14
14 -
15
-
16
-
17
-
18
-
19
-
20
-
21
-
22
-
23
-
24
-
25
-
26
-
27
-
28
-
29
-
30
-
31
-
32
-
33
-
34
-
35
-
36
-
37
-
38
-
39
-
40
-
41
-
42
-
43
-
44
-
45
-
46
-
47
-
48
-
49
-
50
-
51
-
52
-
53
-
54
-
55
-
56
-
57
-
58
-
59
-
60
-
61
-
62
-
63
-
64
-
65
-
66
-
67
-
68
-
69
-
70
-
71
-
72
-
73
-
74
-
75
-
76
-
77
-
78
-
79
-
80
-
81
-
82
-
83
-
84
-
85
 |
 |
