JVC GY-DV5000U GY-DV5000U 3-CCD Professional DV Camcorder 92 page instruction - Page 22
3 Viewing the LCD Monitor, 5- 4 Setting, Displaying and Recording the Date and Time
 |
View all JVC GY-DV5000U manuals
Add to My Manuals
Save this manual to your list of manuals |
Page 22 highlights
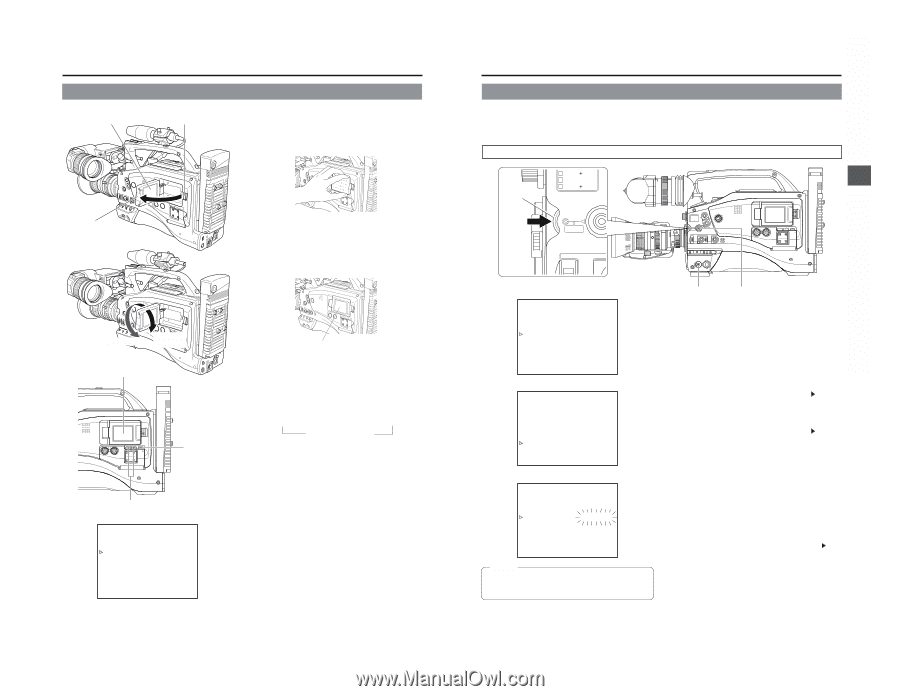
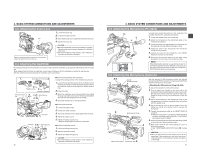
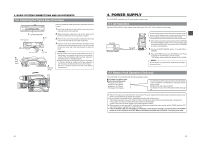
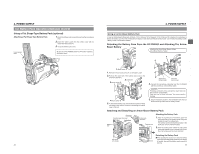
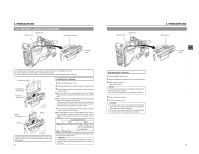
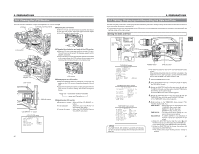
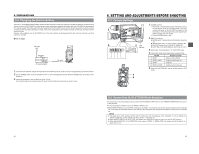
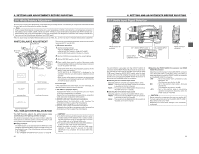
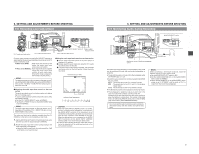
5. PREPARATIONS 5-3 Viewing the LCD Monitor The LCD monitor's orientation, angle, and brightness, etc. can be changed. LCD door LCD lock and release knob ■ Opening the LCD monitor Slide the LCD lock and release knob toward the rear section to open the LCD monitor. Grasp the upper and lower edges of the LCD monitor to open it easily. LCD monitor ■ Changing the orientation and angle of the LCD monitor ● With the LCD door in the open position, turn the LCD door. The LCD door can be turned 180 degrees upward and 90 degrees downward. ● If the LCD door is turned 180 degrees upward and housed in the camera body, the LCD monitor can be viewed from outside while it remains housed in the camera body. Upward 180 degrees Downward 90 degrees LCD monitor OPEN CH-1 AUDIO LEVEL CH-2 LCD BRIGHT FRONT REAR CH-1 CH-2 AUDIO INPUT AUDIO SELECT CH-1 CH-2 AUTO MANUAL DISPLAY PULL OPEN DISPLAY button LCD BRIGHT +/- button LCD/VF (2/2) menu --- LCD/VF(2/2) --- TAPE REMAIN ON TC/UB ON AUDIO ON LCD COLOR NORMAL LCD PEAKINGS NORMAL PAGE BACK LCD monitor ■ Displaying on the LCD monitor ● When the DISPLAY button is pressed for a long time, the display on the LCD monitor is switched between ON and OFF. ● Each time the DISPLAY button is briefly pressed while the LCD monitor is used for display, the contents change as follows. Image only → Characters displayed magnified ↑ Image and Characters ← ■ Adjusting the LCD monitor ● Brightness of screen : Adjust with the LCD BRIGHT +/- button. ● Color saturation : Adjust the LCD COLOR item on the LCD/VF (2/2) menu. ● Contrast of screen : Adjust the LCD PEAKING item on the LCD/VF (2/2) menu. 40 5. PREPARATIONS 5-4 Setting, Displaying and Recording the Date and Time The date and time of the built-in clock should be set. Powered by the built-in backup battery the set date and time data continue to count even when the power is switched off. ● The set date and time data are displayed on the LCD monitor or in the viewfinder and recorded on the tape in accordance with the settings made on the menu screen. Setting the Date and Time SHUTTER dial 2 5600K 1/8 ND .3 5600K .4 5600K 1/64 ND SHUTTER STATU MENU AUTO IRIS FULL BACK L EDITSEARCH FILTER 1 3200K 2 5600K 1/8 ND .3 5600K .4 5600K 1/64 ND SHUTTER STATUS MONITOR MENU AUTO IRIS FULL AUTO BACK L NORMAL SPOT L BLACK LOLUX STRETCH NORMAL COMPRESS MODE VTR CAM POWER VTR ON OFF OPEN CH-1 AUDIO LEVEL CH-2 LCD BRIGHT FRONT REAR CH-1 CH-2 AUDIO INPUT AUDIO SELECT CH-1 CH-2 AUTO MANUAL DISPLAY PULL OPEN TOP MENU screen --- MENU --- CAMERA OPERATION.. CAMERA PROCESS.. AUDIO/VIDEO.. LCD/VF.. TC/UB/CLOCK.. OTHERS.. FILE MANAGE.. MENU ALL RESET CANCEL EXIT TC/UB/CLOCK menu screen --- TC/UB/CLOCK --- TC PRESET 00:00:00:00 EXECUTE TC CLEAR CANCEL UB PRESET 00 00 00 00 EXECUTE UB CLEAR CANCEL DROP/NON DROP DROP TIME/DATE.. PAGE BACK TIME/DATE menu screen --- TIME/DATE --- DISPLAY ON DISPLAY MODE BARS+CAM DATE REC OFF DISPLAY STYLE DATE+TIME DATE STYLE MM/DD/YY TIME STYLE 24HOUR SEC DISPLAY ON CLOCK ADJUST.. PAGE BACK MEMO: The TIME STYLE, SEC DISPLAY and DATA STYLE items can also be set and changed after the date and time have been set. POWER switch STATUS button ● The date and time are set on the CLOCK ADJUST menu screen. When setting while observing on a monitor connected to the VIDEO OUT or Y/C OUT connector, set the OUTPUT CHAR. item on the OTHERS (1/2) menu screen to ON. 1. Set the POWER switch to ON. 2. Press the STATUS button for 1 second or longer to display the TOP MENU screen. 3. Rotate the SHUTTER dial to align the cursor ( ) with the TC/UB/CLOCK item, and then press the SHUTTER dial in the direction of the camera body. ● The TC/UB/CLOCK menu screen appears. 4. Rotate the SHUTTER dial to align the cursor ( ) with the TIME/DATE item, and then press the SHUTTER dial. ● The TIME/DATE menu screen appears. 5. Make settings on the TIME/DATE menu screen. (This includes display style, etc.) DATE STYLE : Selects the style for displaying the date. YY/MM/DD (Year, month, day) MM/DD/YY (Month, day, year) DD/MM/YY (Day, month, year) TIME STYLE : The time can be set to display as a 12hour or 24-hour clock system. SEC DISPLAY : To select whether or not indication of seconds should be displayed on the screen. 1 Rotate the SHUTTER dial to align the cursor ( ) with the item to be set, and then press the SHUTTER dial. ● The setting area of the selected item starts blinking. 2 Rotate the SHUTTER dial to change the setting, and then press the SHUTTER dial. ● The setting area stops blinking and the setting is entered. 41
-
 1
1 -
2
-
3
-
4
-
5
-
6
-
7
-
8
-
9
-
10
-
11
-
12
-
13
-
14
-
15
-
16
-
 17
17 -
 18
18 -
 19
19 -
 20
20 -
 21
21 -
 22
22 -
 23
23 -
 24
24 -
 25
25 -
 26
26 -
 27
27 -
28
-
29
-
30
-
31
-
32
-
33
-
34
-
35
-
36
-
37
-
38
-
39
-
40
-
41
-
42
-
43
-
44
-
45
-
46
-
47
-
48
-
49
 |
 |