JVC GY-DV5000U GY-DV5000U 3-CCD Professional DV Camcorder 92 page instruction - Page 44
6 Switch Setup According to Illumination and Subject, 12- 7 How to Use Skin Detail
 |
View all JVC GY-DV5000U manuals
Add to My Manuals
Save this manual to your list of manuals |
Page 44 highlights
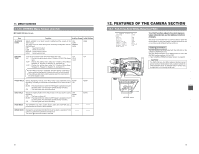
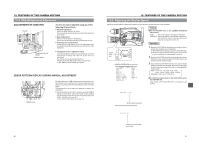
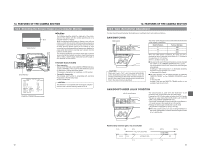
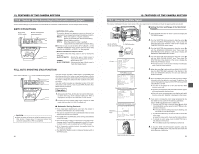
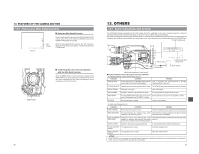
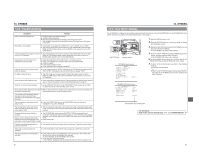
12. FEATURES OF THE CAMERA SECTION 12-6 Switch Setup According to Illumination and Subject Various switch settings are performed to accommodate the conditions of the illumination and the subject when shooting. SWITCH FUNCTIONS AUTO IRIS LEVEL switch BLACK stretch/black compress switch AUTO IRIS FULL AUTO BACK L NORMAL SPOT L BLACK LOLUX STRETCH NORMAL COMPRESS MODE VTR CAM POWER VTR ON OFF 1AUTO IRIS LEVEL switch This switch allows the reference value for the auto iris adjustment to be changed according to the lighting condition. BACK L : When the subject is in backlit conditions. Opens the iris wider than the standard setting. NORMAL: Normal lighting condition. SPOT L : When the subject is under a spotlight. Closes the iris narrower than the standard setting. ■ The level of auto iris can be set in SPOT L/BACK L on the CAMERA OPERATION menu screen when the AUTO IRIS switch is set to BACK L or SPOT L. ☞ See page 69. 2BLACK stretch/black compress switch This switch makes the image easier to see by varying the black gain. BLACK STRETCH : Boosts the gain of black areas to improve the reproducibility of black. NORMAL : Normal black gain. BLACK COMPRESS : Attenuates the gain of black areas to make the image sharper. FULL AUTO SHOOTING (FAS) FUNCTION FULL AUTO indicator FULL AUTO/shooting button AUTO IRIS FULL AUTO BACK L NORMAL SPOT L BLACK LOLUX STRETCH NORMAL COMPRESS MODE VTR CAM POWER VTR ON OFF CAUTION: ● When the power is turned on while the camera is in the FAS mode, it takes about 10 seconds before the automatic adjustment of FAS is completed. The FAS function provides a wide range of compatibility with shooting conditions that varies as you move between indoors and outdoors or between bright and dark locations. It eliminates the need to change the switch and filter positions every time you move. The FAS function provides an integrated control of the ALC (Automatic Level Control), Auto iris and FAW (Full-time Auto White balance) functions. Operation 1. Simply press the FULL AUTO button to enter the FAS mode, in which the FULL AUTO indicator lights and "FAS" is displayed to the right in the viewfinder or LCD monitor. 2. Pressing the FULL AUTO button again cancels the FAS mode and turns the FULL AUTO indicator off. ■ Automatic Setting Contents ● If you have been displaying the color bars, the screen is switched automatically to the camera image. ● The auto iris adjustment mode is entered even if the iris mode switch of the lens is set to manual. ● The GAIN switch and WHT.BAL switch settings are defeated in the FAS mode. ● The LOLUX button setting is active even in the FAS mode. However, the ALC and EEI are defeated in the LOLUX mode, in which only the auto iris adjustment and FAW are used. ● All of the previous setting contents are recalled when the FAS mode is cancelled. ● The SMOOTH TRANS function is defeated during switch to the FAS function. 84 12. FEATURES OF THE CAMERA SECTION 12-7 How to Use Skin Detail The contour emphasis in the skin color areas of the video signal can be controlled and made to appear gentle and smooth. ■ Setting the Color and Range of the Skin Detail Function EDITSEARCH FILTER 1 3200K 2 5600K 1/8 ND .3 5600K .4 5600K 1/64 ND SHUTTER STATUS MONITOR MENU AUTO IRIS FULL AUTO BACK L NORMAL SPOT L BLACK LOLUX STRETCH NORMAL COMPRESS MODE VTR CAM POWER VTR ON OFF OPEN CH-1 AUDIO LEVEL CH-2 LCD BRIGHT FRONT REAR CH-1 CH-2 AUDIO INPUT AUDIO SELECT CH-1 CH-2 AUTO MANUAL DISPLAY PULL OPEN 2. 3. 4. 5. 6. 1. STATUS button 7. 8. SHUTTER dial SHUTTER MENU Cursor --- MENU --- CAMERA OPERATION.. CAMERA PROCESS.. AUDIO/VIDEO.. LCD/VF.. TC/UB/CLOCK.. OTHERS.. FILE MANAGE.. MENU ALL RESET CANCEL EXIT TOP MENU screen --- CAMERA PROCESS --- MASTER BLACK NORMAL DETAIL NORMAL DTL.V/H BALANCE NORMAL SKIN DTL.DETECT ON SCAN VIDEO WHITE CLIP 108% KNEE POINT 100% ADVANCED PROCESS.. PAGE BACK CAMERA PROCESS menu screen --- ADVANCED PROCESS --- CINE MODE OFF COLOR MATRIX STD GAMMA NORMAL FLARE NORMAL FLARE NORMAL SKIN COLOR ADJUST.. PAGE BACK ADVANCED PROCESS screen --- SKIN COLOR ADJUST --- Detection area ERROR SKIN COLOR DET. EXECUTE SKIN COLOR RANGE NORMAL PAGE BACK SKIN COLOR ADJUST screen 1. Press the STATUS button for about 1 second to display the TOP MENU screen. 2. Turn the SHUTTER dial downward to align the cursor ( ) with the CAMERA PROCESS item. Then press the SHUTTER dial in the direction of the arrow to display the CAMERA PROCESS menu screen. 3. Turn the SHUTTER dial downward to align the cursor ( ) with the ADVANCED PROCESS item. Then press the SHUTTER dial in the direction of the arrow to display the ADVANCED PROCESS menu screen. 4. Turn the SHUTTER dial downward to align the cursor ( ) with the SKIN COLOR ADJUST item. Then press the SHUTTER dial in the direction of the arrow to display the SKIN COLOR ADJUST screen. ● The frame shown on the screen indicates the detection area of the skin detail function. 5. When the cursor ( ) is aligned with the SKIN COLOR DET. item, the SHUTTER dial is pressed in the direction of the arrow and EXECUTE selected, the skin color detection mode is activated. 6. Shoot so that the area with the color that you want to detect is brought within the detection area frame. To decide on the color for the detection, press the SHUTTER dial to set SKIN COLOR DET. to STOP. ● The color is recognized as a color that the skin detail function works with. ● The areas recognized by the skin detail function appear with superimposed zebra patterns. ● If the color is not recognized as a color that the skin detail function works with, "ERROR" is displayed on the screen. 7. If you want to change the color range recognized by the skin detail function, perform the following operations. Set the SKIN COLOR DET. item to EXECUTE. 1 Turn the SHUTTER dial to align the cursor ( ) with SKIN COLOR RANGE, and then press the SHUTTER dial in the direction of the arrow. a The area with the setting value starts blinking, and the value can now be changed. 2 Turn the SHUTTER dial up or down to widen or narrow the color range. ● Adjust the range while observing the zebra patterns. 3 To decide the color range, press the SHUTTER dial in the direction of the arrow. a The setting value stops blinking but remains lit. 8. To stop the SKIN COLOR ADJUST operation, align the cursor ( ) with PAGE BACK and press the SHUTTER dial in the direction of the arrow. SKIN COLOR ADJUST screen 85
-
 1
1 -
2
-
3
-
4
-
5
-
6
-
7
-
8
-
9
-
10
-
11
-
12
-
13
-
14
-
15
-
16
-
17
-
18
-
19
-
20
-
21
-
22
-
23
-
24
-
25
-
26
-
27
-
28
-
29
-
30
-
31
-
32
-
33
-
34
-
35
-
36
-
37
-
38
-
 39
39 -
 40
40 -
 41
41 -
 42
42 -
 43
43 -
 44
44 -
 45
45 -
 46
46 -
 47
47 -
 48
48 -
 49
49
 |
 |
