JVC GY-DV5000U GY-DV5000U 3-CCD Professional DV Camcorder 92 page instruction - Page 33
TIME CODE OPERATION, 10- 1 Displaying Time Code, 10- 2 Presetting and Recording of Time Code
 |
View all JVC GY-DV5000U manuals
Add to My Manuals
Save this manual to your list of manuals |
Page 33 highlights
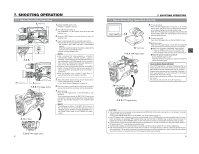
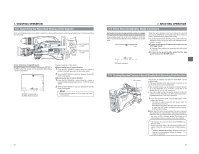
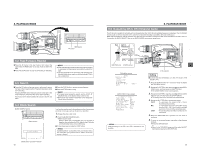
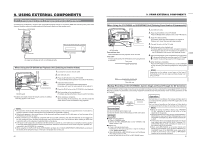
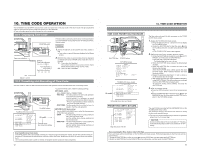
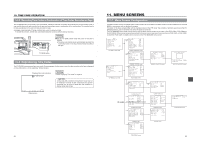
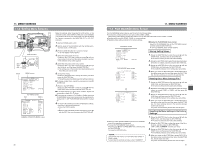
10. TIME CODE OPERATION The GY-DV5000 records SMPTE-standard time codes and user's bits. In the play mode or the record mode, the reproduced time codes or user's bits are shown on the LCD monitor or in the viewfinder. ● Time code data cannot be output through the unit's connectors. 10-1 Displaying Time Code OPEN CH-1 AUDIO LEVEL CH-2 LCD BRIGHT FRONT REAR CH-1 CH-2 AUDIO INPUT AUDIO SELECT CH-1 CH-2 AUTO MANUAL DISPLAY PULL OPEN COUNTER switch LCD BRIGHT DISPLAY CH-1 AUDIO LEVEL CH-2 MONITOR SELECT CH-1 MIX CH-2 AUDIO INPUT FRONT REAR LINE MIC +48V FRONT REAR CH-1 CH-2 AUDIO INPUT AUDIO SELECT CH-1 CH-2 AUTO MANUAL COUNTER TC UB TC GENE. REGEN FREE REC PRST Time code indication TC00:00:00:00 Example Time code indication 00:00:00:00 Non-drop frame (:) Drop frame (.) User's bits indication FF EE DD 20 The time codes or user's bits can be shown on the LCD monitor or in the viewfinder during playback and recording as follows. (Status screen) Setting 1. Set the TC/UB item on the LCD/VF (2/2) menu screen to ON. ● Time codes or user's bit data are displayed on the Status screen. 2. Whether time codes or user's bit data should be displayed is selected with the COUNTER switch inside the cover on the side. TC : Time codes are displayed. The symbol between the seconds and the frame differs with the framing mode. (Colon or dot) UB : User's bit data is displayed. STBY 01/02/03 01:23:45 Status 1 screen 10-2 Presetting and Recording of Time Code The time codes or user's bit data from the internal time code generator can be recorded at the time of recording scenes. OPEN CH-1 AUDIO LEVEL CH-2 LCD BRIGHT FRONT REAR CH-1 CH-2 AUDIO INPUT AUDIO SELECT CH-1 CH-2 AUTO MANUAL DISPLAY PULL OPEN LCD BRIGHT DISPLAY CH-1 AUDIO LEVEL CH-2 MONITOR SELECT CH-1 MIX CH-2 AUDIO INPUT FRONT REAR LINE MIC +48V FRONT REAR CH-1 CH-2 AUDIO INPUT AUDIO SELECT CH-1 CH-2 AUTO MANUAL COUNTER TC UB TC GENE. REGEN FREE REC PRST TC GENE. switch TC/UB/CLOCK menu screen --- TC/UB/CLOCK --- TC PRESET 00:00:00:00 EXECUTE TC CLEAR CANCEL UB PRESET 00 00 00 00 EXECUTE UB CLEAR CANCEL DROP/NON DROP DROP TIME/DATE.. PAGE BACK (U model) → ↓ Framing mode: Non-drop/Drop setting To preset the Time Code, make the following settings. ■ TC GENE. switch Set to PRESET REC or PRESET FREE. PRST REC : The data preset in the time code generator runs only during recording. Use this setting if it is necessary to record continual time codes across different scenes. * However, approximately ±1-frame variations may occur in scene accuracy. PRST FREE : The time code starts to run from the time it is preset in the time code generator. ■ TC/UB/CLOCK menu screen Use the DROP/NON DROP item to select the framing mode for the time code generator. DROP : The time code generator's running method is set to the drop frame mode. Use this setting when placing emphasis on the recording time. NON DROP : The time code generator's running method is set to the non drop frame mode. Use this setting when placing emphasis on the number of frames. Drop frame/Non-drop frame mode In the NTSC system, the actual number of frames per 1 second is approximately 29.97 frames, but per time code 30 frames are processed.To compensate for this difference, the mode called "drop mode" drops frame 00 and 01 for every minute not divisible by 10. The "non-drop frame mode" is when no frames are dropped and the actual time shift is neglected. 62 10. TIME CODE OPERATION TIME CODE PRESETTING PROCEDURE EDITSEARCH FILTER 1 3200K 2 5600K 1/8 ND .3 5600K .4 5600K 1/64 ND SHUTTER STATUS MONITOR MENU AUTO IRIS FULL AUTO BACK L NORMAL SPOT L BLACK LOLUX STRETCH NORMAL COMPRESS MODE VTR CAM POWER VTR ON OFF OPEN CH-1 AUDIO LEVEL CH-2 LCD BRIGHT FRONT REAR CH-1 CH-2 AUDIO INPUT AUDIO SELECT CH-1 CH-2 AUTO MANUAL DISPLAY PULL OPEN SHUTTER dial STATUS button TOP MENU screen --- MENU --- CAMERA OPERATION.. CAMERA PROCESS.. AUDIO/VIDEO.. LCD/VF.. TC/UB/CLOCK.. OTHERS.. FILE MANAGE.. MENU ALL RESET CANCEL EXIT (U model) TC/UB/CLOCK menu screen --- TC/UB/CLOCK --- TC PRESET 00:00:00:00 EXECUTE TC CLEAR CANCEL UB PRESET 00 00 00 00 EXECUTE UB CLEAR CANCEL DROP/NON DROP DROP TIME/DATE.. PAGE BACK Time code (hour, min, sec, frame) PRESETTING USER'S BIT DATA --- TC/UB/CLOCK --- TC PRESET 00:00:00:00 EXECUTE TC CLEAR CANCEL UB PRESET 00 00 00 00 EXECUTE UB CLEAR CANCEL DROP/NON DROP DROP TIME/DATE.. PAGE BACK Align the cursor with UB The time code and user's bit data are preset on the TC/UB/ CLOCK menu screen. 1. Display the TC/UB/CLOCK menu screen. 1 Press the Status button for 1 second or more to display the TOP MENU screen. 2 Rotate the SHUTTER dial to align the cursor ( ) with the TC/UB/CLOCK item, and then press the SHUTTER dial. ● The TC/UB/CLOCK menu screen appears. 2. Set the time code (hours, minutes, seconds, frames). 1 Rotate the SHUTTER dial to align the cursor ( ) with TC PRESET, and then press the SHUTTER dial. ● The first digit of the time code blinks. The blinking digit is the one to be set. 2 When the SHUTTER dial is pressed, the blinking digit changes. 3 When the SHUTTER dial is rotated, the value of the blinking digit changes. When the SHUTTER dial is rotated upward, the value becomes higher. When rotated downward, the value becomes smaller. 4 Repeat the procedure described in 2 and 3 above to set the desired value for all digits. 5 After setting the frame digit, press the SHUTTER dial to make EXECUTE blink. The setting values are confirmed when the SHUTTER dial is pressed again. To cancel the setting, select CANCEL and press the SHUTTER dial. 3. When all the digits are set. ● Press the STATUS button to return to the normal screen or ● Rotate the SHUTTER dial to align the cursor ( ) with the PAGE BACK item, and then press the SHUTTER dial to return to the TOP MENU screen. The user's bit data are preset with the UB PRESET item on the TC/UB/CLOCK menu screen. The method for setting is the same as the method for setting the time code described above. ● The user's bit can be specified using numerals or alphabetic letters from 0 to F for each digit. CAUTION: Do not set all the digits of the user's bit data to "F". Reading of the data during playback will not be possible for an all-F setting. Zero-resetting the Time Code or User's Bit Data This is performed with the CLEAR item on the TC/UB/CLOCK menu screen. (Performed separately for the time code and the user's bit data.) 1 Rotate the SHUTTER dial to align the cursor ( ) with the CLEAR item, and then press the SHUTTER dial. 2 Rotate the SHUTTER dial to select EXECUTE as the setting value, and then press the SHUTTER dial. 63
-
 1
1 -
2
-
3
-
4
-
5
-
6
-
7
-
8
-
9
-
10
-
11
-
12
-
13
-
14
-
15
-
16
-
17
-
18
-
19
-
20
-
21
-
22
-
23
-
24
-
25
-
26
-
27
-
 28
28 -
 29
29 -
 30
30 -
 31
31 -
 32
32 -
 33
33 -
 34
34 -
 35
35 -
 36
36 -
 37
37 -
 38
38 -
39
-
40
-
41
-
42
-
43
-
44
-
45
-
46
-
47
-
48
-
49
 |
 |
