JVC GY-DV5000U GY-DV5000U 3-CCD Professional DV Camcorder 92 page instruction - Page 43
4 Shooting the Screen Image on a Computer Monitor, 12- 5 Gain (Sensitivity) Adjustment, Outline
 |
View all JVC GY-DV5000U manuals
Add to My Manuals
Save this manual to your list of manuals |
Page 43 highlights
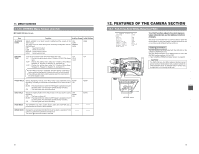
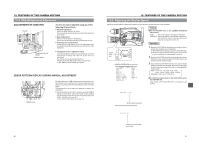
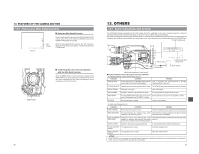
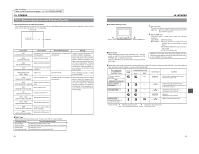
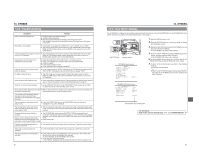
12. FEATURES OF THE CAMERA SECTION 12-4 Shooting the Screen Image on a Computer Monitor Video monitor Band EDITSEARCH FILTER 1 3200K 2 5600K 1/8 ND .3 5600K .4 5600K 1/64 ND SHUTTER STATUS MONITOR MENU AUTO IRIS FULL AUTO BACK L NORMAL SPOT L BLACK LOLUX STRETCH NORMAL COMPRESS MODE VTR CAM POWER VTR ON OFF OPEN CH-1 AUDIO LEVEL CH-2 LCD BRIGHT FRONT REAR CH-1 CH-2 AUDIO INPUT AUDIO SELECT CH-1 CH-2 AUTO MANUAL DISPLAY PULL OPEN SHUTTER dial --- CAMERA OPERATION --- SHUTTER VARIABLE FAW A GAIN L 0dB GAIN M 6dB GAIN H 9dB LOLUX GAIN 30dB SMOOTH TRANS OFF SPOT L/BACK L MIDDLE ASPECT RATIO 4:3 PAGE BACK ⅢOutline The following operation allows the alignment of the shutter speed of the camera with the variable scanning rate of a computer monitor or display. When a computer monitor screen or display is shot with the camera, a bright horizontal line indicating excessive exposure is displayed in cases when the scanning rate of the monitor is faster than the shutter speed of the camera. A dark horizontal line indicating insufficient exposure is displayed in cases when the monitor's scanning rate is slower than the camera's shutter speed. The scanning frequency of a monitor varies due to various reasons during the computer operation. Adjust the scanning rate to obtain a stable image while observing the image in the viewfinder or LCD monitor. Ⅲ Variable Scan [V.SCAN] • Basic operation Set the SHUTTER item on the CAMERA OPERATION menu screen to VARIABLE. Then rotate the SHUTTER dial upward or downward to change the shutter speed. (The speed is displayed in the viewfinder or LCD monitor.) • Compatible frequencies The variable scan function is compatible with scanning frequencies in the following range. 60.1Hz to 2084.6 Hz CAUTION: This function is not compatible with slow-speed computer monitors with a vertical scanning speed of 50 Hz. CAMERA OPERATION menu screen 82 12. FEATURES OF THE CAMERA SECTION 12-5 Gain (Sensitivity) Adjustment The gain should be switched when the brightness is insufficient due to poor lighting conditions. GAIN SWITCHING GAIN switch AUTO IRIS FULL AUTO BACK L NORMAL SPOT L BLACK LOLUX STRETCH NORMAL COMPRESS MODE VTR CAM POWER VTR ON OFF CAUTION: When gain is set to "ALC", gain is boosted automatically as the illumination becomes darker. However, noise will increase a little because the screen becomes brighter as the ALC (Auto Level Control) function boosts the gain more than in the case of manual adjustment. This switch allows the gain to be boosted when the illumination of the subject is insufficient. Switch Position Factory-Set Gain L 0dB M 9dB H 18dB When the GAIN switch is switched, the newly set gain is displayed for about 3 seconds on the Status (0, 1, 3) screen in the viewfinder or LCD monitor. Set it to L (0 dB) in normal use. ■ The gain set for each of the switch positions can be changed with "GAIN" on the CAMERA OPERATION menu screen. It is also possible to use the ALC function that varies the gain automatically. A setting at -3dB corresponds to a decreased sensitivity equivalent to the brightness of a 1/2 filter. ☞ See page 69 for details. ■ The gain transition can be made smoother by selecting "SMOOTH TRANS" on the CAMERA OPERATION menu screen. ☞ See page 69. However, note that the SMOOTH TRANS function is not available if gain is set to ALC. GAIN BOOST UNDER LOLUX CONDITION LOLUX on/off button AUTO IRIS FULL AUTO BACK L NORMAL SPOT L BLACK LOLUX STRETCH NORMAL COMPRESS MODE VTR CAM POWER VTR ON OFF The LOLUX button is used when the illumination is still insufficient after compensating with the GAIN switch. Pressing the LOLUX button again will enter the LOLUX mode. The gain up value during the LOLUX mode is set in LOLUX GAIN of the CAMERA OPERATION menu. "LOLUX ON" is displayed for about 3 seconds on the Status (0, 1, 3) mode screen in the viewfinder or LCD monitor. Pressing the button again cancels the LOLUX mode. "LOLUX OFF" is displayed for about 3 seconds. ■ When the LOLUX function is in use, the image definition on the screen will degrade to increase residual images, but this is not a malfunction. Relationship between gain, iris and shutter 0.2 Lx 8 Lx 36 dB 12dB LOLUX ALC 32 Lx 2000 Lx FULL AUTO SHOOTING 0 dB AUTOMATIC IRIS F1.4 F11 4200 Lx 18000 Lx 1/50 (E model) 1/60 (U model) EEI 1/240 F16 83
-
 1
1 -
2
-
3
-
4
-
5
-
6
-
7
-
8
-
9
-
10
-
11
-
12
-
13
-
14
-
15
-
16
-
17
-
18
-
19
-
20
-
21
-
22
-
23
-
24
-
25
-
26
-
27
-
28
-
29
-
30
-
31
-
32
-
33
-
34
-
35
-
36
-
37
-
 38
38 -
 39
39 -
 40
40 -
 41
41 -
 42
42 -
 43
43 -
 44
44 -
 45
45 -
 46
46 -
 47
47 -
 48
48 -
49
 |
 |
