JVC GY-DV5000U GY-DV5000U 3-CCD Professional DV Camcorder 92 page instruction - Page 47
2 Troubleshooting, 13- 3 Hour Meter Display, For servicing
 |
View all JVC GY-DV5000U manuals
Add to My Manuals
Save this manual to your list of manuals |
Page 47 highlights
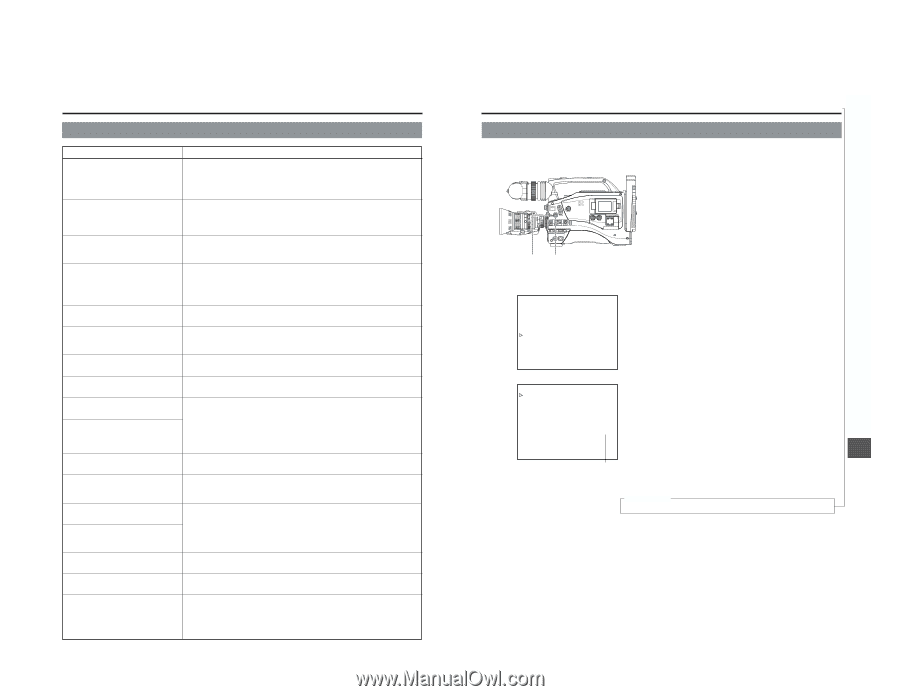
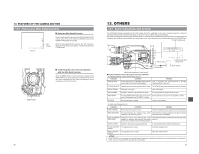
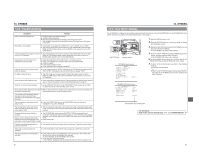
13. OTHERS 13-2 Troubleshooting Symptoms Power cannot be switched ON. Remedy ● Is power supply connected correctly? ● Is battery pack recharged? ● Was the power turned ON immediately after being turned OFF? Wait at least 5 seconds before turning the power ON again once it has been turned OFF. Recording is not possible. ● Is the switch on cassette set to "REC"? If it is set to "SAVE", set it to "REC". ● The Camera mode has not been selected. (The CAM indicator does not light.) While the VTR indicator lights, press the MODE switch upward to turn on the CAM indicator. Camera image does not appear on LCD ● The Camera mode has not been selected. (The CAM indicator does not light.) monitor or in viewfinder. While the VTR indicator lights, camera image will not be output. Press the MODE switch upward to turn on the CAM indicator. Image shown on LCD monitor or in viewfinder is dark or blurred. ● Adjust the brightness of the LCD monitor or viewfinder screen. ● Is the color temperature conversion filter knob set to 5600K+ND? ● Is the iris closed? ● Is the shutter speed too fast? ● Is the viewfinder cable correctly connected? Playback does not start when the play button is pressed. ● In the Camera mode, is "STOP" indicated as the VTR operation mode indicator? When "STBY" is indicated, press the STOP button to display "STOP". DV signal cannot be input. ● The VTR mode has not been selected. (The VTR indicator does not light.) While the CAM indicator lights, press the MODE switch upward to turn on the VTR indicator. Noise interferes with playback video. ● Video head may be clogged with dirt. Clean head with the special head cleaning tape. (☞ See "Precautions for Use of Head Cleaning Tape" on page 8.) Sound is not output during playback. ● Is the AUDIO SELECT item on the AUDIO/VIDEO menu screen set to CH3/4. To output the sound of the recording, set to CH1/2. Noise appears when playing back a tape ● When a tape recorded on another unit is played back or used for recording, this recorded on another unit. phenomenon may occur due to tracking errors. The transient section between scenes recorded on other units and those recorded on the GY-DV5000 may appear disturbed. The front section's audio level control doesn't work. ● Is the CH1 FRONT VR item on the AUDIO/VIDEO menu screen set to "DISABLE"? If so, set to "ENABLE". The front section's audio level control doesn't change the audio level of the sound input to CH2. ● The front section's audio level control cannot be used to change the audio level of the sound input to CH2. Use the side section's CH2 audio level control for this purpose. Remaining battery power display is ● The OTHERS (2/2) menu screen's BATTERY TYPE item may not be set incorrect. correctly in accordance with the type of battery in use. If the menu item setting is incorrect, set it correctly using the OTHERS (2/2) menu screen's item BATTERY Battery alarm is displayed and the GY- TYPE. DV5000 enters the non-operating mode ● Is the battery old? even when a fully charged battery is used. Cassette cannot be ejected after the power is turned ON. ● The capacity of the power supply may be insufficient. Check the power voltage. Time code or user's bits data not displayed. ● Is the TC/UB item on the LCD/VF menu screen set to OFF? If so, set to ON. The date and time are not displayed or recorded. ● Is the DISPLAY item on the TIME/DATE menu screen set to OFF? Set to ON when the data should be displayed and recorded. To record the data, set the DATE REC item as well. ● Is the date and time setting made? ☞ See "Setting, Displaying and Recording the Date and Time" on page 41~43. 90 13. OTHERS 13-3 Hour Meter Display The GY-DV5000 can display the accumulated running time of the head drum in the HOUR METER item on the OTHERS (2/2) menu screen. Use this as a guide for periodical maintenance. ☞ See page 7. EDITSEARCH FILTER 1 3200K 2 5600K 1/8 ND .3 5600K .4 5600K 1/64 ND SHUTTER STATUS MONITOR MENU AUTO IRIS FULL AUTO BACK L NORMAL SPOT L BLACK LOLUX STRETCH NORMAL COMPRESS MODE VTR CAM POWER VTR ON OFF OPEN CH-1 AUDIO LEVEL CH-2 LCD BRIGHT FRONT REAR CH-1 CH-2 AUDIO INPUT AUDIO SELECT CH-1 CH-2 AUTO MANUAL DISPLAY PULL OPEN SHUTTER dial STATUS button TOP MENU menu screen --- MENU --- CAMERA OPERATION.. CAMERA PROCESS.. AUDIO/VIDEO.. LCD/VF.. TC/UB/CLOCK.. OTHERS.. FILE MANAGE.. MENU ALL RESET CANCEL EXIT 1. Set the POWER switch to ON. 2. Press the STATUS button for 1 second or longer to display the TOP MENU screen. 3. Rotate the SHUTTER dial to select the OTHERS item, and then press the SHUTTER dial. ● The OTHERS (1/2) menu screen appears. 4. Select the NEXT PAGE item on the OTHERS (2/2) menu screen, and then press the SHUTTER dial. ● The OTHERS (2/2) menu screen appears. ■ The accumulated drum running time is shown next to the DRUM HOUR item on the OTHERS (2/2) menu screen. 5. To return to the normal screen, use either of the following methods. ● Press the STATUS button or ● Return to the TOP MENU screen and then select the EXIT item from the TOP MENU screen before pressing the SHUTTER dial. OTHERS (2/2) menu screen --- OTHERS(2/2) --- ALARM VR LEVEL HIGH BATTERY TYPE 12V FRONT TALLY BLINK BACK TALLY OFF PAGE BACK DRUM HOUR 00200 Accumulated drum running time For servicing Refer to the service manual page. 1-11 "1.9.10 HOUR METER" ← 91
-
 1
1 -
2
-
3
-
4
-
5
-
6
-
7
-
8
-
9
-
10
-
11
-
12
-
13
-
14
-
15
-
16
-
17
-
18
-
19
-
20
-
21
-
22
-
23
-
24
-
25
-
26
-
27
-
28
-
29
-
30
-
31
-
32
-
33
-
34
-
35
-
36
-
37
-
38
-
39
-
40
-
41
-
 42
42 -
 43
43 -
 44
44 -
 45
45 -
 46
46 -
 47
47 -
 48
48 -
 49
49
 |
 |