JVC GY-DV5000U GY-DV5000U 3-CCD Professional DV Camcorder 92 page instruction - Page 37
6 Camera Process Menu Screen, 11- 7 Advanced Process Screen, 11- 8 Skin Color Adjust Screen
 |
View all JVC GY-DV5000U manuals
Add to My Manuals
Save this manual to your list of manuals |
Page 37 highlights
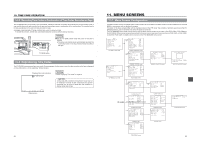
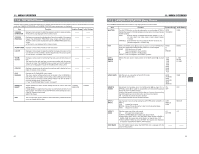
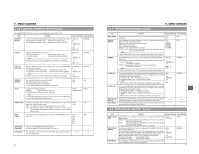
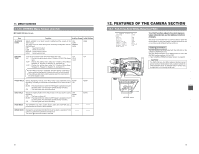
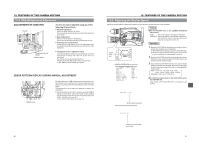
11. MENU SCREENS 11-6 CAMERA PROCESS MENU Screen The CAMERA PROCESS menu screen is only displayed in the Camera mode. Item Function Variation Range Initial Setting MASTER BLACK Adjusts the pedestal level (master black), which is the reference of black. ● To increase the pedestal level ..... Increase the number. (UP) ● To decrease the pedestal level .... Decrease the number. (DOWN) MAX (10) 9 to NORMAL (0) to -9 MIN (-10) NORMAL DETAIL Adjusts the detail enhancement level. ● To sharpen details Increase the number. (UP) ● To soften details Decrease the number. (DOWN) Note: When LOLUX is ON, "FIX" is displayed and setting is not possible. MAX (10) 9 to NORMAL (0) to -9 MIN (-10) NORMAL DTL. V/H BALANCE Sets the direction, horizontal (H) or vertical (V), in which stronger detail enhancement is applied. To strengthen the H enhancement ...... Increase the number (UP). To strengthen the V enhancement ...... Decrease the number (DOWN). Note: When LOLUX is ON, "FIX" is displayed and setting is not possible. H-MAX (5) 4 to NORMAL (0) to -4 H-MIN (-5) NORMAL SKIN DTL DETECT Sets the Skin Detail function to ON or OFF. ON :Skin Detail function activated. OFF :Skin Detail function not activated. ☞ See "Using the Skin Detail Function" on page 86. ON OFF OFF SCAN Increases the vertical resolution. ● VIDEO :Vertical resolution 380 lines. ● FRAME MODE :Vertical resolution 450 lines Note: In the FRAME MODE the bright sections may be coloured depending on the colour temperature of the subject. VIDEO VIDEO FRAME MODE WHITE CLIP KNEE POINT ADVANCED PROCESS PAGE BACK Sets the point where white clipping is to take place for an input video signal with a high luminance level. 108% :The luminance level is white-clipped at the point of 108%. 100% :The luminance level is white-clipped at the point of 100%. If the screen appears too white even with the point set at 108%, set the point at 100%. 108% 100% Sets the knee point (brightness level) when the AUTO KNEE function is set to OFF. 100% 96% 92% 88% 84% 80% Displays the ADVANCED PROCESS Screen. ☞ See "ADVANCED PROCESS Screen" on page 71. The TOP MENU returns when the SHUTTER dial is pressed with the cursor at this position. ----- 108% 100% ----- 70 11. MENU SCREENS 11-7 ADVANCED PROCESS Screen Item CINE MODE COLOR MATRIX Function Variation Range Initial Setting When set to ON, produces gamma curve close to the picture characteristics of movies. Used to set the color matrix. When set to ON, color reproduction becomes good. However, noise will increase. 5 types of color matrix functions are provided. OFF : The function is OFF STD : Standard colour matrix WARM : Colour adjustment with red tinge EXTRA 1 to 3 : To set a color matrix other that those described above. Select the desired option. Note: When CINE MODE is ON, "FIX" is displayed and setting is not possible. OFF ON OFF STD WARM EXTRA1 EXTRA2 EXTRA3 OFF STD GAMMA Compensates for the gamma curve that determines the reproducibility of black color. ● To enhance the black color reproducibility. However, halftones will be lost for white section Increase the number ● When reproducibility of the black color is not so important Decrease the number Note: When CINE MODE is ON, "FIX" is displayed and setting is not possible. MAX (2) 1 to NORMAL (0) to -7 MIN (-8) OFF NORMAL FLARE For correcting the black level of Rch when the flare phenomenon in which light entering the lens is diffused and results in reflection that colors the black portions of the image occurs. To weaken tinge of red ... Increase the number To strengthen tinge of red ... Decrease the number Note: When LOLUX is ON, "FIX" is displayed and setting is not possible. MAX +9 to NORMAL to -9 MIN NORMAL FLARE For correcting the black level of Bch when the flare phenomenon in which light entering the lens is diffused and results in reflection that colors the black portions of the image occurs. To weaken tinge of blue ... Increase the number To strengthen tinge of blue ... Decrease the number Note: When LOLUX is ON, "FIX" is displayed and setting is not possible. SKIN COLOR ADJUST PAGE BACK Pressing the SHUTTER dial once when the cursor is at this position switches the screen to display the SKIN COLOR ADJUST screen. The CAMERA PROCESS menu screen returns when the SHUTTER dial is pressed with the cursor at this position. ----- ----- ----- ----- 11-8 SKIN COLOR ADJUST Screen Item SKIN COLOR DET. SKIN COLOR RANGE PAGE BACK Function Variation Range Initial Setting Sets whether it is possible to change the color used by the Skin Tone Detail function. EXECUTE:Choose this setting to allow detection of the color used by the Skin Tone Detail function. STOP :Choose this setting to stop detection of the color used by the Skin Tone Detail function. ☞ See "Using the Skin Tone Detail Function" on page 86. The setting of this item can only be changed when the SKIN COLOR DET. item is set to EXECUTE. This setting is for adjusting the skin color range where Skin Tone Detail functions. (When this item is selected, the area where the Skin Tone Detail function is applicable is indicated by zebra patterns on the screen.) While viewing the zebra pattern range, perform the adjustment. Increasing the range ........ Increase the number Increasing the range ........ Decrease the number STOP EXECUTE WIDE +11 to NORMAL to -11 NARROW STOP NORMAL The ADVANCED PROCESS menu screen returns when the SHUTTER dial is pressed with the cursor at this position. ----- ----- 71
-
 1
1 -
2
-
3
-
4
-
5
-
6
-
7
-
8
-
9
-
10
-
11
-
12
-
13
-
14
-
15
-
16
-
17
-
18
-
19
-
20
-
21
-
22
-
23
-
24
-
25
-
26
-
27
-
28
-
29
-
30
-
31
-
 32
32 -
 33
33 -
 34
34 -
 35
35 -
 36
36 -
 37
37 -
 38
38 -
 39
39 -
 40
40 -
 41
41 -
 42
42 -
43
-
44
-
45
-
46
-
47
-
48
-
49
 |
 |
