Konica Minolta bizhub 25 bizhub 25 User Guide - Page 52
Loading Documents on the Document Glass - images
 |
View all Konica Minolta bizhub 25 manuals
Add to My Manuals
Save this manual to your list of manuals |
Page 52 highlights
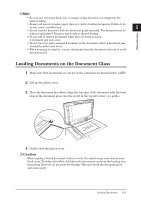
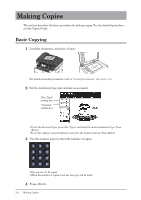
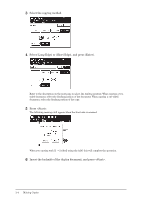
Note ••Be sure any correction fluid, ink, or stamps on the document are completely dry before loading. ••Remove all metals (staples, paper clips, etc.) before loading documents. Failure to do so may cause a malfunction. 1 ••Do not load the document with the document guide extended. The document may be Introduction reduced and printed. Doing so may result in skewed feeding. ••Do not add or remove documents while they are being scanned. A document jam may occur. ••Do not leave too many scanned documents on the document outlet. A document jam around the outlet may occur. ••When scanning is complete, remove documents from the document exit tray to avoid document jams. Loading Documents on the Document Glass 11 Make sure that documents are not set in the automatic document feeder (ADF). 22 Lift up the platen cover. 33 Place the document face down. Align the top edge of the document with the back edge of the document glass (use the arrow in the top left corner as a guide). 44 Gently close the platen cover. Caution When copying a bound document, such as a book, the copied image may contain some black areas. To reduce this effect, hold down the document to prevent the binding area from rising. However, do not press too strongly. This may break the document glass and cause injury. Loading Documents 1-33
-
 1
1 -
2
-
3
-
4
-
5
-
6
-
7
-
8
-
9
-
10
-
11
-
12
-
13
-
14
-
15
-
16
-
17
-
18
-
19
-
20
-
21
-
22
-
23
-
24
-
25
-
26
-
27
-
28
-
29
-
30
-
31
-
32
-
33
-
34
-
35
-
36
-
37
-
38
-
39
-
40
-
41
-
42
-
43
-
44
-
45
-
46
-
 47
47 -
 48
48 -
 49
49 -
 50
50 -
 51
51 -
 52
52 -
 53
53 -
 54
54 -
 55
55 -
 56
56 -
 57
57 -
58
-
59
-
60
-
61
-
62
-
63
-
64
-
65
-
66
-
67
-
68
-
69
-
70
-
71
-
72
-
73
-
74
-
75
-
76
-
77
-
78
-
79
-
80
-
81
-
82
-
83
-
84
-
85
-
86
-
87
-
88
-
89
-
90
-
91
-
92
-
93
-
94
-
95
-
96
-
97
-
98
-
99
-
100
-
101
-
102
-
103
-
104
-
105
-
106
-
107
-
108
-
109
-
110
-
111
-
112
-
113
-
114
-
115
-
116
-
117
-
118
-
119
-
120
-
121
-
122
 |
 |