Konica Minolta bizhub 25 bizhub 25 User Guide - Page 92
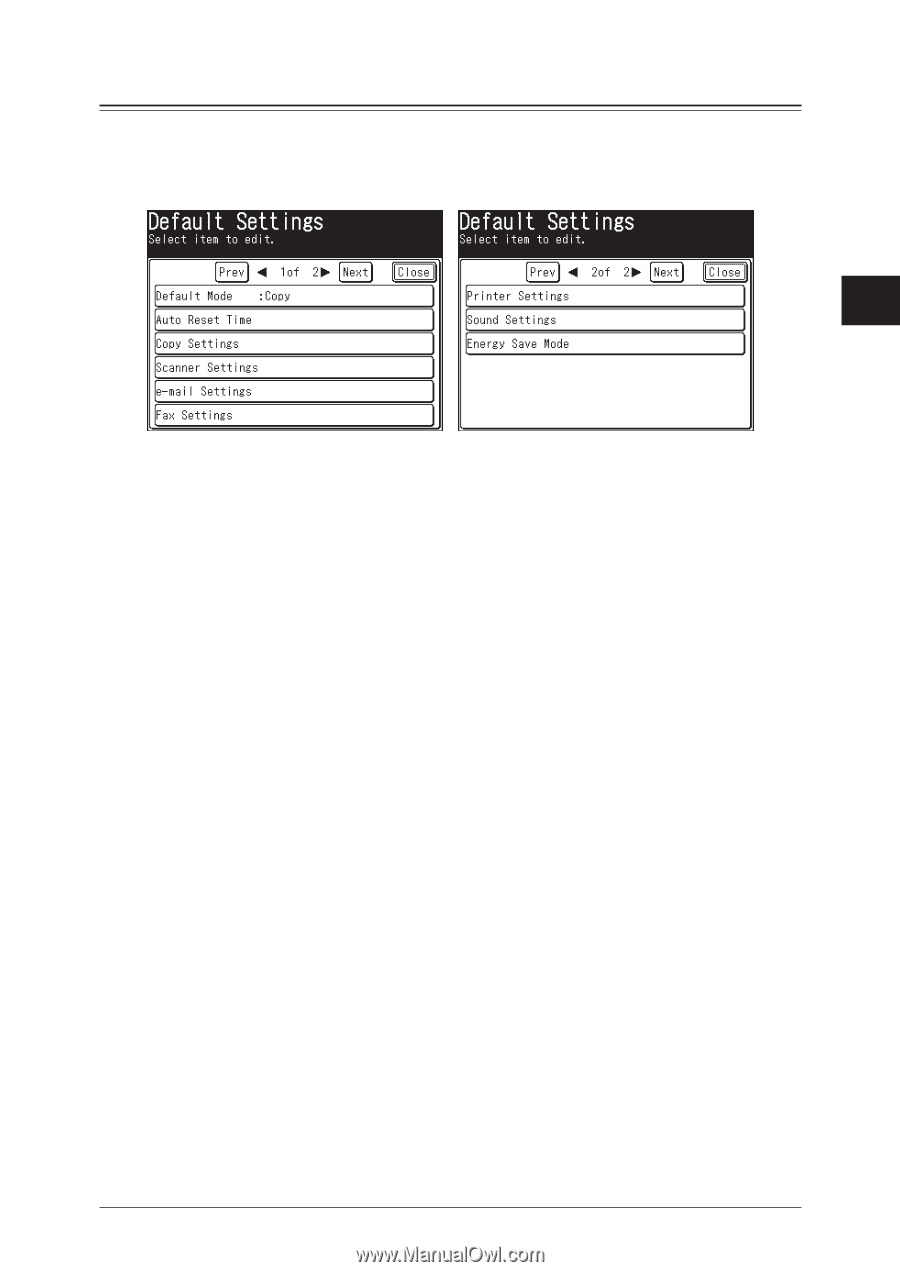
[Default Settings] Screen, Default Mode, Auto Reset Time, Copy Settings, Scanner Settings - fax settings
 |
View all Konica Minolta bizhub 25 manuals
Add to My Manuals
Save this manual to your list of manuals |
Page 92 highlights
[Default Settings] Screen The default values are those used when you press to return to the ready screen. The machine returns to the default settings if is left without any operation for a designated period of time. Changing the default values of often-used functions can 1 shorten the time required to adjust settings. 2 3 Registration Default Mode You can set the ready screen to display when the power switch is turned ON and when the specified auto reset time has elapsed. Refer to Chapter 1, "Specifying Default Settings" in the Administrator's Guide. Auto Reset Time You can set the time until each screen returns to the ready screen. Refer to Chapter 1, "Specifying Default Settings" in the Administrator's Guide. Copy Settings You can set the default values for the copy mode, such as the document type and contrast for the documents to be copied. Refer to Chapter 3, "Specifying Default Copy Settings" in the Copier Guide. Scanner Settings You can set the default values for the scanner mode, such as the document type and contrast for the documents to be scanned. Refer to Chapter 7, "Specifying Default Settings" in the Scanner and Fax Guide. e-mail Settings You can set the default settings for divided transmissions, templates, and the file format for the Scan to E-Mail function and Internet Faxes. Refer to Chapter 7, "Specifying Default Settings" in the Scanner and Fax Guide. Fax Settings You can set the default values for the fax mode, such as the document type and contrast for the documents to be faxed. Refer to Chapter 7, "Specifying Default Settings" in the Scanner and Fax Guide. Printer Settings You can set the default values for the printer mode, such as the printer controller settings and the auto deletion time setting for security printing. Refer to Chapter 9, "Setting the Print Controller" and "Setting the Auto Deletion Time for Security Printing" in the Printer Guide. List of Settings 3-11
-
 1
1 -
2
-
3
-
4
-
5
-
6
-
7
-
8
-
9
-
10
-
11
-
12
-
13
-
14
-
15
-
16
-
17
-
18
-
19
-
20
-
21
-
22
-
23
-
24
-
25
-
26
-
27
-
28
-
29
-
30
-
31
-
32
-
33
-
34
-
35
-
36
-
37
-
38
-
39
-
40
-
41
-
42
-
43
-
44
-
45
-
46
-
47
-
48
-
49
-
50
-
51
-
52
-
53
-
54
-
55
-
56
-
57
-
58
-
59
-
60
-
61
-
62
-
63
-
64
-
65
-
66
-
67
-
68
-
69
-
70
-
71
-
72
-
73
-
74
-
75
-
76
-
77
-
78
-
79
-
80
-
81
-
82
-
83
-
84
-
85
-
86
-
 87
87 -
 88
88 -
 89
89 -
 90
90 -
 91
91 -
 92
92 -
 93
93 -
 94
94 -
 95
95 -
 96
96 -
 97
97 -
98
-
99
-
100
-
101
-
102
-
103
-
104
-
105
-
106
-
107
-
108
-
109
-
110
-
111
-
112
-
113
-
114
-
115
-
116
-
117
-
118
-
119
-
120
-
121
-
122
 |
 |