Konica Minolta bizhub C552 bizhub C452/C552/C552DS/C652/C652DS Copy Operations - Page 158
System Settings, Settings, isher FS-526 and Saddle Stitcher SD - imaging unit toner
 |
View all Konica Minolta bizhub C552 manuals
Add to My Manuals
Save this manual to your list of manuals |
Page 158 highlights
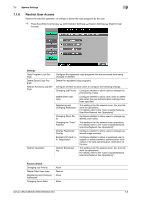
7.1 System Settings Settings Finisher Adjustment Density Adjustment Image Stabilization 7 Adjust the staple, folding, and punch position of the finisher. This button appears only when the finisher is installed. d Reference Create a sample in advance, and then adjust them while checking the sample. Center Staple Position p. 7-14 Half-Fold Position p. 7-15 Tri-Fold Position Adjustment p. 7-15 (This item is displayed when the Finisher FS-526 and Saddle Stitcher SD508 are installed.) Punch Vertical Position Adjustment p. 7-16 (This item is displayed when the Finisher FS-526 and Punch Kit PK-516 are installed.) Punch Horizontal Position Adjustment p. 7-16 Punch Regist Loop Size Adjust- p. 7-17 ment Punch Edge Sensor Adjustment p. 7-17 (This item is displayed when the Finisher FS-526 and Punch Kit PK-516 are installed.) Vertical Punch (Z-Fold) Position Adjustment p. 7-17 (This item is displayed when Z Folding Unit is installed.) Horizontal Punch (Z-Fold) Position Adjustment p. 7-18 (This item is displayed when Z Folding Unit is installed.) 1st Z-Fold Position Adjustment p. 7-18 (This item is displayed when Z Folding Unit is installed.) 2nd Z-Fold Position Adjustment p. 7-19 (This item is displayed when Z Folding Unit is installed.) Punch Unit Size Detect Sensor p. 7-19 (This item is displayed when Z Folding Unit is installed.) Post Inserter Tray Size Adjustment Adjust the paper size to be used in the Post Inserter. You can specify different paper sizes for the upper and lower trays. This button appears when the Post Inserter PI-505 is installed. Correct the toner amount to be used by color depending on the paper type. • To correct the toner amount to be used in the black print mode, press [Black Image Density]. Image Stabilization Only Press the [Start] key to stabilize images. Pressing the [Image Stabilization Only] button executes normal image stabilization. If a good result was not achieved after the [Image Stabilization Only] button was pressed, execute [Initialize + Image Stabilization]. bizhub C652/C652DS/C552/C552DS/C452 7-10
-
 1
1 -
2
-
3
-
4
-
5
-
6
-
7
-
8
-
9
-
10
-
11
-
12
-
13
-
14
-
15
-
16
-
17
-
18
-
19
-
20
-
21
-
22
-
23
-
24
-
25
-
26
-
27
-
28
-
29
-
30
-
31
-
32
-
33
-
34
-
35
-
36
-
37
-
38
-
39
-
40
-
41
-
42
-
43
-
44
-
45
-
46
-
47
-
48
-
49
-
50
-
51
-
52
-
53
-
54
-
55
-
56
-
57
-
58
-
59
-
60
-
61
-
62
-
63
-
64
-
65
-
66
-
67
-
68
-
69
-
70
-
71
-
72
-
73
-
74
-
75
-
76
-
77
-
78
-
79
-
80
-
81
-
82
-
83
-
84
-
85
-
86
-
87
-
88
-
89
-
90
-
91
-
92
-
93
-
94
-
95
-
96
-
97
-
98
-
99
-
100
-
101
-
102
-
103
-
104
-
105
-
106
-
107
-
108
-
109
-
110
-
111
-
112
-
113
-
114
-
115
-
116
-
117
-
118
-
119
-
120
-
121
-
122
-
123
-
124
-
125
-
126
-
127
-
128
-
129
-
130
-
131
-
132
-
133
-
134
-
135
-
136
-
137
-
138
-
139
-
140
-
141
-
142
-
143
-
144
-
145
-
146
-
147
-
148
-
149
-
150
-
151
-
152
-
 153
153 -
 154
154 -
 155
155 -
 156
156 -
 157
157 -
 158
158 -
 159
159 -
 160
160 -
 161
161 -
 162
162 -
 163
163 -
164
-
165
-
166
-
167
-
168
-
169
-
170
-
171
-
172
-
173
-
174
-
175
-
176
-
177
-
178
-
179
-
180
-
181
-
182
-
183
-
184
-
185
-
186
-
187
-
188
-
189
-
190
-
191
-
192
-
193
-
194
-
195
-
196
-
197
-
198
-
199
-
200
-
201
-
202
-
203
-
204
-
205
-
206
-
207
-
208
-
209
-
210
-
211
-
212
-
213
-
214
-
215
-
216
-
217
-
218
-
219
-
220
-
221
-
222
-
223
-
224
-
225
-
226
-
227
-
228
-
229
-
230
-
231
-
232
-
233
-
234
-
235
-
236
-
237
-
238
-
239
-
240
-
241
-
242
-
243
-
244
-
245
-
246
-
247
-
248
-
249
-
250
-
251
-
252
-
253
-
254
-
255
-
256
-
257
-
258
-
259
-
260
-
261
-
262
-
263
-
264
-
265
-
266
-
267
-
268
-
269
-
270
-
271
-
272
-
273
-
274
-
275
-
276
-
277
-
278
-
279
-
280
-
281
-
282
-
283
-
284
-
285
-
286
-
287
-
288
-
289
-
290
-
291
-
292
-
293
-
294
-
295
-
296
-
297
-
298
-
299
-
300
-
301
-
302
-
303
-
304
-
305
-
306
-
307
 |
 |
