Konica Minolta bizhub C552 bizhub C452/C552/C552DS/C652/C652DS Copy Operations - Page 230
Troubleshooting table, Message, Cause, Remedy, solved or released, inform your - error codes
 |
View all Konica Minolta bizhub C552 manuals
Add to My Manuals
Save this manual to your list of manuals |
Page 230 highlights
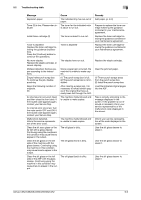
9.2 Troubleshooting table 9 Message Replenish paper. Toner (X) is low. Please when indicate. Install toner cartridge (X) Toner is depleted Replace the toner cartridge following the guidance (explanation). Press the [Continue] button to continue the operations. No more staples. Replace the staple cartridge, or cancel stapling Misfeed detected. Remove paper according to the instructions. Empty hole-punch scrap box To continue the job, disable punching. Reset the following number of originals. XX An internal error occurred. Open and then close the front door. If the trouble code appears again, contact your Service Rep. An internal error occurred. Turn the main switch OFF and ON. If the trouble code appears again, contact your Service Rep. Malfunction detected. Inform the service representative of the error code. Clean the slit scan glass on the far left with a glass cleaner. Continuing using the machine in this condition may cause lines to appear in the output. Clean the slit glass on the left side of the machine with the glass cleaner. Continuing using the machine in this condition may cause lines to appear in the output. Clean the slit glass on the left side of the ADF with the glass cleaner. Continuing using the machine in this condition may cause lines to appear in the output. Cause The indicated tray has run out of paper. The toner for the indicated color is about to run out. The toner is about to run out. Toner is depleted The staples have run out. Since a paper jam occurred, the machine is unable to make copies. (1) The punch scrap box is full. (2) The punch scrap box is not installed. After clearing a paper jam, it is necessary to reload certain pages of the original that have already been fed through the ADF. The machine malfunctioned and is unable to make copies. The machine malfunctioned and is unable to make copies. The slit glass is dirty. The slit glass (front) is dirty. The slit glass (back) is dirty. Remedy Add paper. (p. 8-3) Prepare to replace the toner cartridge following the guidance contained in your maintenance agreement. Replace the toner cartridge following the guidance contained in your maintenance agreement. Replace the toner cartridge following the guidance contained in your maintenance agreement. Replace the staple cartridge. Clear the jammed paper. (1) Throw punch scraps away from the punch scrap box. (2) Install the punch scrap box. Load the indicated original pages into the ADF. Take a remedy according to the message displayed in the screen. If the problem is not resolved or released, inform your service representative of the malfunction code displayed in the screen. Inform your service representative of the code displayed in the screen. User the slit glass cleaner to clean it. User the slit glass cleaner to clean it. User the slit glass cleaner to clean it. bizhub C652/C652DS/C552/C552DS/C452 9-9
-
 1
1 -
2
-
3
-
4
-
5
-
6
-
7
-
8
-
9
-
10
-
11
-
12
-
13
-
14
-
15
-
16
-
17
-
18
-
19
-
20
-
21
-
22
-
23
-
24
-
25
-
26
-
27
-
28
-
29
-
30
-
31
-
32
-
33
-
34
-
35
-
36
-
37
-
38
-
39
-
40
-
41
-
42
-
43
-
44
-
45
-
46
-
47
-
48
-
49
-
50
-
51
-
52
-
53
-
54
-
55
-
56
-
57
-
58
-
59
-
60
-
61
-
62
-
63
-
64
-
65
-
66
-
67
-
68
-
69
-
70
-
71
-
72
-
73
-
74
-
75
-
76
-
77
-
78
-
79
-
80
-
81
-
82
-
83
-
84
-
85
-
86
-
87
-
88
-
89
-
90
-
91
-
92
-
93
-
94
-
95
-
96
-
97
-
98
-
99
-
100
-
101
-
102
-
103
-
104
-
105
-
106
-
107
-
108
-
109
-
110
-
111
-
112
-
113
-
114
-
115
-
116
-
117
-
118
-
119
-
120
-
121
-
122
-
123
-
124
-
125
-
126
-
127
-
128
-
129
-
130
-
131
-
132
-
133
-
134
-
135
-
136
-
137
-
138
-
139
-
140
-
141
-
142
-
143
-
144
-
145
-
146
-
147
-
148
-
149
-
150
-
151
-
152
-
153
-
154
-
155
-
156
-
157
-
158
-
159
-
160
-
161
-
162
-
163
-
164
-
165
-
166
-
167
-
168
-
169
-
170
-
171
-
172
-
173
-
174
-
175
-
176
-
177
-
178
-
179
-
180
-
181
-
182
-
183
-
184
-
185
-
186
-
187
-
188
-
189
-
190
-
191
-
192
-
193
-
194
-
195
-
196
-
197
-
198
-
199
-
200
-
201
-
202
-
203
-
204
-
205
-
206
-
207
-
208
-
209
-
210
-
211
-
212
-
213
-
214
-
215
-
216
-
217
-
218
-
219
-
220
-
221
-
222
-
223
-
224
-
 225
225 -
 226
226 -
 227
227 -
 228
228 -
 229
229 -
 230
230 -
 231
231 -
 232
232 -
 233
233 -
 234
234 -
 235
235 -
236
-
237
-
238
-
239
-
240
-
241
-
242
-
243
-
244
-
245
-
246
-
247
-
248
-
249
-
250
-
251
-
252
-
253
-
254
-
255
-
256
-
257
-
258
-
259
-
260
-
261
-
262
-
263
-
264
-
265
-
266
-
267
-
268
-
269
-
270
-
271
-
272
-
273
-
274
-
275
-
276
-
277
-
278
-
279
-
280
-
281
-
282
-
283
-
284
-
285
-
286
-
287
-
288
-
289
-
290
-
291
-
292
-
293
-
294
-
295
-
296
-
297
-
298
-
299
-
300
-
301
-
302
-
303
-
304
-
305
-
306
-
307
 |
 |
