Kyocera ECOSYS FS-1135MFP FS-1135MFP Fax Operation Guide - Page 88
Document Box, Function Menu, Right Select, Using Polling Transmission, Function, Description
 |
View all Kyocera ECOSYS FS-1135MFP manuals
Add to My Manuals
Save this manual to your list of manuals |
Page 88 highlights
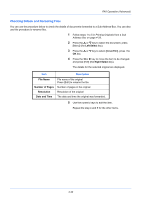
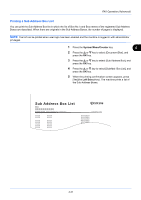
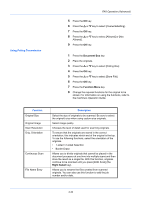
Using Polling Transmission FAX Operation (Advanced) 5 Press the OK key. 6 Press the or key to select [OverwriteSetting]. 7 Press the OK key. 8 Press the or key to select [Allowed] or [Not Allowed]. 9 Press the OK key. 1 Press the Document Box key. 2 Place the originals. 3 Press the or key to select [Polling Box]. 4 Press the OK key. 5 Press the or key to select [Store File]. 6 Press the OK key. 7 Press the Function Menu key. 8 Change the required functions for the original to be stored. For information on using the functions, refer to the machine's Operation Guide. Function Original Size Original Image Scan Resolution Orig. Orientation Continuous Scan File Name Entry Description Select the size of originals to be scanned. Be sure to select the original's size when using custom size originals. Select image quality. Chooses the level of detail used for scanning originals. To ensure that the originals are stored in the correct orientation, this indicates which end of the original is the top. To use the following functions, select the orientation of the originals. • 1-sided / 2-sided Selection • Border Erase Allows you to divide originals that cannot be placed in the document processor at one time into multiple scans and then store the result as a single file. With this function, originals continue to be scanned until you press [END Scan] (the Right Select key). Allows you to rename the files created from scanned originals. You can also use this function to add the job number and/or date. 4-34
-
 1
1 -
2
-
3
-
4
-
5
-
6
-
7
-
8
-
9
-
10
-
11
-
12
-
13
-
14
-
15
-
16
-
17
-
18
-
19
-
20
-
21
-
22
-
23
-
24
-
25
-
26
-
27
-
28
-
29
-
30
-
31
-
32
-
33
-
34
-
35
-
36
-
37
-
38
-
39
-
40
-
41
-
42
-
43
-
44
-
45
-
46
-
47
-
48
-
49
-
50
-
51
-
52
-
53
-
54
-
55
-
56
-
57
-
58
-
59
-
60
-
61
-
62
-
63
-
64
-
65
-
66
-
67
-
68
-
69
-
70
-
71
-
72
-
73
-
74
-
75
-
76
-
77
-
78
-
79
-
80
-
81
-
82
-
 83
83 -
 84
84 -
 85
85 -
 86
86 -
 87
87 -
 88
88 -
 89
89 -
 90
90 -
 91
91 -
 92
92 -
 93
93 -
94
-
95
-
96
-
97
-
98
-
99
-
100
-
101
-
102
-
103
-
104
-
105
-
106
-
107
-
108
-
109
-
110
-
111
-
112
-
113
-
114
-
115
-
116
-
117
-
118
-
119
-
120
-
121
-
122
-
123
-
124
-
125
-
126
-
127
-
128
-
129
-
130
-
131
-
132
-
133
-
134
-
135
-
136
-
137
-
138
-
139
-
140
-
141
-
142
-
143
-
144
-
145
-
146
-
147
-
148
-
149
-
150
-
151
-
152
-
153
-
154
-
155
-
156
-
157
-
158
-
159
-
160
-
161
-
162
-
163
-
164
-
165
-
166
-
167
-
168
-
169
-
170
-
171
-
172
-
173
-
174
-
175
-
176
-
177
-
178
-
179
-
180
 |
 |