Kyocera TASKalfa 180 180/220 Operation Guide Rev-2 - Page 120
Cleaning Electrical Charge BNOTE
 |
View all Kyocera TASKalfa 180 manuals
Add to My Manuals
Save this manual to your list of manuals |
Page 120 highlights
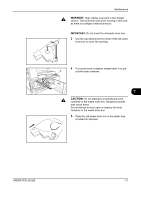
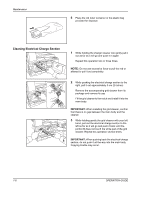
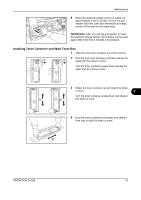
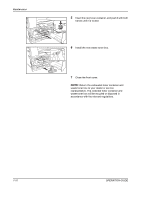
Maintenance 6 Place the old toner container in the plastic bag provided for disposal. Cleaning Electrical Charge Section 1 While holding the charger cleaner rod, gently pull it out as far as it will go and push it in again. Repeat this operation two or three times. NOTE: Do not use excessive force to pull the rod or attempt to pull it out completely. 2 While pushing the electrical charge section to the right, pull it out approximately 5 cm (2 inches). Remove the accompanying grid cleaner from its package and remove its cap. Fit the grid cleaner to the notch and install it into the main body. IMPORTANT: When installing the grid cleaner, confirm that there is no gap between the main body and the cleaner. 3 While holding gently the grid cleaner with your left hand, pull out the electrical charge section to the left as far as it will go and push it back until the portion B does not touch the white pad of the grid cleaner. Repeat this operation several times. B IMPORTANT: When pushing back the electrical charge section, do not push it all the way into the main body. Copying trouble may occur. 7-8 OPERATION GUIDE
-
 1
1 -
2
-
3
-
4
-
5
-
6
-
7
-
8
-
9
-
10
-
11
-
12
-
13
-
14
-
15
-
16
-
17
-
18
-
19
-
20
-
21
-
22
-
23
-
24
-
25
-
26
-
27
-
28
-
29
-
30
-
31
-
32
-
33
-
34
-
35
-
36
-
37
-
38
-
39
-
40
-
41
-
42
-
43
-
44
-
45
-
46
-
47
-
48
-
49
-
50
-
51
-
52
-
53
-
54
-
55
-
56
-
57
-
58
-
59
-
60
-
61
-
62
-
63
-
64
-
65
-
66
-
67
-
68
-
69
-
70
-
71
-
72
-
73
-
74
-
75
-
76
-
77
-
78
-
79
-
80
-
81
-
82
-
83
-
84
-
85
-
86
-
87
-
88
-
89
-
90
-
91
-
92
-
93
-
94
-
95
-
96
-
97
-
98
-
99
-
100
-
101
-
102
-
103
-
104
-
105
-
106
-
107
-
108
-
109
-
110
-
111
-
112
-
113
-
114
-
 115
115 -
 116
116 -
 117
117 -
 118
118 -
 119
119 -
 120
120 -
 121
121 -
 122
122 -
 123
123 -
 124
124 -
 125
125 -
126
-
127
-
128
-
129
-
130
-
131
-
132
-
133
-
134
-
135
-
136
-
137
-
138
-
139
-
140
-
141
-
142
-
143
-
144
-
145
-
146
-
147
-
148
-
149
-
150
-
151
-
152
-
153
-
154
-
155
-
156
-
157
-
158
-
159
-
160
-
161
-
162
-
163
-
164
 |
 |
