Kyocera TASKalfa 180 180/220 Operation Guide Rev-2 - Page 125
Corrective Actions
 |
View all Kyocera TASKalfa 180 manuals
Add to My Manuals
Save this manual to your list of manuals |
Page 125 highlights
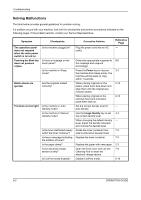
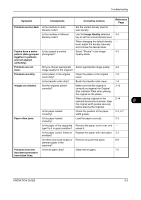
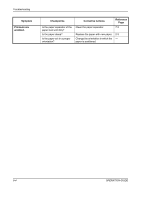
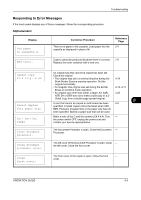
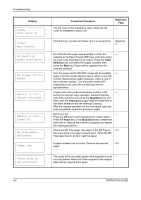
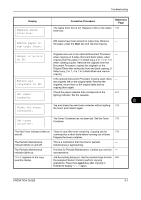
Troubleshooting Symptom Checkpoints Corrective Actions Reference Page Printouts are too dark. Is the machine in Auto Density mode? Set the correct density level for - auto density. Is the machine in Manual Density mode? Use the Image Quality selection 4-4 key to set the correct density level. When changing the default density - level, adjust the density manually and choose the desired level. Copies have a moire Is the original a printed Select "Photos" in the Image 4-4 pattern (dots grouped photograph? Quality Mode. together in patterns and not aligned uniformly). Printouts are not clear. Did you choose appropriate Select appropriate image quality. 4-4 image quality for the original? Printouts are dirty. Is the platen or the original Clean the platen or the original 7-2 cover dirty? cover. Is the transfer roller dirty? Brush the transfer roller clean. 7-4 Images are skewed. Are the originals placed correctly? Make sure that the original is correctly set against the Original Size Indicator Plate when placing the original on the platen. 2-13 When placing originals in the 2-14 optional document processor, align 8 the original width guides securely before placing the originals. Is the paper loaded correctly? Check the position of the paper width guides. 2-4, 2-7 Paper often jams. Is the paper loaded Load the paper correctly. 2-3 correctly? Is the paper of the supported Remove the paper, turn it over, and - type? Is it in good condition? reload it. Is the paper curled, folded or Replace the paper with new paper. 2-3 wrinkled? Are there any loose scraps or Remove any jammed paper. 8-9 jammed paper in the machine? Printouts from the Is the slit glass dirty? Clean the slit glass. 7-2 document processor have black lines. OPERATION GUIDE 8-3
-
 1
1 -
2
-
3
-
4
-
5
-
6
-
7
-
8
-
9
-
10
-
11
-
12
-
13
-
14
-
15
-
16
-
17
-
18
-
19
-
20
-
21
-
22
-
23
-
24
-
25
-
26
-
27
-
28
-
29
-
30
-
31
-
32
-
33
-
34
-
35
-
36
-
37
-
38
-
39
-
40
-
41
-
42
-
43
-
44
-
45
-
46
-
47
-
48
-
49
-
50
-
51
-
52
-
53
-
54
-
55
-
56
-
57
-
58
-
59
-
60
-
61
-
62
-
63
-
64
-
65
-
66
-
67
-
68
-
69
-
70
-
71
-
72
-
73
-
74
-
75
-
76
-
77
-
78
-
79
-
80
-
81
-
82
-
83
-
84
-
85
-
86
-
87
-
88
-
89
-
90
-
91
-
92
-
93
-
94
-
95
-
96
-
97
-
98
-
99
-
100
-
101
-
102
-
103
-
104
-
105
-
106
-
107
-
108
-
109
-
110
-
111
-
112
-
113
-
114
-
115
-
116
-
117
-
118
-
119
-
 120
120 -
 121
121 -
 122
122 -
 123
123 -
 124
124 -
 125
125 -
 126
126 -
 127
127 -
 128
128 -
 129
129 -
 130
130 -
131
-
132
-
133
-
134
-
135
-
136
-
137
-
138
-
139
-
140
-
141
-
142
-
143
-
144
-
145
-
146
-
147
-
148
-
149
-
150
-
151
-
152
-
153
-
154
-
155
-
156
-
157
-
158
-
159
-
160
-
161
-
162
-
163
-
164
 |
 |
