Magnavox MDR537H Owners Manual - Page 118
Symptom, Remedy, RECORDING, PLAYBACK
 |
View all Magnavox MDR537H manuals
Add to My Manuals
Save this manual to your list of manuals |
Page 118 highlights
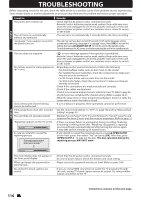
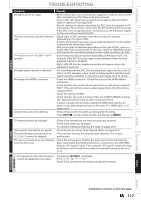
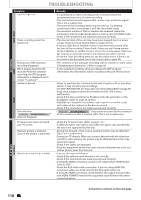
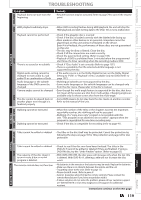
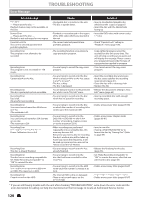
HDD / DVD RECORDING HDD TROUBLESHOOTING Symptom Unable to Record. Timer recording cannot be performed. The picture of the autostart recording disappears. When playing back the title recorded from the autostart recording, the DTV program information is displayed and it cannot be removed. Unable to Record. The indication " Writing to Disc 100% does not disappear. TV aspect ratio does not match your TV screen. Playback picture is distorted. Color of the picture is abnormal. There is no sound or no subtitle. Remedy • It is prohibited to make a recording from 2 minutes before the programmed start time of a timer recording. • This unit cannot record programs that contain copy protection signal. This is not a malfunction. • The space of the recording media may be used up. Try deleting unnecessary titles, or exchange it with the recordable media. • The maximum number of titles or chapters has exceeded. Delete the unnecessary titles to make enough space or insert a new recordable media. • Check if the connections are made securely and correctly. • The internal clock of the unit may have been stopped due to a power outage. Reset the Clock Setting (Refer to pages 32-34.) • If using a Cable Box or Satellite receiver it may have been turned off at the time of the recording. Please check, if there are any Timing options for the Cable Box or Satellite receiver to turn On, if none please make sure the receiver is turned On and set to the channel you wish to record. • Check the Timer Recording menu for any Recording errors, if there is an error look at the Recording Error Code Listing (refer to page 50). • The contents of the autostart recording will be cleared in some cases (Changing input channel etc.). Refer to page 46. • In the autostart recording, when you display the DTV program information, the information will be recorded as the part of the picture. • Check to see if the disc is format to this unit. If used in a PC or any other device, it may not allow any recordings. • For DVD+RW/DVD-RW, try "Erase Disc" for reformatting (Refer to page 99). • Copy-once programs cannot be recorded on DVD. This is not a malfunction. • Check if the disc is protected or finalized. Undo the protection or the finalization. (Refer to page 64 and 65.) • DVD-RW once formatted on another unit cannot be recorded on this unit unless all the contents in the disc are erased. • Check if the connections are made securely and correctly. • " Writing to Disc 100% may remain on screen for the maximum of 20 seconds even after it reached 100%. This is not a malfunction. • Check the TV aspect ratio. (Refer to page 113.) • A different aspect ratio will be used when the aspect ratio specified by the disc is not supported by this unit. • During fast forward or fast reverse, playback picture may be distorted. This is not a malfunction. • Connect to TV directly. When you connect this unit with the television via VCR or other devices, the picture may be distorted due to the copyprotection signal. • Check if the cables are damaged. • Keep the equipment which may cause electrical disturbances, such as a cellular phone, away from the unit. • Turn on all connected devices. • Check if the external input channel is set correctly. • Check if the connections are made securely and correctly. • If using the HDMI connection, sound is not output when "HDMI Audio" is set to "OFF". • Check the RCA audio cable connection. If you are using HDMI-DVI conversion cable, you must connect the RCA audio cable, too. • If using the HDMI connection, check whether the output format of this unit (HDMI FORMAT) matches the supported input format of the other connected device. DVD PLAYBACK GENERAL 118 EN Instructions continue on the next page.
-
 1
1 -
2
-
3
-
4
-
5
-
6
-
7
-
8
-
9
-
10
-
11
-
12
-
13
-
14
-
15
-
16
-
17
-
18
-
19
-
20
-
21
-
22
-
23
-
24
-
25
-
26
-
27
-
28
-
29
-
30
-
31
-
32
-
33
-
34
-
35
-
36
-
37
-
38
-
39
-
40
-
41
-
42
-
43
-
44
-
45
-
46
-
47
-
48
-
49
-
50
-
51
-
52
-
53
-
54
-
55
-
56
-
57
-
58
-
59
-
60
-
61
-
62
-
63
-
64
-
65
-
66
-
67
-
68
-
69
-
70
-
71
-
72
-
73
-
74
-
75
-
76
-
77
-
78
-
79
-
80
-
81
-
82
-
83
-
84
-
85
-
86
-
87
-
88
-
89
-
90
-
91
-
92
-
93
-
94
-
95
-
96
-
97
-
98
-
99
-
100
-
101
-
102
-
103
-
104
-
105
-
106
-
107
-
108
-
109
-
110
-
111
-
112
-
 113
113 -
 114
114 -
 115
115 -
 116
116 -
 117
117 -
 118
118 -
 119
119 -
 120
120 -
 121
121 -
 122
122 -
 123
123 -
124
-
125
-
126
-
127
-
128
-
129
-
130
-
131
-
132
 |
 |