Magnavox MDR537H Owners Manual - Page 13
Recording, Playback, Editing, Connections, Basic Setup, Function Setup, Others, Español - problems
 |
View all Magnavox MDR537H manuals
Add to My Manuals
Save this manual to your list of manuals |
Page 13 highlights
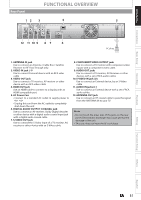
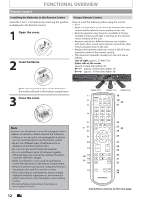
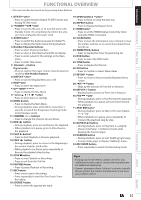
Introduction Connections Basic Setup Recording FUNCTIONAL OVERVIEW (*) The unit can also be turned on by pressing these buttons. 1. DTV/TV button • Press to switch between Digital TV (DTV) mode and Analog TV (TV) mode. 2. STANDBY/ON y button • Press to turn On the unit, or to turn the unit to the Standby mode. (To completely shut down the unit, you must unplug the AC power cord) 3. AUDIO button • Press to switch the Audio language for digital TV. • Press to display the Audio menu during playback. 4. Number/Character buttons • Press to select Channel numbers. • Press to select a title/chapter/track/file on display. • Press to enter values for the settings in the Main menu. • Press to enter Title names. 5. Decimal ( • ) button Digital mode: • Press to confirm the major / minor channel selection made by [the Number buttons]. 6. DISPLAY button • Press to turn the Display Menu on or off. 7. HDD button • Press to select the HDD mode. 8. DISC MENU button • Press to display the Disc Menu. 9. Cursor K / L / { / B buttons • Press to select items or settings. 10. MENU button • Press to display the Main Menu. • During playback, press and hold for more than 3 seconds to switch the Progressive Scanning mode to the Interlace mode. 11. CHANNEL / buttons • Press to change the Channel Up and Down. 12.REW E button • During playback, press to Fast Reverse the playback. • When playback is in pause, press to Slow Reverse the playback. 13.PLAY B button* • Press to start Playback or Resume playback. 14.PREV H button • During playback, press to return to the Beginning of the current chapter, track or file. • When playback is in Pause, press repeatedly to Reverse the playback step by step. 15.STOP C button • Press to stop Playback or Recording. • Press to exit from the Title list. 16.PAUSE F button • Press to pause Playback or Recording. 17. REC button • Press once to start a Recording. • Press repeatedly to start the One-Touch Timer Recording. 18. SOURCE button • Press to select the appropriate Input. 19.OPEN/CLOSE A button* • Press to Open or Close the Disc tray. 20. REPEAT button • Press to display the Repeat menu. 21. HDMI button • Press to set the HDMI Display mode-Only when using the HDMI connection. 22. CLEAR button • Press to clear the information once entered, to clear the marker settings, or to cancel the programming for CD, etc. 23. TIMER PROG. button • Press to display the Timer Programming list. 24. DVD button • Press to select the DVD mode. 25. TITLE button • Press to display the Title list. 26. OK button • Press to Confirm or Select Menu items. 27.RETURN button • Press to return to the previously displayed menu screen. 28. SKIP button • Skips by the amount of Time Set in Advance. 29. REPLAY button • Replays by the amount of Time Set in Advance. 30.FFW D button • During playback, press to Fast Forward the playback. • When playback is in pause, press to Slow Forward the playback. 31.NEXT G button • During playback, press to Skip to the next chapter, track or file. • When playback is in pause, press repeatedly to Forward the playback step by step. 32. RAPID PLAY button • During playback, press to Play Back in a slightly Slower-0.8x/Faster-1.3x/Normal mode while Keeping the Sound output. 33. DUBBING button • During playback, press to start Dubbing right away. • In stop mode, press to display "Dubbing" menu. 34. REC MODE button • Press repeatedly to switch the Recording mode. Note • If using a universal remote, please check for any additional remote code or contact the manufacturer for additional assistances. • Cannot guarantee about 3rd party's remote controls. Please contact the remote manufacturer if you have any problem with it. Playback Editing Function Setup Others Español EN 13
-
 1
1 -
2
-
3
-
4
-
5
-
6
-
7
-
 8
8 -
 9
9 -
 10
10 -
 11
11 -
 12
12 -
 13
13 -
 14
14 -
 15
15 -
 16
16 -
 17
17 -
 18
18 -
19
-
20
-
21
-
22
-
23
-
24
-
25
-
26
-
27
-
28
-
29
-
30
-
31
-
32
-
33
-
34
-
35
-
36
-
37
-
38
-
39
-
40
-
41
-
42
-
43
-
44
-
45
-
46
-
47
-
48
-
49
-
50
-
51
-
52
-
53
-
54
-
55
-
56
-
57
-
58
-
59
-
60
-
61
-
62
-
63
-
64
-
65
-
66
-
67
-
68
-
69
-
70
-
71
-
72
-
73
-
74
-
75
-
76
-
77
-
78
-
79
-
80
-
81
-
82
-
83
-
84
-
85
-
86
-
87
-
88
-
89
-
90
-
91
-
92
-
93
-
94
-
95
-
96
-
97
-
98
-
99
-
100
-
101
-
102
-
103
-
104
-
105
-
106
-
107
-
108
-
109
-
110
-
111
-
112
-
113
-
114
-
115
-
116
-
117
-
118
-
119
-
120
-
121
-
122
-
123
-
124
-
125
-
126
-
127
-
128
-
129
-
130
-
131
-
132
 |
 |