Olympus D-100 D-100 Instruction Manual - Page 56
Using the Flash
 |
View all Olympus D-100 manuals
Add to My Manuals
Save this manual to your list of manuals |
Page 56 highlights
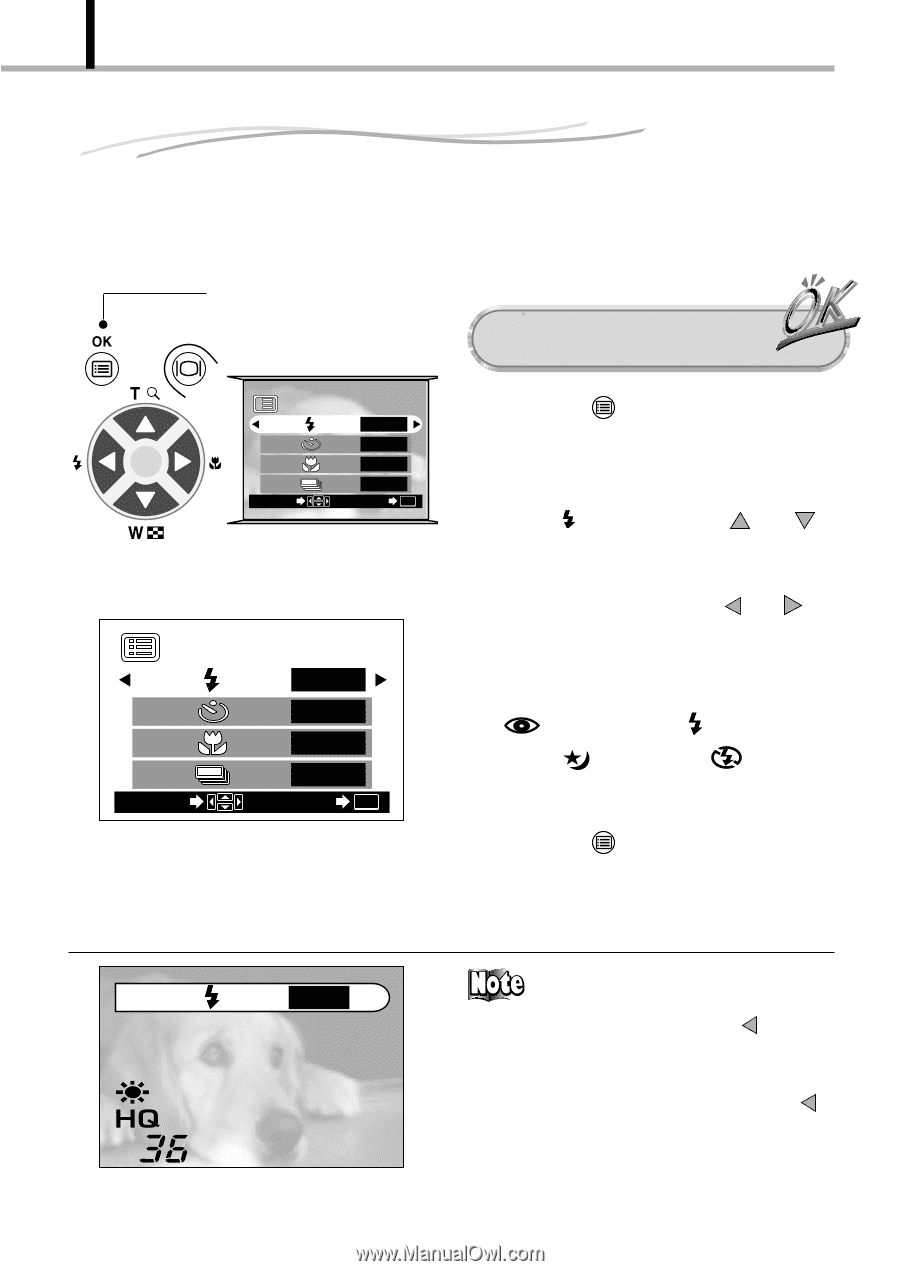
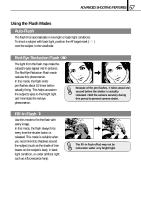
56 ADVANCED SHOOTING FEATURES Using the Flash The flash has been designed to fire automatically when shooting under low light or against strong back light. You can change this flash mode according to different shooting situations. OK/menu button Operating Procedure Check that the lens barrier is open. Arrow pad 1/3 SELECT AUTO OFF OFF OFF END OK Shooting mode menu 1/3 screen 1/3 AUTO OFF OFF SELECT OFF END OK Shooting mode menu 1/3 screen 1. Press the OK/menu button. [The monitor shows the shooting mode menu 1/3. 2. Select by pressing the or arrow pad key. 3. Each time you press the or arrow pad key, the flash mode is switched in the sequence: AutoFlash[Red-Eye Reduction Flash [Fill-In Flash [Night Scene [Flash Off . Select one of these modes. 4. Press the OK/menu button. [The flash mode is set and the shooting screen re-appears. Now you can shoot images with the selected flash mode. AUTO ⅷ The flash mode setting menu can also be displayed by simply pressing the arrow pad key when the lens barrier is open. The flash mark is inscribed on the left of the arrow pad key. The setting menu disappears after a moment if no operation is performed.
-
 1
1 -
2
-
3
-
4
-
5
-
6
-
7
-
8
-
9
-
10
-
11
-
12
-
13
-
14
-
15
-
16
-
17
-
18
-
19
-
20
-
21
-
22
-
23
-
24
-
25
-
26
-
27
-
28
-
29
-
30
-
31
-
32
-
33
-
34
-
35
-
36
-
37
-
38
-
39
-
40
-
41
-
42
-
43
-
44
-
45
-
46
-
47
-
48
-
49
-
50
-
 51
51 -
 52
52 -
 53
53 -
 54
54 -
 55
55 -
 56
56 -
 57
57 -
 58
58 -
 59
59 -
 60
60 -
 61
61 -
62
-
63
-
64
-
65
-
66
-
67
-
68
-
69
-
70
-
71
-
72
-
73
-
74
-
75
-
76
-
77
-
78
-
79
-
80
-
81
-
82
-
83
-
84
-
85
-
86
-
87
-
88
-
89
-
90
-
91
-
92
-
93
-
94
-
95
-
96
-
97
-
98
-
99
-
100
-
101
-
102
-
103
-
104
 |
 |