Olympus D-100 D-100 Instruction Manual - Page 64
Varying the Image Brightness
 |
View all Olympus D-100 manuals
Add to My Manuals
Save this manual to your list of manuals |
Page 64 highlights
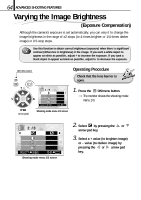
64 ADVANCED SHOOTING FEATURES Varying the Image Brightness (Exposure Compensation) Although the camera's exposure is set automatically, you can vary it to change the image brightness in the range of ±2 stops (to 4-times brighter or 1/4-times darker image) in 0.5-stop steps. Use this function to obtain correct brightness (exposure) when there is significant contrast (difference in brightness) in the image. If you want a white object to appear as white as possible, adjust + to increase the exposure. If you want a black object to appear as black as possible, adjust to to decrease the exposure. OK/menu button Operating Procedure Check that the lens barrier is open. Arrow paad 1/3 SELECT AUTO OFF OFF OFF END OK Shooting mode menu 1/3 screen 1. Press the OK/menu button. [The monitor shows the shooting mode menu 1/3. 2/3 SELECT HQ AUTO ON END OK Shooting mode menu 2/3 screen 2. Select by pressing the or arrow pad key. 3. Select a + value (to brighten image) or - value (to darken image) by pressing the or arrow pad key.
-
 1
1 -
2
-
3
-
4
-
5
-
6
-
7
-
8
-
9
-
10
-
11
-
12
-
13
-
14
-
15
-
16
-
17
-
18
-
19
-
20
-
21
-
22
-
23
-
24
-
25
-
26
-
27
-
28
-
29
-
30
-
31
-
32
-
33
-
34
-
35
-
36
-
37
-
38
-
39
-
40
-
41
-
42
-
43
-
44
-
45
-
46
-
47
-
48
-
49
-
50
-
51
-
52
-
53
-
54
-
55
-
56
-
57
-
58
-
 59
59 -
 60
60 -
 61
61 -
 62
62 -
 63
63 -
 64
64 -
 65
65 -
 66
66 -
 67
67 -
 68
68 -
 69
69 -
70
-
71
-
72
-
73
-
74
-
75
-
76
-
77
-
78
-
79
-
80
-
81
-
82
-
83
-
84
-
85
-
86
-
87
-
88
-
89
-
90
-
91
-
92
-
93
-
94
-
95
-
96
-
97
-
98
-
99
-
100
-
101
-
102
-
103
-
104
 |
 |
