Olympus D-100 D-100 Instruction Manual - Page 75
Print Ordered, Viewing Options
 |
View all Olympus D-100 manuals
Add to My Manuals
Save this manual to your list of manuals |
Page 75 highlights
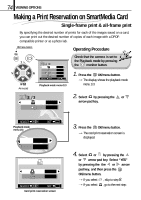
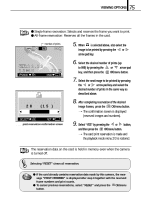
75 VIEWING OPTIONS ⅷ Single-frame reservation: Selects and reserves the frame you want to print. ⅷ All-frame reservation: Reserves all the frames in the card. Number of prints HQ 5. When is selected above, also select the image to be printed by pressing the or arrow pad key. .12.23 23 45 12 FRAME END OK PRINT ORDERED 28 (15 ) CANCEL SELECT SET OK Card print reservation confirmation screen 6. Select the desired number of prints (up to 999) by pressing the or arrow pad key, and then press the OK/menu button. 7. Select the next image to be printed by pressing the or arrow pad key and select the desired number of prints in the same way as described above. 8. After completing reservation of the desired image frames, press the OK/menu button. [The confirmation screen is displayed (reserved images and numbers). 9. Select "YES" by pressing the or button, and then press the OK/menu button. [The card print reservation is made and the playback mode menu 2/3 is restored. The reservation data on the card is held in memory even when the camera is turned off. Selecting "RESET" clears all reservation. ⅷ If the card already contains reservation data made by this camera, the message "PRINT ORDERED" is displayed after step 3 together with the reserved frame numbers and print counts. ⅷ To cancel previous reservations, select "RESET" and press the OK/menu button.
-
 1
1 -
2
-
3
-
4
-
5
-
6
-
7
-
8
-
9
-
10
-
11
-
12
-
13
-
14
-
15
-
16
-
17
-
18
-
19
-
20
-
21
-
22
-
23
-
24
-
25
-
26
-
27
-
28
-
29
-
30
-
31
-
32
-
33
-
34
-
35
-
36
-
37
-
38
-
39
-
40
-
41
-
42
-
43
-
44
-
45
-
46
-
47
-
48
-
49
-
50
-
51
-
52
-
53
-
54
-
55
-
56
-
57
-
58
-
59
-
60
-
61
-
62
-
63
-
64
-
65
-
66
-
67
-
68
-
69
-
 70
70 -
 71
71 -
 72
72 -
 73
73 -
 74
74 -
 75
75 -
 76
76 -
 77
77 -
 78
78 -
 79
79 -
 80
80 -
81
-
82
-
83
-
84
-
85
-
86
-
87
-
88
-
89
-
90
-
91
-
92
-
93
-
94
-
95
-
96
-
97
-
98
-
99
-
100
-
101
-
102
-
103
-
104
 |
 |
