Olympus D-100 D-100 Instruction Manual - Page 61
Using the Self-Timer
 |
View all Olympus D-100 manuals
Add to My Manuals
Save this manual to your list of manuals |
Page 61 highlights
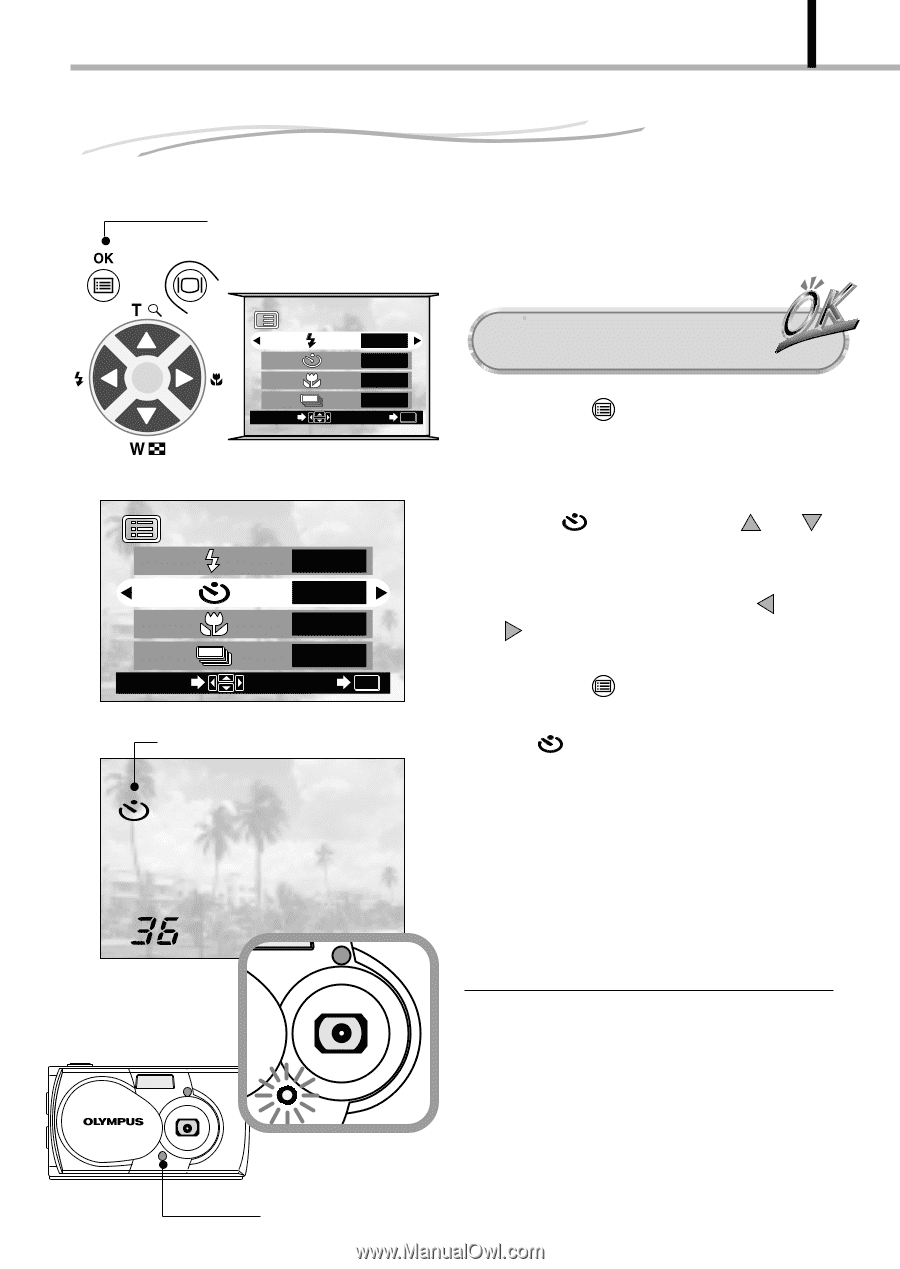
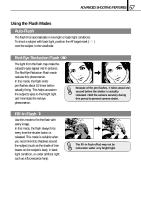
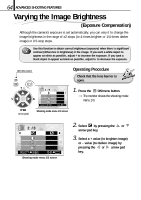
61 ADVANCED SHOOTING FEATURES Using the Self-Timer OK/menu button Arrow pad You can shoot images with self-timer operation. This is useful for taking pictures with yourself included in the image. Fix the camera securely on a tripod, etc., before self-timer shooting. Operating Procedure 1/3 SELECT AUTO OFF OFF OFF END OK Shooting mode menu 1/3 screen Check that the lens barrier is open. 1. Press the OK/menu button. [The monitor shows the shooting mode menu 1/3. 1/3 SELECT AUTO OFF OFF OFF END OK Shooting mode menu 1/3 screen Self-timer mark 2. Select by pressing the or arrow pad key. 3. Select "ON" by pressing the or arrow pad key. 4. Press the OK/menu button. [Self-timer is set and the self-timer mark ( ) is displayed on the monitor. 5. Compose the image in the monitor or viewfinder, and then press the shutter button. [The self-timer lamp on the front of the camera lights for 10 seconds and then blinks for 2 seconds, after which the shutter is released. After shooting: Self-timer is canceled automatically after shooting a single image. To cancel self-timer: Close the lens barrier while the self-timer lamp lights to turn the camera off. Self-timer lamp
-
 1
1 -
2
-
3
-
4
-
5
-
6
-
7
-
8
-
9
-
10
-
11
-
12
-
13
-
14
-
15
-
16
-
17
-
18
-
19
-
20
-
21
-
22
-
23
-
24
-
25
-
26
-
27
-
28
-
29
-
30
-
31
-
32
-
33
-
34
-
35
-
36
-
37
-
38
-
39
-
40
-
41
-
42
-
43
-
44
-
45
-
46
-
47
-
48
-
49
-
50
-
51
-
52
-
53
-
54
-
55
-
 56
56 -
 57
57 -
 58
58 -
 59
59 -
 60
60 -
 61
61 -
 62
62 -
 63
63 -
 64
64 -
 65
65 -
 66
66 -
67
-
68
-
69
-
70
-
71
-
72
-
73
-
74
-
75
-
76
-
77
-
78
-
79
-
80
-
81
-
82
-
83
-
84
-
85
-
86
-
87
-
88
-
89
-
90
-
91
-
92
-
93
-
94
-
95
-
96
-
97
-
98
-
99
-
100
-
101
-
102
-
103
-
104
 |
 |