Olympus D-100 D-100 Instruction Manual - Page 83
the Browse button., ROM is set as, you can select it
 |
View all Olympus D-100 manuals
Add to My Manuals
Save this manual to your list of manuals |
Page 83 highlights
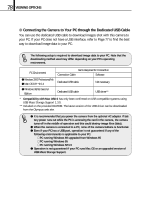
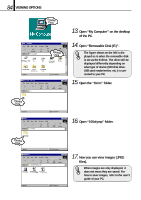
83 VIEWING OPTIONS Click 9. If the window shown on the left is displayed automatically, press "close" to close it. Check Click F:¥USB¥WIN98 Browse button 10. After selecting "Specify a location" in the window shown on the left, specify the "WIN 98" folder in the CD-ROM and click "Next". If you don't know what drive the CDROM is set as, you can select it from the "Browse" button. The figure shown on the left is displayed as is when the CD-ROM is set as the F drive. If your PC's CDROM is set otherwise, the drive will be displayed accordingly. 11. Click "Next" in the window shown on the left. Click 12. Click "Finish" in the window shown on the left. Click Steps 5 to 9 are required only when the camera is being connected to a PC for the first time. Skip to step 13 from the next time.
-
 1
1 -
2
-
3
-
4
-
5
-
6
-
7
-
8
-
9
-
10
-
11
-
12
-
13
-
14
-
15
-
16
-
17
-
18
-
19
-
20
-
21
-
22
-
23
-
24
-
25
-
26
-
27
-
28
-
29
-
30
-
31
-
32
-
33
-
34
-
35
-
36
-
37
-
38
-
39
-
40
-
41
-
42
-
43
-
44
-
45
-
46
-
47
-
48
-
49
-
50
-
51
-
52
-
53
-
54
-
55
-
56
-
57
-
58
-
59
-
60
-
61
-
62
-
63
-
64
-
65
-
66
-
67
-
68
-
69
-
70
-
71
-
72
-
73
-
74
-
75
-
76
-
77
-
 78
78 -
 79
79 -
 80
80 -
 81
81 -
 82
82 -
 83
83 -
 84
84 -
 85
85 -
 86
86 -
 87
87 -
 88
88 -
89
-
90
-
91
-
92
-
93
-
94
-
95
-
96
-
97
-
98
-
99
-
100
-
101
-
102
-
103
-
104
 |
 |
