Onkyo HT-R640 Owner Manual - Page 8
Continued - setup
 |
View all Onkyo HT-R640 manuals
Add to My Manuals
Save this manual to your list of manuals |
Page 8 highlights
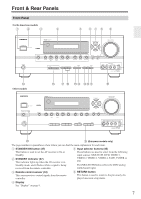
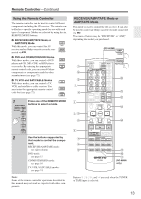
Front & Rear Panels-Continued G Arrow/TUNING/PRESET & ENTER buttons When the AM or FM input source is selected, the TUNING [ ] [ ] buttons are used to tune the tuner, and the PRESET [ ] [ ] buttons are used to select radio presets (see page 49). When the onscreen setup menus are used, they work as arrow buttons and are used to select and set items. The [ENTER] button is also used with the onscreen setup menus. H SETUP button This button is used to access the onscreen setup menus that appear on the connected TV. I MASTER VOLUME control (45) This control is used to adjust the volume of the AV receiver to MIN, 1 through 99, or MAX. J VIDEO 4 INPUT This input can be used to connect a camcorder, game console, and so on. There are jacks for optical digital audio, S-Video, composite video, and analog audio. K TUNING MODE button (48) This button is used to select the Auto or Manual tuning mode. L MEMORY button (49) This button is used when storing or deleting radio presets. M DIMMER or RT/PTY/TP button (47, 51) DIMMER is used to adjust the display brightness. On the European model, this is the RT/PTY/TP button, and it's for RDS (Radio Data System). See "Using RDS (European models only)" on page 50. N DIGITAL INPUT button (39, 70) This button is used to assign the digital inputs and to specify the format of digital input signals. O DISPLAY button (46) This button is used to display various information about the currently selected input source. P LISTENING MODE [ ] [ ] buttons (57) These buttons are used to select the listening modes. Q STEREO button (57) This button is used to select the Stereo listening mode. R TONE, [-] & [+] buttons (46) These buttons are used to adjust the bass and treble. S PHONES jack (47) This 1/4-inch phone jack is for connecting a standard pair of stereo headphones for private listening. T PURE AUDIO button and indicator (57) The North American models do not have this button and indicator. Selects the Pure Audio listening mode. The indicator lights up when this mode is selected. 8
-
 1
1 -
2
-
 3
3 -
 4
4 -
 5
5 -
 6
6 -
 7
7 -
 8
8 -
 9
9 -
 10
10 -
 11
11 -
 12
12 -
 13
13 -
14
-
15
-
16
-
17
-
18
-
19
-
20
-
21
-
22
-
23
-
24
-
25
-
26
-
27
-
28
-
29
-
30
-
31
-
32
-
33
-
34
-
35
-
36
-
37
-
38
-
39
-
40
-
41
-
42
-
43
-
44
-
45
-
46
-
47
-
48
-
49
-
50
-
51
-
52
-
53
-
54
-
55
-
56
-
57
-
58
-
59
-
60
-
61
-
62
-
63
-
64
-
65
-
66
-
67
-
68
-
69
-
70
-
71
-
72
-
73
-
74
-
75
-
76
-
77
-
78
-
79
-
80
 |
 |