Philips HDRW720 User manual - Page 21
Connecting with Video (CVBS) cable, Connection with the antenna cable only
 |
View all Philips HDRW720 manuals
Add to My Manuals
Save this manual to your list of manuals |
Page 21 highlights
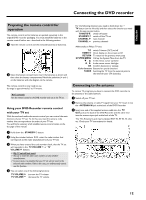
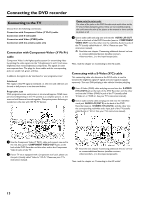
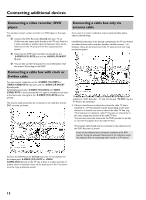
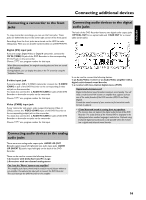
ENGLISH Connecting the DVD recorder Connecting with Video (CVBS) cable This cable, usually featuring yellow cinch plugs, is used for transmitting the Composite Video Baseband Signal (CVBS). In this method of transmission the color signal and the brightness signal are transmitted on the same cable. Under certain circumstances, this may lead to problems with the picture, such as 'Moiré' patterns. 1 Use a video (CVBS) cable and plug one end into the yellow jack VIDEO (CVBS)-OUT2 at the back of the DVD Recorder and the other end into the Video In jack (usually yellow) of the TV (usually called Video in or AV in. See your TV's instruction manual). 2 Use an audio (cinch) cable and plug one end into the red/white cinch jack AUDIO L/R (OUT 2) at the back of the DVD Recorder (under to VIDEO (CVBS)-EXT2 ) and the other into the corresponding red/white audio input jack of the TV (usually called Audio in', 'AV in'. See your TV's instruction manual). Connecting to the AC outlet Always check if the local mains voltage matches the voltage range printed on the type plate at the back or bottom of the DVD-recorder. If not consult your dealer or the customer support from your country. 1 Switch on the TV set. 2 Connect the mains jack 4MAINS at the back of the DVD Recorder with the power supply using the supplied power cable. P The most important features of the DVD recorder will appear in scrolling text on the display. After the first installation is completed this function will be switched off. Then, read the paragraph on 'Initial installation' in 'Installing your DVD recorder'. O Read the next chapter 'Connecting additional devices' on how to connect additional devices (satellite receivers, videorecorders,...) to the input-/output jacks. Then, read the chapter on 'Connecting to the AC-outlet'. Connection with the antenna cable only If your TV has only a single antenna input jack and does not have any audio/video jacks you can use the connected antenna cable. Please observe that you must adjust the TV to the DVD-Recorder (channel 3 or 4). 14
-
 1
1 -
2
-
3
-
4
-
5
-
6
-
7
-
8
-
9
-
10
-
11
-
12
-
13
-
14
-
15
-
 16
16 -
 17
17 -
 18
18 -
 19
19 -
 20
20 -
 21
21 -
 22
22 -
 23
23 -
 24
24 -
 25
25 -
 26
26 -
27
-
28
-
29
-
30
-
31
-
32
-
33
-
34
-
35
-
36
-
37
-
38
-
39
-
40
-
41
-
42
-
43
-
44
-
45
-
46
-
47
-
48
-
49
-
50
-
51
-
52
-
53
-
54
-
55
-
56
-
57
-
58
-
59
-
60
-
61
-
62
-
63
-
64
-
65
-
66
-
67
-
68
-
69
-
70
-
71
-
72
-
73
-
74
-
75
-
76
-
77
-
78
-
79
-
80
-
81
-
82
-
83
-
84
-
85
-
86
-
87
-
88
-
89
-
90
 |
 |
