Philips HDRW720 User manual - Page 30
Setting the time and date, Set up, System, Installation, Time/Date, Not allowed, Manual, AM/PM, Month - 02
 |
View all Philips HDRW720 manuals
Add to My Manuals
Save this manual to your list of manuals |
Page 30 highlights
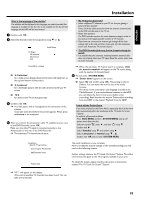
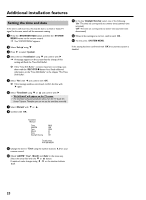
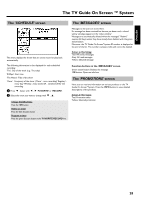
Additional installation features Setting the time and date If the time is still incorrect, this may be due to a weak or faulty TV signal. In this case, switch off the automatic setting. 1 Press the BROWSER HDD button and then the SYSTEM MENU button on the remote control. P The 'SYSTEM MENU' appears. A In the line 'Daylight Saving', select one of the following: 'On': The time set corresponds to summer time (summer time activated) 'Off': The time set corresponds to winter time (summer time deactivated) B When all the settings are correct, confirm with OK . C To end, press SYSTEM MENU . 2 Select 'Set up' using B . 3 Press C to select 'System'. 4 Select the line 'Installation' using B and confirm with C . P A message appears on the screen that the change of this setting will flush the 'Time Shift Buffer'. O If the 'Time Shift Buffer ' contains important recordings, save them with the REC/OTR n button first. Read additional information to the 'Time Shift Buffer' in the chapter 'The Time Shift Buffer'. If the setting has been confirmed with OK the automatic system is disabled 5 Select 'Yes' with D and confirm with OK . O If the message window was closed, confirm the line with C again. 6 Select 'Time/Date' using B or A and confirm with C . a 'Not allowed' will appear on the TV screen b The time/date will automatically be taken from the TV Guide On Screen™System. Therefore you can not set the time/date manually. 7 Select 'Manual' with B or A . 8 Confirm with OK . Time/Date Manual Time AM/PM Year Month Date Daylight Saving 09:02 AM 2004 01 01 Off To exit press SYSTEM MENU 9 Change the time in 'Time' using the number buttons 0..9 on your remote control. 0 Check 'AM/PM', 'Year', 'Month' and 'Date' in the same way. Select the entry field with the B or A button. If required, make changes using D , C or the number buttons 0..9 . 23
-
 1
1 -
2
-
3
-
4
-
5
-
6
-
7
-
8
-
9
-
10
-
11
-
12
-
13
-
14
-
15
-
16
-
17
-
18
-
19
-
20
-
21
-
22
-
23
-
24
-
 25
25 -
 26
26 -
 27
27 -
 28
28 -
 29
29 -
 30
30 -
 31
31 -
 32
32 -
 33
33 -
 34
34 -
 35
35 -
36
-
37
-
38
-
39
-
40
-
41
-
42
-
43
-
44
-
45
-
46
-
47
-
48
-
49
-
50
-
51
-
52
-
53
-
54
-
55
-
56
-
57
-
58
-
59
-
60
-
61
-
62
-
63
-
64
-
65
-
66
-
67
-
68
-
69
-
70
-
71
-
72
-
73
-
74
-
75
-
76
-
77
-
78
-
79
-
80
-
81
-
82
-
83
-
84
-
85
-
86
-
87
-
88
-
89
-
90
 |
 |
