Philips HDRW720 User manual - Page 25
ENGLISH, 3 letterbox, 3 panscan, ch. search complete, Dealer demo, Standby, Low power, Normal
 |
View all Philips HDRW720 manuals
Add to My Manuals
Save this manual to your list of manuals |
Page 25 highlights
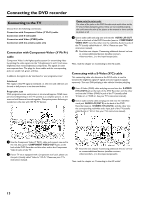
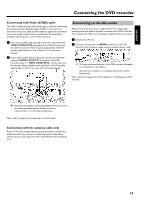
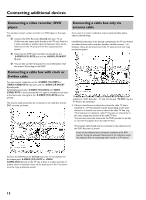
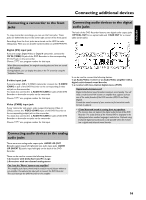
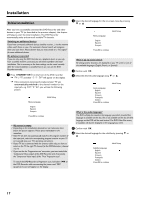
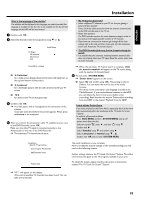
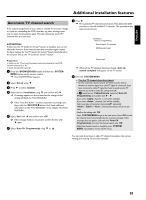
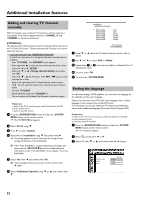
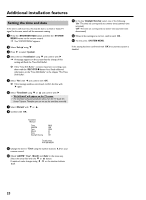
ENGLISH Installation What is the language of the subtitles? The subtitles will be displayed in the language you select, provided this language is available on the disc. If it is not available on the disc the fist language on the DVD will be used instead. 7 Confirm with OK . 8 Select the desired screen format position using B or A . TV Shape 4:3 letterbox 4:3 panscan 16:9 Initial Setup a No TV-Stations found yet? b Select a different TV channel on your TV set. Are you getting a picture for this channel? If not, check the cable connection from the antenna (antenna jack) to the DVD recorder and to the TV set. b Please have patience. The DVD recorder searches the entire frequency range in order to find and save the largest possible number of TV channels. b If you have not connected an antenna, go through all the basic settings right to the end and then, if you wish, start the automatic search (see 'Automatic TV channel search'). a The DVD Recorder finds very few/no channels during the search. b It is possible that the automatic switching between antenna/cable does not properly detect your TV signal. Read the section about how to switch manually. Press OK to continue O '4:3 letterbox' for a wide-screen display (theatrical format) with black bars at the top and bottom of the picture. O '4:3 panscan' for a full-height picture with the sides trimmed to fill you TV screen. O '16:9' for wide-screen TV (16:9) aspect ratio 9 Confirm with OK . P A screen appers with a message about the connection of the antenna. It can take some time before this screen appears. Please press no button in the meantime. 0 After you connect the antenna (or cable TV, satellite receiver, etc.) to the DVD Recorder, press OK . Make sure the cable TV signal is connected securely to the Antenna jack on the rear of the DVD Recorder. P The automatic TV channel search starts. P When the automatic TV channel search is complete, 'Auto ch. search complete' will appear on the TV screen along with the number of channels found. A To end, press SYSTEM MENU . P 'Dealer demo' appears on the screen. O Select 'No' and confirm using OK . This setting is only for Dealers. You can watch the movie's also in the media browser. The demo movie is stored for each language as a title in the 'Media Browser'. If you need additional capacity on the HDD you can delete the demo movie as you delete a titel (recording). Read therefor the section 'Delete titles/recordings from the HDD' in the chapter 'Playback from the HDD'. Switch off the Dealer Demo If you have switched on the Demo Movie, repeat play back of the movie starts automatically after the installation of the TV Guide On Screen ™System. To switch it off proceed as follows: - Press DISC MENU and then SYSTEM MENU (call up the system menu from the disc). A w - Select the symbol ' ' using D , and then ' ' using B . - Confirm with C . - Select 'Standby' using B and confirm using C . - Select 'Low power' or 'Normal' using B , A . - Confirm with OK and end with SYSTEM MENU . Installation Auto Ch. Programming Searching for TV channels 000 Channels found Please wait The initial installation is now complete. How to modify the channel settings or the time/date settings you will read on the following chapter. Further settings relate to the TV Guide On Screen™System. This offers a free interactive guide to the TV programs available in your area. To install this system, please read the instructions in the section entitled 'The TV Guide On Screen™System'. P 'WAIT' will appear on the display. Wait until all available TV channels have been found. This can take several minutes. 18
-
 1
1 -
2
-
3
-
4
-
5
-
6
-
7
-
8
-
9
-
10
-
11
-
12
-
13
-
14
-
15
-
16
-
17
-
18
-
19
-
 20
20 -
 21
21 -
 22
22 -
 23
23 -
 24
24 -
 25
25 -
 26
26 -
 27
27 -
 28
28 -
 29
29 -
 30
30 -
31
-
32
-
33
-
34
-
35
-
36
-
37
-
38
-
39
-
40
-
41
-
42
-
43
-
44
-
45
-
46
-
47
-
48
-
49
-
50
-
51
-
52
-
53
-
54
-
55
-
56
-
57
-
58
-
59
-
60
-
61
-
62
-
63
-
64
-
65
-
66
-
67
-
68
-
69
-
70
-
71
-
72
-
73
-
74
-
75
-
76
-
77
-
78
-
79
-
80
-
81
-
82
-
83
-
84
-
85
-
86
-
87
-
88
-
89
-
90
 |
 |
