Philips HDRW720 User manual - Page 42
General, Programming recordings with the 'TV Guide On Screen system'
 |
View all Philips HDRW720 manuals
Add to My Manuals
Save this manual to your list of manuals |
Page 42 highlights
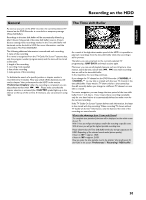
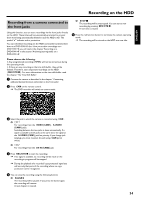
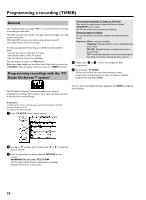
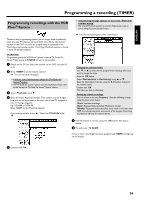
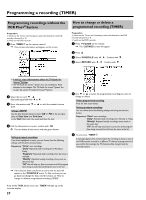
Programming a recording (TIMER) General Use 'Programming a recording (TIMER)', to automatically start and stop a recording at a later date. The DVD recorder will switch to the right channel and begin recording at the correct time. With this DVD recorder, you can pre-programme at least 15 recordings within a period of one year. To make a programmed recording, your DVD recorder needs to know: * the date you want to make the recording * the channel number of the TV channel * the start and stop time of the recording This information is saved in a 'TIMER block'. Before you begin, make sure the clock is set. If the clock is not set, the 'Time/Date' menu will appear when you press the TIMER s button. Programming recordings with the 'TV Guide On Screen™ system' You can also programme TV shows as 'Favorites' Press instead the green function button the blue one (labeled 'FAVORITE' on the screen). The TV show will be stored in memory for favorites. Setting up repeat recordings You can choose from the following settings with the green function button: Frequency :'Once': one-time recordings 'Regulary': Repeated when the show is available.At least twice a week 'Weekly': Repeated weekly recordings (every week on the same day). 'Off': this will stop any future occurrences of the program from being recorded but will keep the show in the list. 4 Repeat steps 2 to 3 , until all recordings have been programmed. 5 To end, press TV GUIDE . To find out how you can check which shows you have programmed, read the section on 'How to change or delete a programmed recording (TIMER)'. The TV Guide On Screen™system has made it even easier to programme recordings. All you have to do is select the show you want to record from a channel listing. If one or more recordings have been programmed 'TIMER' will light up on the display. Preparation: •) Switch on the TV set, and if necessary, select the channel for the DVD recorder (channel 3 or 4). •) Switch on the DVD recorder. 1 Press TV GUIDE on the remote control. 2 Use A or B to select the TV station, and D or C to select the show to record. 3 Press the green function button (labeled 'RECORD' on the screen). WARNING! Do not press REC/OTR n ! The TV -show will be stored in memory for recordings. Read the information on the screen. 35
-
 1
1 -
2
-
3
-
4
-
5
-
6
-
7
-
8
-
9
-
10
-
11
-
12
-
13
-
14
-
15
-
16
-
17
-
18
-
19
-
20
-
21
-
22
-
23
-
24
-
25
-
26
-
27
-
28
-
29
-
30
-
31
-
32
-
33
-
34
-
35
-
36
-
 37
37 -
 38
38 -
 39
39 -
 40
40 -
 41
41 -
 42
42 -
 43
43 -
 44
44 -
 45
45 -
 46
46 -
 47
47 -
48
-
49
-
50
-
51
-
52
-
53
-
54
-
55
-
56
-
57
-
58
-
59
-
60
-
61
-
62
-
63
-
64
-
65
-
66
-
67
-
68
-
69
-
70
-
71
-
72
-
73
-
74
-
75
-
76
-
77
-
78
-
79
-
80
-
81
-
82
-
83
-
84
-
85
-
86
-
87
-
88
-
89
-
90
 |
 |
