Pioneer 79AVi Owner's Manual - Page 21
Connecting up, About i.LINK - dv
 |
UPC - 012562768335
View all Pioneer 79AVi manuals
Add to My Manuals
Save this manual to your list of manuals |
Page 21 highlights
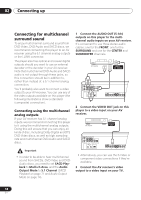
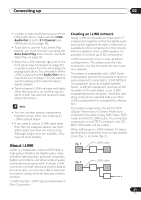
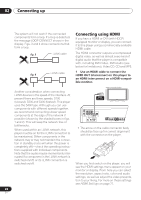
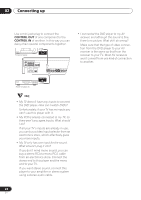
Connecting up 02 • In order to hear multichannel sound from DVD-Audio discs, make sure that DVDAudio Out is set to 5.1 Channel (see DVD-Audio Out on page 78). • To be able to use the Auto Select Play feature, you must first set it up using the Auto Select Play menu screen. See Auto Select Play on page 78. • When the i.LINK indicator ( ) is lit on the front panel (see Front panel on page 25), no audio is output from the other digital or analog audio jacks. You can switch off the i.LINK output using the Audio Out menu (see Audio Out on page 77) if you need to use the analog and/or optical/coaxial digital outputs. • The front panel i.LINK indicator only lights when the receiver is on and the input is set to i.LINK. See also the receiver's operating instructions. • You can connect several components together using i.LINK. See Creating an i.LINK network below. • If you need to use an i.LINK cable other than the one supplied, please use 4-pin, S400 cables less than 3.5 meters long. Although longer ones are available, they may not work reliably. Creating an i.LINK network Using i.LINK it is possible to chain up to 17 components together so that the digital audio and control signals from each component is available to other components in the network. With the addition of an i.LINK repeater, it's possible to connect up to 63 components. i.LINK connectors come in 4-pin and 6-pin configurations. This player uses the 4-pin connection, but the two types can be mixed on a network. This player is compatible with i.LINK Audio components, such as AV receivers. It may not work properly if connected to i.LINK MPEG-II TS equipment (such as a digital satellite tuner), i.LINK DV equipment (such as a DVD recorder or DV camcorder), or an i.LINKequipped personal computer. Check the operating instructions supplied with your other i.LINK components for compatibility information. Connected components should be DTCP (Digital Transmission Content Protection) compliant to be able to play DVD-Video, DVDAudio and SACD i.LINK audio. If a connected component is not DTCP compliant, only CD, MP3, VCD audio will be output. When setting up an i.LINK network, it's important that the components form an open ended chain (fig. 1), or a tree (fig. 2). About i.LINK fig. 1 i.LINK is a trademark name for IEEE1394, a high-speed interface for digital audio, video and other data found on personal computers, digital camcorders, and other kinds of audio and audio/visual equipment. A single i.LINK connector can both send and receive data at the same time, so only one cable is required to connect components for two-way communication. fig. 2 "i.LINK" and the "i.LINK" logo are trademarks of Sony Corporation. i.LINK cable i.LINK cable 21 En
-
 1
1 -
2
-
3
-
4
-
5
-
6
-
7
-
8
-
9
-
10
-
11
-
12
-
13
-
14
-
15
-
 16
16 -
 17
17 -
 18
18 -
 19
19 -
 20
20 -
 21
21 -
 22
22 -
 23
23 -
 24
24 -
 25
25 -
 26
26 -
27
-
28
-
29
-
30
-
31
-
32
-
33
-
34
-
35
-
36
-
37
-
38
-
39
-
40
-
41
-
42
-
43
-
44
-
45
-
46
-
47
-
48
-
49
-
50
-
51
-
52
-
53
-
54
-
55
-
56
-
57
-
58
-
59
-
60
-
61
-
62
-
63
-
64
-
65
-
66
-
67
-
68
-
69
-
70
-
71
-
72
-
73
-
74
-
75
-
76
-
77
-
78
-
79
-
80
-
81
-
82
-
83
-
84
-
85
-
86
-
87
-
88
-
89
-
90
-
91
-
92
-
93
-
94
-
95
-
96
-
97
-
98
-
99
 |
 |