Pioneer 79AVi Owner's Manual - Page 77
Initial Settings menu, i.LINK Setup - vsx
 |
UPC - 012562768335
View all Pioneer 79AVi manuals
Add to My Manuals
Save this manual to your list of manuals |
Page 77 highlights
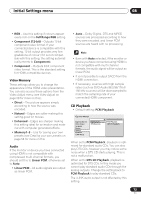
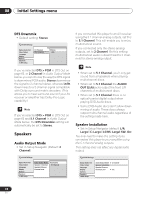
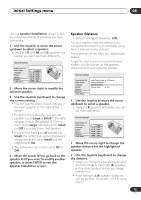
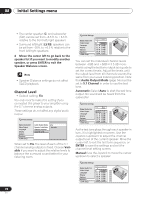
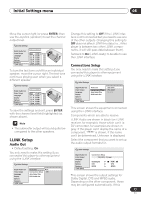
Initial Settings menu 08 Move the cursor right (or press ENTER) then use the Joystick (up/down) to set the channel output level. Initial Settings Digital Audio Out Video Output Language Display Options Speakers i.LINK Setup Auto L 0.0dB C 0.0dB R 0.0dB RS 0.0dB LS 0.0dB SW 0.0dB To turn the test tone on/off for an individual speaker, move the cursor right. The test tone continues playing even when you select a different speaker. Initial Settings Digital Audio Out Video Output Language Display Options Speakers i.LINK Setup Auto L 0.0dB C 0.0dB R 0.0dB RS 0.0dB LS 0.0dB SW 0.0dB To save the settings and exit, press ENTER with the channel level field highlighted (as shown above). • The subwoofer output will sound quite low compared to the other speakers. i.LINK Setup Audio Out • Default setting: On You only need to make this setting if you connected this player to other equipment using the i.LINK interface. Initial Settings Digital Audio Out Video Output Language Display Options Speakers i.LINK Setup Audio Out On Connections Setup Off Auto Select Play DVD-Audio Out Change this setting to Off if the i.LINK interface is still connected but you need to use one of the other outputs. Changing this setting to Off does not affect i.LINK thru data (i.e., if this player is between two other i.LINK components, it will still pass data between them). Set back to On (i.LINK-ready) to be able to use the i.LINK interface. Connections Setup You only need to make this setting if you connected this player to other equipment using the i.LINK interface. Initial Settings Digital Audio Out Video Output Language Display Options Speakers i.LINK Setup Audio Out Connections Setup Auto Select Play DVD-Audio Out VSX-49TXi VSX-AX10i DV-47Ai This screen shows the equipment connected using the i.LINK interface. Components which are able to receive i.LINK Audio are shown in black (an i.LINK receiver, for example); those which can't (a DV camcorder, for example) are shown in gray. If the player can't display the name of a component, '****' is shown; if the name can't be determined, Unknown is displayed. Select the component that you want to set up the audio output formats for. Initial Settings Digital Audio Out Video Output Language Display Options Speakers i.LINK Setup Connections Setup VSX-49TXi : Pioneer DolbyDigital DTS MPEG PCM DTS MPEG This screen shows the output settings for Dolby Digital, DTS and MPEG audio. Depending on the other component, these may be configured automatically. If this 77 En
-
 1
1 -
2
-
3
-
4
-
5
-
6
-
7
-
8
-
9
-
10
-
11
-
12
-
13
-
14
-
15
-
16
-
17
-
18
-
19
-
20
-
21
-
22
-
23
-
24
-
25
-
26
-
27
-
28
-
29
-
30
-
31
-
32
-
33
-
34
-
35
-
36
-
37
-
38
-
39
-
40
-
41
-
42
-
43
-
44
-
45
-
46
-
47
-
48
-
49
-
50
-
51
-
52
-
53
-
54
-
55
-
56
-
57
-
58
-
59
-
60
-
61
-
62
-
63
-
64
-
65
-
66
-
67
-
68
-
69
-
70
-
71
-
 72
72 -
 73
73 -
 74
74 -
 75
75 -
 76
76 -
 77
77 -
 78
78 -
 79
79 -
 80
80 -
 81
81 -
 82
82 -
83
-
84
-
85
-
86
-
87
-
88
-
89
-
90
-
91
-
92
-
93
-
94
-
95
-
96
-
97
-
98
-
99
 |
 |
