Pioneer 79AVi Owner's Manual - Page 22
Connecting up, Connecting using HDMI
 |
UPC - 012562768335
View all Pioneer 79AVi manuals
Add to My Manuals
Save this manual to your list of manuals |
Page 22 highlights
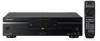
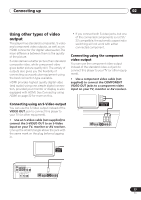
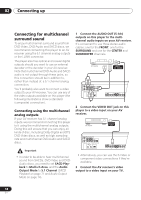
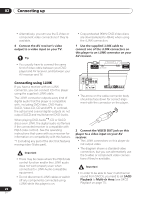
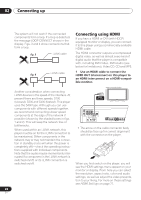
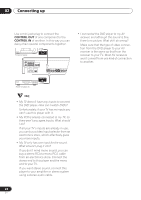
02 Connecting up The system will not work if the connected components form a loop. If a loop is detected, the message LOOP CONNECT shows in the display. Figs. 3 and 4 show connections that form a loop. fig. 3 i.LINK cable fig. 4 i.LINK cable Connecting using HDMI If you have a HDMI or DVI (with HDCP) equipped monitor or display, you can connect it to this player using a commercially available HDMI cable. The HDMI connector outputs uncompressed digital video, as well as almost every kind of digital audio that the player is compatible with, including DVD-Video, DVD-Audio (see below for limitations), Video CD, CD and MP3. 1 Use an HDMI cable to connect the HDMI OUT interconnect on this player to an HDMI interconnect on a HDMI-compatible monitor. Another consideration when connecting i.LINK devices is the speed of the interface. At present there are three speeds; S100 (slowest), S200 and S400 (fastest). This player uses the S400 type. Although you can use components with different speeds together, we recommend connecting slower speed components at the edge of the network if possible (shown by the shaded boxes in figs. 1 and 2). This will keep the network free of bottlenecks. When used within an i.LINK network, this player must be on for the i.LINK connection to be maintained. Other components in the network may or may not maintain the connection in standby (none will when the power is completely off)-check the operating instructions supplied with individual components. Note that the audio may be momentarily interrupted if a component in the i.LINK network is switched on/off, or its i.LINK connection is switched on/off. HDMI-compatible display HDMI connector FRONT SURROUND CENTER L L R AUDIO OUT (2ch) R SUB WOOFER AUDIO OUT (5.1ch) COAXIAL OPTICAL DIGITAL AUDIO OUT (AUDIO) HDMI OUT S400 IN OUT 1 2 CONTROL VIDEO OUT 1 2 Y PB PR S-VIDEO OUT COMPONENT VIDEO OUT • The arrow on the cable connector body should be face up for correct alignment with the connector on the player. When you first switch on the player, you will see the HDMI settings menu appear on your monitor or display. From here you can select the resolution, aspect ratio, color and audio settings, as well as adjust the video presentation to your liking. For more on these settings see HDMI Settings on page 71. 22 En
-
 1
1 -
2
-
3
-
4
-
5
-
6
-
7
-
8
-
9
-
10
-
11
-
12
-
13
-
14
-
15
-
16
-
 17
17 -
 18
18 -
 19
19 -
 20
20 -
 21
21 -
 22
22 -
 23
23 -
 24
24 -
 25
25 -
 26
26 -
 27
27 -
28
-
29
-
30
-
31
-
32
-
33
-
34
-
35
-
36
-
37
-
38
-
39
-
40
-
41
-
42
-
43
-
44
-
45
-
46
-
47
-
48
-
49
-
50
-
51
-
52
-
53
-
54
-
55
-
56
-
57
-
58
-
59
-
60
-
61
-
62
-
63
-
64
-
65
-
66
-
67
-
68
-
69
-
70
-
71
-
72
-
73
-
74
-
75
-
76
-
77
-
78
-
79
-
80
-
81
-
82
-
83
-
84
-
85
-
86
-
87
-
88
-
89
-
90
-
91
-
92
-
93
-
94
-
95
-
96
-
97
-
98
-
99
 |
 |