Pioneer 79AVi Owner's Manual - Page 72
x 480 P, x 576 P, x 480 I, x 576 I, x 720 P, x 1080 I, ENTER, 3 Letter Box, 3 Pan&Scan, 9 Wide,
 |
UPC - 012562768335
View all Pioneer 79AVi manuals
Add to My Manuals
Save this manual to your list of manuals |
Page 72 highlights
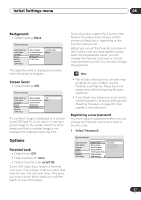
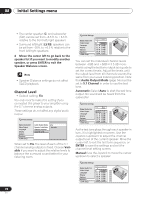
08 Initial Settings menu Resolution Since HDMI has the capacity to support many different high-definition video formats, you may want to change the resolution depending on the monitor you're using. The options that appear will depend on the video format of the current disc (NTSC or PAL). • VGA - 640x480 pixel progressive-scan video (NTSC only) • 720 x 480 P (NTSC)/ 720 x 576 P (PAL) - 720x480/576 pixel progressive-scan video • 720 x 480 I (NTSC)/ 720 x 576 I (PAL) - 720x480/576 pixel interlace video • 1280 x 720 P - 1280x720 pixel progressive-scan video • 1920 x 1080 I - 1920x1080 pixel interlace video • When the resolution is changed, a confirmation message appears on the screen. Press ENTER to confirm. Note that this may take some time. • If the screen goes blank after changing the resolution, it means the you selected a resolution incompatible with your monitor. Press and hold the (number) 0 button for 5 seconds to return to the auto resolution setting. Aspect Ratio Select an aspect ratio according to the kind of display you have, and how you want to see the image on-screen. Refer to the table below to match the HDMI resolution you chose in Resolution above to the disc type you're using and the setting on your monitor. See also Screen sizes and disc formats on page 81. • 4:3 (Letter Box) - Widescreen discs are shown with black bars top and bottom. • 4:3 (Pan&Scan) - Widescreen discs are shown with the left and right sides cropped. • 16:9 (Wide) - Use this setting if you have a widescreen monitor. • 16:9(Compressed) - Progressive-scan 4:3 material is shown with black bars on either side of the screen. Disc type HDMI resolution setting Compressed Aspect Monitor (HDMI ) setting 4:3 Aspect Monitor (HDMI ) setting 720 x 480 I/P (720 x 576 I/P) 1280 x 720 P 1920 x 1080 I 16:9 (Wide)/ 16:9 (Compressed) Full/ Squeeze Normal/ Passthru/ Dot-bydot/4:3 4:3/ 16:9 (Wide) 16:9 (Compressed) Normal/ Passthru/ Dot-bydot/4:3 • The monitor settings listed in the table may be different from your monitor's settings. Colour This setting determines the video output colour format. Depending on the connected equipment, some HDMI Colour settings may cause the picture to be displayed incorrectly. In this case, use the TV's own video input settings to select RGB, if possible. Alternatively, revert to the previous HDMI Colour setting. • Full Range RGB - Gives brighter colours and deeper black. Use if colours are weak. (This is the standard setting for HDMIcompatible DVI devices, but it is also effective with HDMI devices.) 72 En
-
 1
1 -
2
-
3
-
4
-
5
-
6
-
7
-
8
-
9
-
10
-
11
-
12
-
13
-
14
-
15
-
16
-
17
-
18
-
19
-
20
-
21
-
22
-
23
-
24
-
25
-
26
-
27
-
28
-
29
-
30
-
31
-
32
-
33
-
34
-
35
-
36
-
37
-
38
-
39
-
40
-
41
-
42
-
43
-
44
-
45
-
46
-
47
-
48
-
49
-
50
-
51
-
52
-
53
-
54
-
55
-
56
-
57
-
58
-
59
-
60
-
61
-
62
-
63
-
64
-
65
-
66
-
 67
67 -
 68
68 -
 69
69 -
 70
70 -
 71
71 -
 72
72 -
 73
73 -
 74
74 -
 75
75 -
 76
76 -
 77
77 -
78
-
79
-
80
-
81
-
82
-
83
-
84
-
85
-
86
-
87
-
88
-
89
-
90
-
91
-
92
-
93
-
94
-
95
-
96
-
97
-
98
-
99
 |
 |