Pioneer SVM 1000 SVM-1000 Operating Instructions
Pioneer SVM 1000 - Audio/Video Mixer Manual
 |
UPC - 012562870540
View all Pioneer SVM 1000 manuals
Add to My Manuals
Save this manual to your list of manuals |
Pioneer SVM 1000 manual content summary:
- Pioneer SVM 1000 | SVM-1000 Operating Instructions - Page 1
SOUND & VISION MIXER SVM-1000 Operating Instructions - Pioneer SVM 1000 | SVM-1000 Operating Instructions - Page 2
buying this Pioneer product. Please read through these operating instructions so you will know how to operate your model properly. After you have finished reading the instructions AC outlet in case of an accident. MIXER Model Number: SVM-1000 Responsible Party Name: PIONEER ELECTRONICS SERVICE - Pioneer SVM 1000 | SVM-1000 Operating Instructions - Page 3
service personnel VIDEO CONTROL FUNCTIONS 15 OPERATING THE VIDEO CROSS FADER 15 OPERATING THE VIDEO CHANNEL SWITCH 15 OPERATING IN THE VIDEO SOLO MODE 16 VIDEO AUDIO SIGNALS TO EXTERNAL SEQUENCER, OR USING SVM-1000 INFORMATION TO OPERATE AN EXTERNAL SEQUENCER 36 MIDI CODE LIST 37 PERFORM VIDEO - Pioneer SVM 1000 | SVM-1000 Operating Instructions - Page 4
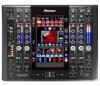
the unit is used inside a carrying case or DJ booth, separate it from the walls channel, a new, wider range of performances is possible with the sensation of using conventional DJ mixers. "AV Effects" support a wide variety of new performance styles by synchronizing music and video. Equipped with AV - Pioneer SVM 1000 | SVM-1000 Operating Instructions - Page 5
to choose whether the monitor video output shows master only, all channels, master and each channel, master mixing inversion, etc. 5 "FULLY ASSIGNABLE MIDI" allows control of DJ effecter, DJ/ VJ application programs, and other external components. Installing the SVM-1000 in an EIA rack The screw - Pioneer SVM 1000 | SVM-1000 Operating Instructions - Page 6
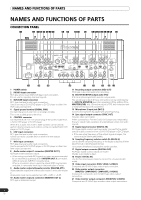
are supported.) 13 Microphone 2 input jack (MIC 2) Connect microphones equipped with phone-type plug. 14 Sync signal output connector (SYNC OUT) Outputs video sync signal. When connecting a Pioneer DJ/VJ DVD player (sold separately), the sync signal helps suppress any lag between video and audio - Pioneer SVM 1000 | SVM-1000 Operating Instructions - Page 7
PROFESSIONAL SOUND&VISION MIXER SVM-1000 A 16 VIDEO INPUT 17 VIDEO INPUT DVD VIDEO S-VIDEO DVD VIDEO S-VIDEO VIDEO EX VIDEO MASTER LEVEL 32 51 45 46 47 48 28 18 VIDEO TRIM 18 VIDEO TRIM 21 CH SELECT MIN MAX MIN MAX 22 AUDIO INPUT AUDIO the channel to which a DJ/VJ DVD player or DJ - Pioneer SVM 1000 | SVM-1000 Operating Instructions - Page 8
Use to adjust the level of the audio input signal for each channel. (Adjustable range: -∞ to +9 dB, mid-position is about 0 dB) 24 Channel equalizer high-range adjust dial (HI) Use to adjust the treble (high-range) frequency sound for each channel. Video parameters can also be assigned. See P. 34 - Pioneer SVM 1000 | SVM-1000 Operating Instructions - Page 9
channel balance for audio video solo mode ON/OFF. When the video solo mode is ON, the indicator will flash. 44 Fader AV synchro button (FADER AV SYNC) This button determines whether sound and video are controlled together, or independently. When set to ON, the indicator lights, and the channel - Pioneer SVM 1000 | SVM-1000 Operating Instructions - Page 10
MIDI OUT S-VIDEO DVD S-VIDEO DVD USB VIDEO VIDEO S-VIDEO S-VIDEO VIDEO VIDEO LR LR LR LR LR RL Cassette deck, etc. CD player, etc. Analog turntable DJ/VJ DVD player or DJ CD player Pioneer DJ/VJ DVD players or DJ CD players Audio cable connection A DJ/VJ DVD or DJ CD player - Pioneer SVM 1000 | SVM-1000 Operating Instructions - Page 11
AV VIDEO VIDEO S-VIDEO S-VIDEO VIDEO VIDEO Sampling frequency selector switch Power amplifier (XLR plug input connectors) Plasma display Display (for monitor) Power amplifier (for booth monitor) Audio master output This unit is furnished with balanced output MASTER OUT 1 (supporting - Pioneer SVM 1000 | SVM-1000 Operating Instructions - Page 12
HEAD PHONES MONO SPLIT STEREO MIXING CUE MASTER LEVEL 9 8 7 6 5 4 3 2 1 0 CROSS FADER ASSIGN 0 PHONES A THRU B PROFESSIONAL SO SVM- Microphone 1 USB CH 1 VIDEO EX CH 4 MIC MIC 1 MIC2 External video connector A camera, DVD player or other video output device can be connected to the CH 1/CH - Pioneer SVM 1000 | SVM-1000 Operating Instructions - Page 13
]. 3 Use the VIDEO INPUT switch for the selected channel to choose the video input. 4 Use the AUDIO TRIM dial to adjust the input level for each channel. 5 Use the VIDEO TRIM dial to adjust the input level for each channel. POWER VIDEO MASTER LEVEL VIDEO TRIM AUDIO MASTER LEVEL AUDIO TRIM HI, MID - Pioneer SVM 1000 | SVM-1000 Operating Instructions - Page 14
the MONO/STEREO switch is set to [MONO], the audio master output becomes a monaural combination of L+R channels. Microphone Input 1 To use a microphone, set the FADER CURVE switch to select the desired channel fader response curve. The sound volume and video level changes as follows: • At the left - Pioneer SVM 1000 | SVM-1000 Operating Instructions - Page 15
CONTROL FUNCTIONS Touch the LCD screen to control video functions. Supports video cross fader functions and video channel switch functions. VIDEO SOLO MODE HI FADER AV SYNC CROSS FADER ASSIGN 10 10 9 9 8 8 7 7 6 6 5 5 4 4 3 3 2 2 1 1 0 0 Cross fader lever (A/B) OPERATING - Pioneer SVM 1000 | SVM-1000 Operating Instructions - Page 16
changing the FADER AV SYNC from ON to OFF, the original channel fader position will be maintained until the channel monitor is touched again. Operation of the video cross fader and [TRANS] button are not supported in the video solo mode. VIDEO MIX EFFECTS CHART Video mix effects Video cross fader - Pioneer SVM 1000 | SVM-1000 Operating Instructions - Page 17
CH SELECT dial to select the channel to which you wish to apply the effect. 5 Effect mode select buttons A: Touch to apply the effect to audio only. AV: Touch to apply the effect to both audio and video. V: Touch to apply the effect to video only. 6 Video EFFECT monitor Monitors effect results - Pioneer SVM 1000 | SVM-1000 Operating Instructions - Page 18
cases, use TAP mode to manually enter the BPM. [Manually audio only. AV: The effect will be applied to both the audio and video. V: The effect will be applied to the video only. • When turning the power ON, [AV = 250 ms 2/1 = 1000 ms 7 Set the EFFECT ON to select the desired channel. • The image will - Pioneer SVM 1000 | SVM-1000 Operating Instructions - Page 19
the channel to which you wish to apply the effect. • The selected effect channel display will appear white. • If [MIC] is selected, the audio audio only. AV: The effect will be applied to both the audio and video. V: The effect will be applied to the video only. • When turning the power ON, [AV - Pioneer SVM 1000 | SVM-1000 Operating Instructions - Page 20
the effect to audio only. AV: Touch to apply the effect to both audio and video. V: Touch to apply the effect to video only. 5 Video EFFECT monitor 6 track, the BPM may not be accurately measured. In these cases, use TAP mode to manually input the BPM. 2 Touch the effect category button [TEXT]. - Pioneer SVM 1000 | SVM-1000 Operating Instructions - Page 21
automatically set. [Example] When BPM=120 1/1 = 500 ms 1/2 = 250 ms 2/1 = 1000 ms 8 Set the effect EFFECT ON/OFF button to ON to apply the effect. • Each • When effect is ON, the button is flashes. Text bank Rotate the VIDEO FX PATTERN/TEXT BANK dial to select a TEXT BANK. Parameter 1 Rotate the TIME - Pioneer SVM 1000 | SVM-1000 Operating Instructions - Page 22
the [EXIT] button to return to the TEXT effect screen. 2 Rotate the VIDEO FX PATTERN/TEXT BANK dial to select TEXT BANK and touch the [TEXT BANK] will be highlighted. • Touch the caps button to switch between upper case and lower case. 9 Touch the text input button to enter text. • The entered - Pioneer SVM 1000 | SVM-1000 Operating Instructions - Page 23
completely to the left. Sets the balance between the original video and the effect video. Sets the balance between the original sound and the effect sound. 6. FLANGER VIDEO AUDIO VIDEO AUDIO (*2) VIDEO AUDIO 7. PHASER 8. REVERB Video with an afterimage will Sets the degree of the afterimage - Pioneer SVM 1000 | SVM-1000 Operating Instructions - Page 24
THE EFFECT FUNCTION 9. ROBOT VIDEO AUDIO VIDEO (*6) AUDIO (*2) VIDEO (*6) AUDIO (*2) VIDEO AUDIO 10. CHORUS Description of on the video effects monitor. (*7) Effects will be disabled in all channels if copy-protected contents are input to any channel. In other words, in this case effects will - Pioneer SVM 1000 | SVM-1000 Operating Instructions - Page 25
image zoomed out from from the point touched. the point touched. AUDIO Outputs a sound with the cutoff frequency of the filter changed. filter. enhance the effect. Touch toward the left to reduce the effect. VIDEO Outputs a blurred image. PATTERN1 Outputs an image with blur toward the left - Pioneer SVM 1000 | SVM-1000 Operating Instructions - Page 26
Outputs audio as if the input Touch the screen toward the right to - - sound has been crushed. enhance the effect. Touch toward the left to reduce the effect. VIDEO Outputs an image with a radial concentric effect. PATTERN1 Outputs an image that appears The touched location will have the - Pioneer SVM 1000 | SVM-1000 Operating Instructions - Page 27
- - the pitch of the input sound. enhance the effect. Touch toward the left to reduce the effect. VIDEO Outputs image with a lens-like effect. PATTERN1 PATTERN2 PATTERN3 PATTERN4 AUDIO Outputs image with a lens-like effect. Outputs image with a lens-like effect. Outputs image with a lens-like - Pioneer SVM 1000 | SVM-1000 Operating Instructions - Page 28
is divided, and in proportion to the audio level, the image is stretched and compressed toward the left to reduce the effect. VIDEO Outputs image with a spotlight effect. PATTERN1 the touched location. which the spotlight location. is updated. PATTERN2 Outputs image with a spotlight Outputs an - Pioneer SVM 1000 | SVM-1000 Operating Instructions - Page 29
USING THE EFFECT FUNCTION AUDIO Flanger effect is applied. Move Touch more toward right side to - finger on touch panel to right- enhance effect. Touch more toward left to change effect volume. left side to decrease effect. VIDEO Outputs an image of a circle with color in motion. - Rotate the - Pioneer SVM 1000 | SVM-1000 Operating Instructions - Page 30
USING THE EFFECT FUNCTION TEXT effects 1. BLOCK VIDEO AUDIO 2. ROTATION VIDEO AUDIO VIDEO AUDIO VIDEO AUDIO VIDEO AUDIO 3. SLIDE Description of the effect Beat button parameters Parameter 1 (TIME/PARAMETER) Description Dramatically changes the sound tone by moving the frequency of the filter - Pioneer SVM 1000 | SVM-1000 Operating Instructions - Page 31
a USB memory device or SD card into this mixer. Using a USB memory device Insert a USB Pioneer will not be held responsible for any loss of data or direct/ indirect damages. 9 7 1 2 4 3 8 5 6 1 [MANUAL Sets the JPEG play mode to MANUAL channels. 6 Channel select buttons Sets the channel - Pioneer SVM 1000 | SVM-1000 Operating Instructions - Page 32
THE JPEG VIEWER Loading JPEG files to the SVM-1000 Use this function to load JPEG files into wide range of performance styles. Operating in MANUAL MODE Assign JPEG image in JPEG BOX as image for designated channel. 1 Touch the [MANUAL MODE] button to select MANUAL mode. 2 From the JPEG BOX, select - Pioneer SVM 1000 | SVM-1000 Operating Instructions - Page 33
JPEG BOX, a slide show can be created with transitions between images at chosen intervals. The channel fader for the assigned channel is used to perform the transitions. 1 Touch the [FADER MODE] button to select FADER automatically resized to 640 x 480 pixels when downloaded to the SVM-1000. 33 En - Pioneer SVM 1000 | SVM-1000 Operating Instructions - Page 34
THE VIDEO EQUALIZER FUNCTION THE VIDEO EQUALIZER FUNCTION Rotating the channel equalizer dial normally applies equalizer effects on audio only. However, by using the VIDEO EQ function, effects can be applied to video as well. VIDEO EQ HI 10 10 9 9 8 8 7 7 6 6 5 5 4 4 3 3 2 2 1 - Pioneer SVM 1000 | SVM-1000 Operating Instructions - Page 35
FADER START FUNCTION FADER START FUNCTION By connecting the optional Pioneer DJ/VJ DVD Player or DJ CD Player control cable, the channel fader and cross fader can be used to start DVD/CD playback. When the mixer's channel fader lever or cross fader lever are moved, the DVD/CD player is released - Pioneer SVM 1000 | SVM-1000 Operating Instructions - Page 36
other than MIDI CHANNEL and KEYBOARD LANGUAGE AUDIO SIGNALS TO EXTERNAL SEQUENCER, OR USING SVM-1000 SVM-1000 to your computer using the USB cable. • Perform the MIDI settings for the application program. For further information, refer to the instruction manual for application program. • Supported - Pioneer SVM 1000 | SVM-1000 Operating Instructions - Page 37
CH1 CH2 CH3 CH4 CROSS FADER FADER CURVE MASTER Switch Name VIDEO TRIM AUDIO TRIM HI MID LOW CUE FADER CF ASSIGN VIDEO TRIM AUDIO TRIM HI MID LOW CUE FADER CF ASSIGN VIDEO TRIM AUDIO TRIM HI MID LOW CUE FADER CF ASSIGN VIDEO TRIM AUDIO TRIM HI MID LOW CUE FADER CF ASSIGN CROSS FADER CH - Pioneer SVM 1000 | SVM-1000 Operating Instructions - Page 38
127 OFF=0, ON=127 OFF=0, ON=127 OFF=0, ON=127 For CHANNEL SELECT and VIDEO FX PATTERN, the logical sum of both values is sent. PARAMETER Category Switch Name Switch Type UTILITY BTN VIDEO EQ BTN JPEG VIEWER BTN VIDEO SOLO BTN MODE FADER AV SYNC BTN MIDI Message MSB LSB ------ - Pioneer SVM 1000 | SVM-1000 Operating Instructions - Page 39
MSB LSB Commnets EFFECT CATEGORY BEAT EFFECT BTN TOUCH EFFECT BTN TEXT EFFECT BTN A BTN Changing the category inevitably causes an effect program change. AV BTN --- V BTN --- DELAY BTN 9n 41 dd OFF=0, ON=127 ECHO BTN 9n 42 dd OFF=0, ON=127 PAN BTN 9n 43 dd OFF - Pioneer SVM 1000 | SVM-1000 Operating Instructions - Page 40
PERFORM UTILITY SETUP Category TEXT EFFECT CROSS FADER Switch Name RANDOM ZOOM BLOCK ROTATION CRUSH SLIDE BANK1 BANK2 BANK3 BANK4 BANK5 BANK6 TEXT EDIT Beat BUTTON 1 Beat BUTTON 2 Beat BUTTON 3 Beat BUTTON 4 Beat BUTTON 5 Beat BUTTON 6 Beat BUTTON 7 BPM AUTO/TAP CH1 MONITOR CH2 MONITOR CH3 MONITOR - Pioneer SVM 1000 | SVM-1000 Operating Instructions - Page 41
each applicable button. Touch each applicable button on the screen to operate the video monitor setup. 4 Touch [EXIT]. This will end the utility setup mode end the utility setup mode. MASTER MIRROR OF MASTER MASTER & CHANNEL CHANNEL The master output is sent directly to the monitor output. The - Pioneer SVM 1000 | SVM-1000 Operating Instructions - Page 42
the logo mark [PIONEER PRO DJ] is displayed. • The hardware setup screen will be displayed. MIC SETTING 1 Touch [MIC] The MIC setting screen will be displayed. 2 Choose settings by touching [] or []. VIDEO SYSTEM Selects the video not to output the audio BOOTH MONITOR from the - Pioneer SVM 1000 | SVM-1000 Operating Instructions - Page 43
. Adjusts the contrast of the master output monitor. Adjusts the color tone of the master output monitor. • Cannot be adjusted when the PAL video system is used. • Component outputs cannot be adjusted. Adjusts the saturation of the master output monitor. Adjusts the sharpness of the master output - Pioneer SVM 1000 | SVM-1000 Operating Instructions - Page 44
HARDWARE SETUP TOUCH PANEL SETTINGS 1 Touch [TOUCH PANEL]. The touch panel setting screen will be displayed. 2 Touch either [TOP PANEL] or [BOTTOM PANEL] to select settings. 4 Touch all [+] marks and make sure the color of the [+] marks are inverted. TOP PANEL BOTTOM PANEL Calibrates the TOP - Pioneer SVM 1000 | SVM-1000 Operating Instructions - Page 45
another component. Thus, also check the other electrical appliances also in use. If the trouble cannot be rectified even after checking the following items, contact your dealer or nearest PIONEER service center. Symptom Possible Cause Remedy No power. • The power cord has not been connected - Pioneer SVM 1000 | SVM-1000 Operating Instructions - Page 46
TROUBLESHOOTING Symptom Possible Cause Remedy No video image, or image is disrupted. • VIDEO INPUT switch is set incorrectly. • Connection cables are not connected properly, or are disconnected. • to see displayed images. In this event, consult your dealer or service center for repairs. 46 En - Pioneer SVM 1000 | SVM-1000 Operating Instructions - Page 47
x 16.56 in (D) 2 Audio section Sampling rate 96 kHz A/D, (DVD/LINE 89 dB Channel equalizer response HI 26 dB Video output, S-connector 1 OTHER MIDI OUT connector 5P-DIN 1 USB 1 CONTROL connector Mini phone jacks (Ø 3.5 mm 4 5 Accessories Power cord 1 Warranty card 1 Operating Instructions - Pioneer SVM 1000 | SVM-1000 Operating Instructions - Page 48
, or if you wish to purchase replacement parts, operating instructions, service manuals, or accessories, please call the number shown below. 800 - 782 - 7210 Please do not ship your product to Pioneer without first calling the Customer Support Division at the above listed number for assistance
-
 1
1 -
 2
2 -
 3
3 -
 4
4 -
 5
5 -
 6
6 -
 7
7 -
8
-
9
-
10
-
11
-
12
-
13
-
14
-
15
-
16
-
17
-
18
-
19
-
20
-
21
-
22
-
23
-
24
-
25
-
26
-
27
-
28
-
29
-
30
-
31
-
32
-
33
-
34
-
35
-
36
-
37
-
38
-
39
-
40
-
41
-
42
-
43
-
44
-
45
-
46
-
47
-
48
 |
 |
Operating Instructions
SOUND & VISION MIXER
SVM-1000