Pioneer SVM 1000 SVM-1000 Operating Instructions - Page 45
Troubleshooting - service manual
 |
UPC - 012562870540
View all Pioneer SVM 1000 manuals
Add to My Manuals
Save this manual to your list of manuals |
Page 45 highlights
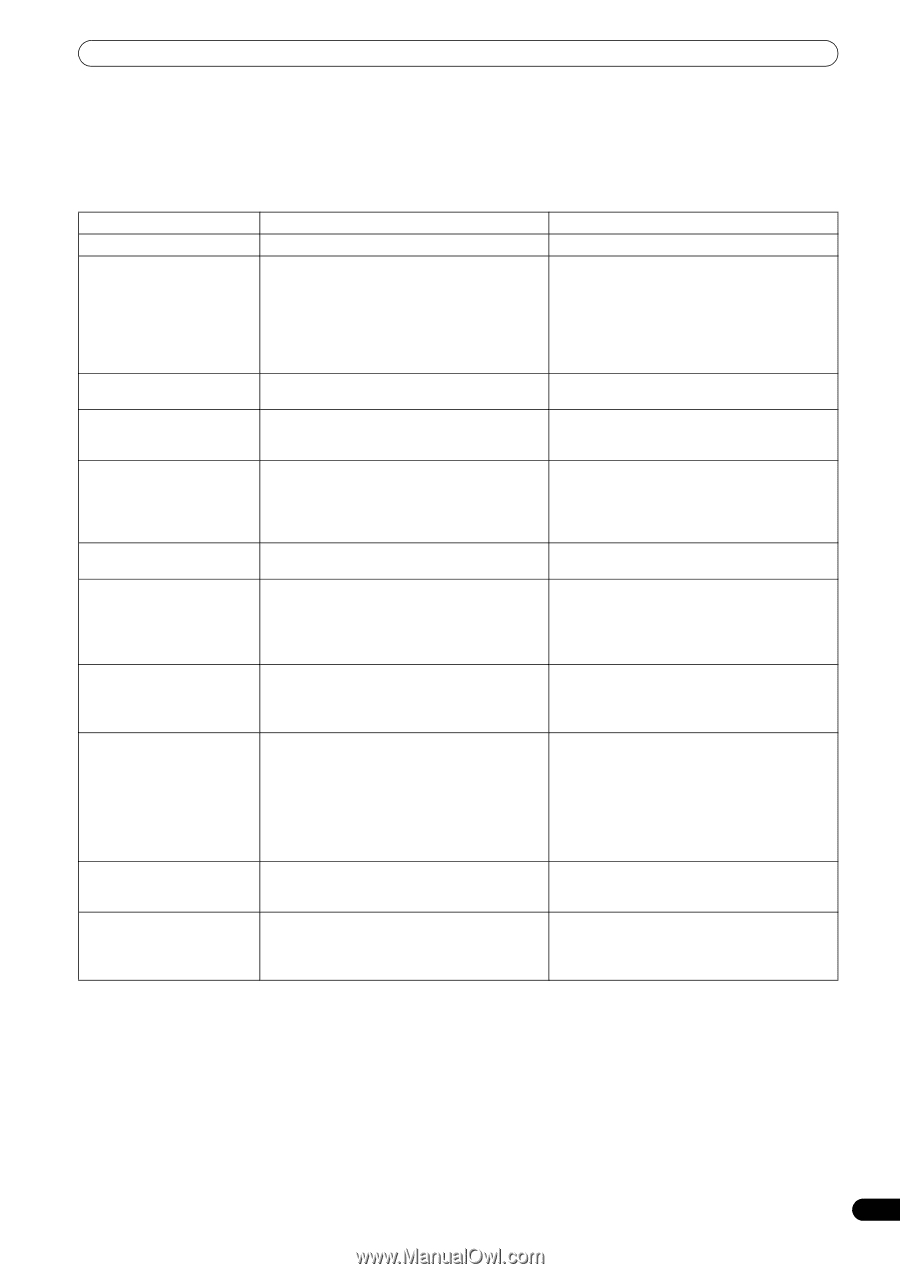
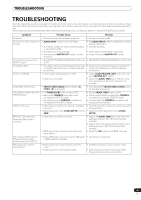
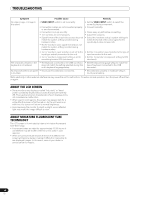
TROUBLESHOOTING TROUBLESHOOTING Incorrect operations are often mistaken for trouble and malfunctions. If you think there is something wrong with this component, check the points below. Sometimes the trouble may originate from another component. Thus, also check the other electrical appliances also in use. If the trouble cannot be rectified even after checking the following items, contact your dealer or nearest PIONEER service center. Symptom Possible Cause Remedy No power. • The power cord has not been connected. • Connect to power outlet. No sound, or sound volume is too low. • AUDIO INPUT switch is set incorrectly. • Connection cables are not connected properly, or are disconnected. • Connentors or plugs are dirty. • The rear panel MASTER ATT. switch is set to -6 dB, etc. • Set AUDIO INPUT switch to select the currently playing component. • Connect correctly. • Clean away any dirt before connecting. • Adjust rear panel MASTER ATT. switch. No microphone sound from BOOTH output. • The OUTPUT TO BOOTH MONITOR (P. 42) is set • Set OUTPUT TO BOOTH MONITOR (P. 42) to ON. to OFF. No digital output. • The digital output sampling frequency (fs) does • Set rear panel sampling frequency selector to not match the specifications of the connected match the specifications of the connected component. component. Sound is distorted. • Audio master output level is too high. • Input level is too high. • Adjust AUDIO MASTER LEVEL dial or the rear panel MASTER ATT. switch. • Adjust the AUDIO TRIM dial so that the input level approaches 0 dB on the channel level indicator. Cross fader doesn't work. • CROSS FADER ASSIGN switch setting ([A], [THRU], [B]) is incorrect. • Correctly set the CROSS FADER ASSIGN switch for the desired channel. Can't perform fader start with DVD/CD player. • The FADER START button is set to OFF. • Rear panel CONTROL connector is not connected to DVD/CD player. • Only the rear panel CONTROL connector is connected to the DVD/CD player. • Set the FADER START button to ON. • Use a control cable to connect the CONTROL connectors of mixer and DVD/CD player. • Connect both the CONTROL connectors and analog input connectors. Effects don't work. • Effect channel selecter (CH SELECT) setting is incorrect. • Effect parameter 2 dial (LEVEL/DEPTH) is set to [MIN]. • Correctly select the channel on which you wish to apply effects. • Adjust the effect parameter 2 dial (LEVEL/ DEPTH). BPM can't be measured. Measured BPM value is incorrect. • Input level is too high, or too low. • BPM may not be correctly measurable with some tracks. • Adjust the AUDIO TRIM dial so that the input level approaches 0 dB in the channel level indicator. • Adjust other channels as well so that the input levels approach 0 dB in the channel level indicator. • Strike the TAP button to set BPM manually. The measured BPM value is different from the value published with the DVD/CD. • Some differences may occur due to differences • No remedy is necessary. in BPM detection methods. MIDI sequencer can't be synchronized. • MIDI sequencer's synch mode is not set to "slave". • MIDI sequencer is not supported type. • Set MIDI sequencer's sync mode to "slave". • MIDI sequencers that do not support MIDI timing clock cannot be synchronized. 45 En
-
 1
1 -
2
-
3
-
4
-
5
-
6
-
7
-
8
-
9
-
10
-
11
-
12
-
13
-
14
-
15
-
16
-
17
-
18
-
19
-
20
-
21
-
22
-
23
-
24
-
25
-
26
-
27
-
28
-
29
-
30
-
31
-
32
-
33
-
34
-
35
-
36
-
37
-
38
-
39
-
 40
40 -
 41
41 -
 42
42 -
 43
43 -
 44
44 -
 45
45 -
 46
46 -
 47
47 -
 48
48
 |
 |