Ricoh Aficio MP C3500 Scanner Reference - Page 118
Relationship of original of mixed sizes and scan size
 |
View all Ricoh Aficio MP C3500 manuals
Add to My Manuals
Save this manual to your list of manuals |
Page 118 highlights
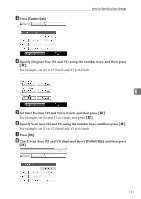
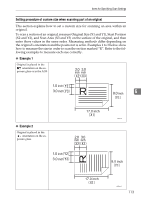
Various Scan Settings Relationship of original of mixed sizes and scan size This section explains differences you need to be aware of when scanning originals of the same width but different length (such as 11" × 17" & 11" × 8 1/2") using the original position setting and size. • If you select [Mixed Sizes], the machine detects the length of same width originals and scans them. You can place combinations of the following original sizes: 11" × 17"L & 81/2" × 11"K, 81/2" × 11"L & 51/2" × 81/2"K, A3L & A4K. • If a template size is selected, the machine scans originals at the selected size regardless of the actual size of originals. If an original is smaller than the selected size, the machine applies margins to the scan area. • If [Auto Detect] is selected for scanning originals from the exposure glass, the machine detects the size of individual originals and scans accordingly. • If only [Auto Detect] is selected for scanning originals from the ADF, the machine detects the size of the largest original and scans all the other originals based on that size. 6 Setting procedure of custom size when scanning an entire original This section explains how to set a custom size for scanning an entire original. To scan the entire area of an original, measure its dimensions on the surface of the original, and enter them under Original Size (X1 and Y1) and Scan Area (X3 and Y3). The example below explains scanning an original of the following size. ARE012S You do not need to specify a Start Position (X2 and Y2). Specify it as 0 inch. For Scan Size, enter the same value as Original Size. A Press [Scan Settings]. B Press [Scan Size]. 110
-
 1
1 -
2
-
3
-
4
-
5
-
6
-
7
-
8
-
9
-
10
-
11
-
12
-
13
-
14
-
15
-
16
-
17
-
18
-
19
-
20
-
21
-
22
-
23
-
24
-
25
-
26
-
27
-
28
-
29
-
30
-
31
-
32
-
33
-
34
-
35
-
36
-
37
-
38
-
39
-
40
-
41
-
42
-
43
-
44
-
45
-
46
-
47
-
48
-
49
-
50
-
51
-
52
-
53
-
54
-
55
-
56
-
57
-
58
-
59
-
60
-
61
-
62
-
63
-
64
-
65
-
66
-
67
-
68
-
69
-
70
-
71
-
72
-
73
-
74
-
75
-
76
-
77
-
78
-
79
-
80
-
81
-
82
-
83
-
84
-
85
-
86
-
87
-
88
-
89
-
90
-
91
-
92
-
93
-
94
-
95
-
96
-
97
-
98
-
99
-
100
-
101
-
102
-
103
-
104
-
105
-
106
-
107
-
108
-
109
-
110
-
111
-
112
-
 113
113 -
 114
114 -
 115
115 -
 116
116 -
 117
117 -
 118
118 -
 119
119 -
 120
120 -
 121
121 -
 122
122 -
 123
123 -
124
-
125
-
126
-
127
-
128
-
129
-
130
-
131
-
132
-
133
-
134
-
135
-
136
-
137
-
138
-
139
-
140
-
141
-
142
-
143
-
144
-
145
-
146
-
147
-
148
-
149
-
150
-
151
-
152
-
153
-
154
-
155
-
156
-
157
-
158
-
159
-
160
-
161
-
162
-
163
-
164
-
165
-
166
-
167
-
168
-
169
-
170
-
171
-
172
 |
 |
