Ricoh CL7200 Maintenance Manual
Ricoh CL7200 - Aficio D Color Laser Printer Manual
 |
UPC - 026649024115
View all Ricoh CL7200 manuals
Add to My Manuals
Save this manual to your list of manuals |
Ricoh CL7200 manual content summary:
- Ricoh CL7200 | Maintenance Manual - Page 1
Maintenance Guide Read This First Trademarks...4 How to Read This Manual 5 Paper and Other Media Paper and Other Media Supported by This Printer 6 Paper Recommendations 13 Loading Paper...13 Storing Paper ...13 Types of Paper and Other Media 13 Paper not supported by this printer 17 Print Area - Ricoh CL7200 | Maintenance Manual - Page 2
the Development Unit 52 Replacing the Fusing Unit 58 Replacing the Dustproof Filter 62 Replacing the Waste Toner Troubleshooting Error & Status Messages on the Control Panel 97 Printer Does Not Print 108 Checking the port connection 110 Other Printing Problems 113 Additional Troubleshooting - Ricoh CL7200 | Maintenance Manual - Page 3
Misfeed Z2:Dup.Feed Unit" Appears 153 Appendix When the Front Cover Does Not Close 157 Moving and Transporting the Printer 159 Moving the Printer 159 Consumables ...161 Toner Cartridge ...161 Staple Cartridge ...161 Other consumables 162 Specifications...163 Mainframe ...163 Options ...166 3 - Ricoh CL7200 | Maintenance Manual - Page 4
Corporation in the United States and/or other countries. IPS-PRINT Printer Language Emulation Copyright© 1999-2000 Oak Technology, Inc., All rights owned by the Bluetooth SIG, Inc. and any use of such marks by Ricoh Company, Ltd. is under license. Other product names used herein are for - Ricoh CL7200 | Maintenance Manual - Page 5
following set of symbols is used in this manual. This symbol indicates a potentially hazardous situation that might result in death or serious injury when you misuse the machine without following the instructions under this symbol. Be sure to read the instructions, all of which are described in the - Ricoh CL7200 | Maintenance Manual - Page 6
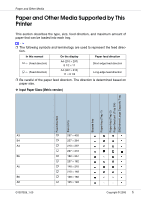
Media Supported by This Printer This section describes the type, size, feed direction, and maximum amount of paper that can be loaded into each tray. ❒ The following symbols and terminology are used to represent the feed direction. In this manual L ← (Feed direction) K ← (Feed direction) On - Ricoh CL7200 | Maintenance Manual - Page 7
Paper and Other Media Feed direction Size (mm) Bypass tray Paper tray (Tray 1) Paper tray ( is exclusive. • The size is supported and the printer selects it automatically. • The size is supported, but it should be selected using the control panel. • The size is supported, but it should be set as - Ricoh CL7200 | Maintenance Manual - Page 8
custom size setting using the control panel. When using the RPCSTM printer driver, sheets of up to 1260 mm(600 × 600 dpi, 1200 × 600 dpi) in length can be set. • The size is not supported. ❖ Input Paper Sizes (Inch version) Feed direction Size (inch) Bypass tray Paper tray (Tray 1) Paper tray (Tray - Ricoh CL7200 | Maintenance Manual - Page 9
Paper and Other Media Feed direction Size (inch) Bypass tray Paper tray (Tray 1) Paper tray (Tray 18 inch in length. The supported size may differ depending on the printer language you use. Set as a custom size setting using the control panel. When using the RPCSTM printer driver, sheets of up to 49 - Ricoh CL7200 | Maintenance Manual - Page 10
Paper and Other Media Maximum number of Supported paper weight sheets (plain paper) *1 Bypass tray 60 is not higher than the limit mark inside the tray. ❖ Output Paper Sizes (Metric version) Feed direction Size (mm) Standard tray External tray *1 2 tray finisher Booklet finisher A3 B4 A4 B5 A5 - Ricoh CL7200 | Maintenance Manual - Page 11
68" × 101/2") L 267 × 390 L 195 × 267 K 267 × 195 • The size is supported. • The size is not supported. *1 The external tray does not support duplex printing. ❖ Output Paper Sizes (Inch version) Feed direction Size (inch) Standard tray External tray *1 2 tray finisher Booklet finisher 12" × 18 - Ricoh CL7200 | Maintenance Manual - Page 12
Paper and Other Media Feed direction Size (inch) Standard tray External tray *1 2 tray finisher Booklet finisher A4 L 8.26" /2" × 15.35" 16K L 7.68" × 101/2" K 101/2" × 7.68" • The size is supported and it should be set using the control panel. There is no dial in the tray. • The size is not - Ricoh CL7200 | Maintenance Manual - Page 13
contact your sales or service representative. ❒ Do not use paper that has already been printed onto by other printers. Storing Paper • Paper paper misfeeds, or printer damage. Recommendations are as follows: • Avoid storing paper in humid areas. • Avoid exposing paper to direct sunlight. • Store on - Ricoh CL7200 | Maintenance Manual - Page 14
sure paper is not stacked higher than the paper guides inside the bypass tray. Possible When printing on the reverse side of plain paper that is already printed on, select [Plain:Dup.Back] from [Paper Type] using the control panel or printer driver. 106 - 163 g/m2 (28.2 - 42 lb.) Make the following - Ricoh CL7200 | Maintenance Manual - Page 15
cautions ❒ Make sure paper is not stacked higher than the paper guides inside the bypass tray. Not possible • Print speed for OHP transparencies is slower than for plain paper. • Paper settings can be set using the printer driver. Setting the paper sizes using the display panel is not necessary - Ricoh CL7200 | Maintenance Manual - Page 16
shown below are supported. Supported *1 Supported *1 Not supported *1 Misfeeds might Printer driver setup Click [Thick] in the [Type:] list. Enabled paper feeding tray Bypass tray Enabled paper feeding tray 10 Both-sided printing ❒ Make sure paper is not stacked higher than the paper guides - Ricoh CL7200 | Maintenance Manual - Page 17
. Paper not supported by this printer Avoid using the following paper as they are not supported by this printer. • Paper meant for an ink-jet printer • Bent, using paper printed on by other than a laser printer (e.g. monochrome and color copiers, ink-jet printers, etc.) • Special paper, such as - Ricoh CL7200 | Maintenance Manual - Page 18
set the print margins correctly by the application. ❖ Paper A Print area B Feed direction C Approx. 4.2 mm (0.17 inches) D Approx. 4.2 mm (0.17 inches) ❒ Print area may vary depending on paper size, printer language, and printer driver settings. ❒ If you load paper larger than A3L in the bypass tray - Ricoh CL7200 | Maintenance Manual - Page 19
Paper and Other Media ❖ Envelope A Print area B Feed direction C Approx. 4.2 mm (0.17 inches) D Approx. 4.2 mm (0.17 inches) ❒ The print area may vary depending on the paper size, printer language and printer driver settings. 19 - Ricoh CL7200 | Maintenance Manual - Page 20
you want to load A4 K paper in tray 1 and the optional 2000-sheet large capacity tray, contact your sales or service representative. See p.6 "Paper and Other Media Supported by This Printer", for details about paper to be loaded in the paper tray and optional Paper Feed Unit Type 7300. Loading Paper - Ricoh CL7200 | Maintenance Manual - Page 21
limit mark inside the tray. C Carefully slide the paper tray into the printer, until it stops. Loading Paper in Tray 2 and Paper Feed Unit Type the positions of the side and end guides. This section describes loading paper in tray 2. ❒ If the side and end guides are in the right positions for the - Ricoh CL7200 | Maintenance Manual - Page 22
Other Media Release the side guide lock. C Press the side guide green lever ( ), adjust the position of the guide by moving it in the direction of the arrow ( ). D Adjust the end guide according to the size and orientation of the paper by gripping both edges of the guide ( ), and then moving it in - Ricoh CL7200 | Maintenance Manual - Page 23
the limit mark inside the tray. F Make sure the paper is fixed in place, and then lock the side guide. G Slowly slide the paper tray back until it stops. ❒ Do not slide the paper tray in with force. A4 K paper in the 2000-sheet large capacity tray, contact your sales or service representative. 23 - Ricoh CL7200 | Maintenance Manual - Page 24
Paper and Other Media A Slowly pull out the paper tray, until it stops. B With the print side down, align all four sides of the two paper stacks, and then load them next to each other in the tray. Each side has a limit of 1,000 sheets. ❒ Align the paper and load the stacks against the left and right - Ricoh CL7200 | Maintenance Manual - Page 25
paper at all times. ❒ If you want to load A4 K paper in tray 1 and the optional 2000-sheet large capacity tray, contact your sales or service representative. This section uses A4 (210 × 297) L as an example. A Press the {Menu} key. The [Menu] screen appears on the display. B Press the {U} or {T} key - Ricoh CL7200 | Maintenance Manual - Page 26
Paper and Other Media E Press the {U} or {T} key to display the loaded paper size, and then press the {# Enter} key. Tray 2 : *A4 (210 x 297) After about two seconds, the display returns to the menu. F Press the {Online} key. The initial screen appears. This completes the setting change. ❒ After - Ricoh CL7200 | Maintenance Manual - Page 27
paper type for Tray 1/2 and the optional paper feed unit Improve printer performance by selecting the optimum paper type for the tray. You can select from the following paper types: • Plain Paper, Recycled Paper, Special Paper, Color Paper, Letterhead, Pre- printed Paper A Press the {Menu} key. The - Ricoh CL7200 | Maintenance Manual - Page 28
paper feed unit. • Set the size and direction of the loaded paper on the control panel or with the printer driver. Make sure the settings do not conflict. the paper size must be set using the control panel. When using the RPCSTM printer driver, sheets of up to 1260 mm(49.61") in length can be set. - Ricoh CL7200 | Maintenance Manual - Page 29
Paper and Other Media ❒ The number of pages that can be loaded in the bypass tray differs depending on paper type. Check that the top of the stack is not higher than the limit mark inside the tray. ❒ When loading paper in the bypass tray, use L orientation if possible. ❒ When loading the bypass tray - Ricoh CL7200 | Maintenance Manual - Page 30
( ), and then load paper print side up, un- til it stops ( ). C Adjust the side guides to fit the paper width. ❒ Check that the top of the stack is not higher than the limit mark inside the tray. ❒ Shuffle the paper - Ricoh CL7200 | Maintenance Manual - Page 31
them using the printer driver. However, when printing with a printer driver other than the RPCSTM printer driver, you must make the settings using the control panel. For details about the printer driver, see Help. ❒ The printer cannot print from applications that do not support custom size paper - Ricoh CL7200 | Maintenance Manual - Page 32
for the Bypass Tray By selecting the paper type you want to load, the printer performs better. You can select from the following paper types: • Plain Paper, Recycled Paper, Special Paper, Color Paper, Letterhead, Pre- printed Paper, OHP Transparencies, Thick Paper, Plain Paper (Duplex), Thick Paper - Ricoh CL7200 | Maintenance Manual - Page 33
Paper and Other Media • Staple, Punch • Auto Tray Select ❒ Be sure to select the paper type when you load labels, thick paper, or OHP transparencies in the bypass tray. ❒ When printing labels, select thick paper as the paper type. A Press the {Menu} key. The [Menu] screen appears on the display. B - Ricoh CL7200 | Maintenance Manual - Page 34
the same size is loaded in both the standard tray and the paper feed unit (option), and when "Auto Tray Select" is set with the printer driver, paper will be fed from the standard tray when you start printing. To print on paper loaded in the paper feed unit, switch the tray - Ricoh CL7200 | Maintenance Manual - Page 35
Paper and Other Media The initial screen appears. 35 - Ricoh CL7200 | Maintenance Manual - Page 36
and Maintenance Kit Using the Screwdriver The screwdriver supplied is used for attaching options and is located inside the front cover. A Open the printer's front cover, and then remove the provided screwdriv- er. B Insert the screw into the screwdriver. By pushing the screw into the screwdriver - Ricoh CL7200 | Maintenance Manual - Page 37
various units or removing jammed paper. Detaching the SR960 (2 Tray Finisher) There are times when you may need to detach the 2 tray finisher from the printer to remove misfed paper. This section describes how to detach the 2 tray finisher. A Hold the handle at the top of the 2 tray finisher firmly - Ricoh CL7200 | Maintenance Manual - Page 38
) A Hold the release lever, and then pull out the booklet finisher. The booklet finisher is detached from the printer. B Attach the booklet finisher. The booklet finisher is reattached to the printer. Opening and Closing the Duplex Reversal Unit There are times when you may need to detach the duplex - Ricoh CL7200 | Maintenance Manual - Page 39
duplex reversal unit slowly until it stops. ❒ Open the duplex reversal unit after detaching the 2 tray finisher or the booklet finisher from the printer. See p.37 "Detaching the SR960 (2 Tray Finisher)" or p.38 "Detaching the SR950 (Booklet Finisher)". ❒ You do not have to remove the external tray - Ricoh CL7200 | Maintenance Manual - Page 40
on paper type, size, contents, and settings. For details, see p.161 "Toner Cartridge". The color of the lit LED indicates the toner status for each color. A red light indicates the toner cartridge must be replaced. Replace the toner cartridge if the following message appears on the display: Add - Ricoh CL7200 | Maintenance Manual - Page 41
runs out, you can print in black and white mode using the black toner. Change the color mode setting to "Black and White" from the printer driver. ❒ If black toner runs out, printing is not possible until the black toner cartridge is replaced. A While pushing the lock button on the upper right cover - Ricoh CL7200 | Maintenance Manual - Page 42
hand, slowly pull it up and out. ❒ Do not shake the removed toner cartridge. Remaining toner might scatter. ❒ Depending on the setting up environment, toner might be left in a toner car- tridge. In such cases, reinstall the toner cartridge. D Take the new toner cartridge out of the box. ❒ The black - Ricoh CL7200 | Maintenance Manual - Page 43
Replacing Consumables and Maintenance Kit F Holding the toner cartridge with the metal contact area in front, insert in the direction of the arrow. ❒ Do not touch the metal contact area with your fingers. G Slowly insert the toner cartridge, until the green hook clips over the met- al contact area. - Ricoh CL7200 | Maintenance Manual - Page 44
Replacing Consumables and Maintenance Kit The following message appears on the display: Loading Toner... ❒ To avoid malfunction, do not turn off the power while "Loading Toner..." appears on the display. 44 - Ricoh CL7200 | Maintenance Manual - Page 45
. Replace Color PCU (Type A) ❒ The replacement procedure for the third photoconductor unit from the top left will be described. The procedure is the same for all four photoconductor units. A Turn off the power, and then unplug the power cable. B Slowly open the front cover of the printer, remove - Ricoh CL7200 | Maintenance Manual - Page 46
Replacing Consumables and Maintenance Kit D Loosen the two screws fastening the inner cover, using the provided screwdriver. You cannot remove these two screws. E Lift the inner cover until it clicks into place and holds. The photoconductor units are installed as shown. Starting from the upper left, - Ricoh CL7200 | Maintenance Manual - Page 47
Replacing Consumables and Maintenance Kit For black, remove the upper left one, and for color, remove the three on the right. G Hold the hook down, grip the green areas at the top and bottom of the photoconductor unit, and then - Ricoh CL7200 | Maintenance Manual - Page 48
Replacing Consumables and Maintenance Kit For black, install one, and for color, install all three. J Hold the photoconductor unit, and remove tip of the photoconductor unit with the rail inside the printer. ❒ Make sure the green arrow fits securely to the rail before proceeding to the next step. 48 - Ricoh CL7200 | Maintenance Manual - Page 49
Replacing Consumables and Maintenance Kit L Slowly push the front of the photoconductor unit, slide the unit on the cover, and then push in until it stops. ❒ If you do not attach the green arrow of the photoconductor unit securely to the rail, you might damage the photoconductor unit. ❒ Do not touch - Ricoh CL7200 | Maintenance Manual - Page 50
Replacing Consumables and Maintenance Kit O Tighten the two screws using the provided screwdriver. ❒ Be sure to return the provided screwdriver to its original position on the back of the front cover. P Turn the green lever clockwise. Q Slowly close the front cover by pushing the two areas on the - Ricoh CL7200 | Maintenance Manual - Page 51
Replacing Consumables and Maintenance Kit The printer starts calibration. Wait until it stops. The following message appears on the display: Calibrating... ❒ To avoid malfunction, do not turn off the power during calibration. 51 - Ricoh CL7200 | Maintenance Manual - Page 52
development unit. Replace Black Dev. Unit(TypeD) If "Replace Color Dev. Unit(TypeB)" appears on the display, replace all three color (CMY) development units. Replace Color four development units. A Turn off the power, and then unplug the power cable. B Slowly open the front cover of the printer, - Ricoh CL7200 | Maintenance Manual - Page 53
cover, using the provided screwdriver. You cannot remove these two screws. E Lift the inner cover until it clicks into place and holds. The development units are installed as shown. Starting from the upper left, the units are attached in the order of black (K), yellow (Y), cyan (C), and magenta - Ricoh CL7200 | Maintenance Manual - Page 54
Consumables and Maintenance Kit The procedure for removing the unit is the same for all four colors. ❒ Pulling out the development unit quickly might cause it to fall. G Hold the right side of the Development unit using your right hand, and pull the unit slowly out. ❒ Be careful not to touch - Ricoh CL7200 | Maintenance Manual - Page 55
Replacing Consumables and Maintenance Kit I Shake the development unit back and forth five or six times. J Remove the adhesive tape on the upper side of the unit. ❒ Do not remove the tape attached to the front of the development unit K Insert the development unit along the rail ( ), and push in - Ricoh CL7200 | Maintenance Manual - Page 56
Replacing Consumables and Maintenance Kit L Holding the development unit, slowly pull out the tape horizontally. ❒ To avoid malfunction, be sure to pull out the tape. ❒ The removed tape is dirty. Be careful not - Ricoh CL7200 | Maintenance Manual - Page 57
Replacing Consumables and Maintenance Kit O Turn the green lever clockwise. P Slowly close the front cover by pushing the two areas on the left and right. Q Plug in the power cable, and then turn on the power. "Please Wait" appears on the display, and initial adjustments begin. Wait until these stop - Ricoh CL7200 | Maintenance Manual - Page 58
burns. B If the 2 tray finisher or the booklet finisher is installed, detach it from the printer. p.37 "Detaching the SR960 (2 Tray Finisher)" p.38 "Detaching the SR950 (Booklet Finisher)" C tray is attached to the printer, raise it in the direction of the arrow ( ), and then remove it ( ). 58 - Ricoh CL7200 | Maintenance Manual - Page 59
Replacing Consumables and Maintenance Kit E Slowly pull out the left cover. F Open the upper left cover. G Holding the fusing unit handle as shown, slowly pull the fusing unit up, and then put it down on a surface. ❒ Do not touch any area other than the green felt parts. ❒ Do not touch the inside of - Ricoh CL7200 | Maintenance Manual - Page 60
the machine stand. ❒ Install the fusing unit so the blue dial is on the front cover side. J Slowly turn the fusing unit handle in the direction of the arrow, until it clicks. K Close the upper left cover ( ), and then push the part labeled "PUSH" next to the handle at the bottom - Ricoh CL7200 | Maintenance Manual - Page 61
unit. p.38 "Opening and Closing the Duplex Reversal Unit" N If the 2 tray finisher or the booklet finisher is installed, reattach it to the printer. p.37 "Detaching the SR960 (2 Tray Finisher)" p.38 "Detaching the SR950 (Booklet Finisher)" O Plug in the power cable, and then turn on the power - Ricoh CL7200 | Maintenance Manual - Page 62
Kit Replacing the Dustproof Filter The dustproof filter is attached to the black development unit. When replacing the black development unit, also replace the dustproof filter. The dustproof filter is attached to the left side of the printer, as shown. A Turn off the power, and then unplug the power - Ricoh CL7200 | Maintenance Manual - Page 63
and Maintenance Kit C From the box that contained the black development unit, take out the new dustproof filter and glove. D one by one, and put them into the box that contained the black development unit. ❒ Handle the removed dustproof filters with care. If you shake them, dust might scatter. F - Ricoh CL7200 | Maintenance Manual - Page 64
filter cover one by one. Attach the large filter. H Attach the small filter. I Insert the dustproof filter cover into the upper left area of the printer. J Plug in the power cable, and then turn on the power. 64 - Ricoh CL7200 | Maintenance Manual - Page 65
Consumables and Maintenance Kit Replacing the Waste Toner Bottle If "Replace Waste Toner (Type E)" appears on the display, replace the waste toner bottle. Replace Waste Toner (Type E) A Turn off the power, and then unplug the power cable. B Take the new waste toner bottle out of the bag. C Slowly - Ricoh CL7200 | Maintenance Manual - Page 66
Maintenance Kit D Slowly remove the used waste toner bottle from inside the printer. ❒ Be sure to remove the waste toner bottle horizontally. E Remove the lid ( ), and then put it in the position shown in the illustra- tion ( ). F Put the used waste toner bottle into the bag that contained the new - Ricoh CL7200 | Maintenance Manual - Page 67
Replacing Consumables and Maintenance Kit H Push it in until it stops. ❒ Be sure to firmly insert the waste toner bottle to avoid toner leakage inside the printer. I Slowly close the front cover by pushing the two areas on the left and right. J Plug in the power cable, and then turn on the - Ricoh CL7200 | Maintenance Manual - Page 68
Replacing Consumables and Maintenance Kit Replacing the Paper Feed Roller If "Replace Feed Roller (Type H)" appears on the display, replace all three paper feed rollers. Replace Feed Roller (Type H) ❒ The following illustrations are examples of replacing the paper feed rollers of Tray 1. The same - Ricoh CL7200 | Maintenance Manual - Page 69
Replacing Consumables and Maintenance Kit C Slowly pull out all trays while lifting up a little. ❒ If you are replacing the paper feed rollers of the optional paper feed unit, or 2000-sheet Large Capacity Tray, pull out all paper trays from each unit. D Check the position of the paper feed rollers. - Ricoh CL7200 | Maintenance Manual - Page 70
Replacing Consumables and Maintenance Kit E While pushing the pin of the paper feed roller A outwards ( ), remove the paper feed roller ( ). F Remove the stopper from the paper feed roller B ( ), and then remove the roller ( ). G Remove the stopper from the paper feed roller C ( ), and then remove - Ricoh CL7200 | Maintenance Manual - Page 71
roller A with its pin towards you ( ). Insert the roller onto the front shaft until it clicks into place ( ). K Slowly slide all trays back into the printer until they stop. ❒ If you are replacing the paper feed rollers of the optional 2000-sheet Large Capacity Tray, load the stocks removed in step - Ricoh CL7200 | Maintenance Manual - Page 72
manual. Some parts of the machine are at a high voltage and could give you an electric shock. Also, if the machine has laser systems, direct (or indirect) reflected eye contact with the laser spray insecticide on the printer. ❒ If there is dust or grime inside the printer, wipe it away using a clean, - Ricoh CL7200 | Maintenance Manual - Page 73
Cleaning Cleaning the Registration Roller • The inside of the printer becomes very hot. To avoid burns, do not touch parts labelled "hot surface", otherwise it could cause a burn. Clean the roller when replacing the black development unit. A Turn off the power, and then unplug the power cable. B - Ricoh CL7200 | Maintenance Manual - Page 74
Cleaning ❒ Do not use chemical cleaners or organic solvents such as thinners or benzene. D Close the right cover by pushing the area labeled "PUSH". E Plug in the power cable, and then turn on the power. 74 - Ricoh CL7200 | Maintenance Manual - Page 75
cleaning brush in and out slowly 8 to 10 times to clean all four areas. ❒ Do not insert the brush roughly. Doing so may damage the printer. 75 - Ricoh CL7200 | Maintenance Manual - Page 76
Cleaning D Return the cleaning brush to its original position. E Plug in the power cable, and then turn on the power. 76 - Ricoh CL7200 | Maintenance Manual - Page 77
, or the building earth leakage breaker may trip. ❒ If the earth leakage breaker fails to trip when tested, contact your sales or service representative. A Make sure the printer's ground is properly connected. B Turn off the power. If the 2 tray finisher or the booklet finisher is attached to the - Ricoh CL7200 | Maintenance Manual - Page 78
Cleaning D Make sure the earth leakage breaker trips. E Reset the earth leakage breaker by moving it to the "-" position. F Turn on the power. ❒ If the printer does not start up when the main power is switched on, check whether the earth leakage breaker has tripped. If it has, contact your sales - Ricoh CL7200 | Maintenance Manual - Page 79
registration adjustment, you can restore optimum print quality. Auto Adjust If documents show color degradation after the printer is moved, perform automatic color adjustment. A Press the {Menu} key. The [Menu] screen appears on the display. B Press the {U} or {T} key to display "Maintenance", and - Ricoh CL7200 | Maintenance Manual - Page 80
color registration shifts when using thick paper, adjust the fuser for thick paper. ❒ Fuser adjustment for thick paper is not possible if the toner has almost run out. Carry out this adjustment after changing the toner loading procedure, see p.6 "Paper and Other Media Supported by This Printer". 80 - Ricoh CL7200 | Maintenance Manual - Page 81
Adjusting the Printer B Press the {Menu} key. The [Menu] screen appears on the display. C Press the {U} or {T} key to display "Maintenance", and then press the {# Enter} key. Menu: Maintenance The maintenance menu appears. D Press the {U} or {T} key to display "Color Regist.", and then press the {# - Ricoh CL7200 | Maintenance Manual - Page 82
Adjusting the Printer H Press the {# Enter} key. Adjusting... I When automatic color adjustment is complete, the confirmation mes In this example, thick A4 paper is loaded in the bypass tray. K Compare the color adjustment sheet sample with the framed white part of the printed pattern. If sample and - Ricoh CL7200 | Maintenance Manual - Page 83
If you select "-1" or "+1", the printer returns to stepI. Keep adjusting until you can select " 0 ". L Press the {Online} key. The initial screen appears. Test Sheet Samples The following illustration is an - Ricoh CL7200 | Maintenance Manual - Page 84
Printer Correcting the Color Gradation Color gradation during color printing various slightly depending on a number of factors. If you print the same file repeatedly or toner was recently replaced, changes may occur in color tones. When this happens, to obtain suitable print results, color color - Ricoh CL7200 | Maintenance Manual - Page 85
Adjusting the Printer A Press the {Menu} key. The [Menu] screen appears on the display. B Press the {U} or {T} key to display "Maintenance", and then press the {# Enter} key. Menu: Maintenance The maintenance menu appears. C Press the {U} or {T} key to display "Color Calibrate", and then press the - Ricoh CL7200 | Maintenance Manual - Page 86
Adjusting the Printer A confirmation message appears when complete. Completed Return to the color calibrate menu. G Press the {U} or {T} key to display "Start Calibr. 1", and then press the {# Enter} key. H Check "Yes" is displayed, and then press the {# Enter} - Ricoh CL7200 | Maintenance Manual - Page 87
Adjusting the Printer M Check "Yes" is displayed, and press the {# Enter} key to print the to correction 2. O Press the {T} key to display "Start Calibr. 2", and then press the {# Enter} key. Color Calibrate: Start Calibr. 2 P Check "Yes" is displayed, and then press the {# Enter} key to print gra - Ricoh CL7200 | Maintenance Manual - Page 88
Adjusting the Printer Viewing the Color Calibration Sample Sheet and Gradation Correction Sheet The color gradation correction value setting sheet contains two color sample columns: the "Sample 1" column for setting the highlight part and the "Sample 2" column for setting the middle part. Similarly, - Ricoh CL7200 | Maintenance Manual - Page 89
C (cyan), and Y (yellow). These values are set using the control panel. ❒ XXXX represents the printer model name. A K (black) correction values Use to adjust the color printed when only black toner is used. The currently set correction value is printed in red. B M (magenta) correction values Use to - Ricoh CL7200 | Maintenance Manual - Page 90
Adjusting the Printer A Press the {Menu} key. The [Menu] screen appears on the display. B Press the {U} or {T} key to display "Maintenance", and then press the {# Enter} key. Menu: Maintenance The maintenance menu appears. C Press the {U} or {T} key to display "Color Calibrate", and then press the - Ricoh CL7200 | Maintenance Manual - Page 91
Adjusting the Printer The initial screen appears. 91 - Ricoh CL7200 | Maintenance Manual - Page 92
output to appear dirty. ❒ Image density settings should be made from the application or the printer driv- er, whenever possible. ❒ Changing image density settings might cause deterioration in color balance. We recommend leaving image density at the factory default setting. A Press the {Menu} key - Ricoh CL7200 | Maintenance Manual - Page 93
Adjusting the Printer E Press the {U} or {T} key to set the image density value, and then press the {# Increasing the value makes printout darker; decreasing the value makes printout lighter. To adjust another color, repeat steps D and E. F Press the {Online} key. The initial screen appears. 93 - Ricoh CL7200 | Maintenance Manual - Page 94
Adjusting the Printer Adjusting Tray Registration You can adjust the registration of each tray. The vertical adjustment is used for all trays. Normally, you need not update the - Ricoh CL7200 | Maintenance Manual - Page 95
Adjusting the Printer F Confirm the position of the image on the test sheet, and then adjust the registration value. In this setting, adjust the margins of the test - Ricoh CL7200 | Maintenance Manual - Page 96
Adjusting the Printer Increase the value to shift the print area in the positive direction, and decrease to shift in the negative direction. A : Print Area B : Feed Direction ❒ Pressing the {U} or {T} key makes the value increase or decrease by 1.0 mm steps. K Press the {# Enter} key. The display - Ricoh CL7200 | Maintenance Manual - Page 97
Troubleshooting Error & Status Messages on the Control Panel This Toner Cartridge"". Add Toner: Yellow The printer is out of toner (Y). Replace the toner cartridge (Y). See p.40 "Replacing the Toner Cartridge". Calibrating... The printer is calibrating the color. Wait a while. Call Service - Ricoh CL7200 | Maintenance Manual - Page 98
Troubleshooting Messages / Second messages Description Solution Change Setting Tray # / /Black Set the indicated toner cartridge(s) correctly. See p.40 "Replacing the Toner Cartridge". Close Front Cover The front cover is open. Close the front cover for the printer. Close Right Cover The - Ricoh CL7200 | Maintenance Manual - Page 99
Troubleshooting Messages / Second messages Description Solution Empty Punch Recep- The The printer identified an Ether- Turn the power off, and then on. If the net error. message appears again, contact your sales or service representative. Hardware Problem Finisher There is a problem with - Ricoh CL7200 | Maintenance Manual - Page 100
Problem IEEE1394 The printer identified an IEEE 1394 interface board error. Solution Turn the power off, and then on. Remove and re-install the HDD board correctly. If the message appears again, contact your sales or service representative. See "Attaching Printer Hard Disk Type 7100", Setup Guide - Ricoh CL7200 | Maintenance Manual - Page 101
Troubleshooting Messages / Second messages Description Solution Hardware Problem Parallel I/F There is a problem with the par- service representative. See "Attaching IEEE 1284 Interface Board Type A", Setup Guide. Hardware Problem Printer font Problems with the font file for the Printer - Ricoh CL7200 | Maintenance Manual - Page 102
Troubleshooting service representative. Hex Dump Mode In Hex Dump Mode. No action required. Irregular Toner Irregular toner is set. Replace the toner to appropriate one. Invalid Data Power Off On The printer printer received a request for a paper type, or paper size not supported by printer, - Ricoh CL7200 | Maintenance Manual - Page 103
Troubleshooting Messages / Second messages Description Solution Proxy User Name/ Password required. Remove Misfeed A:Internal Path / See Instructions in Front Cover There is a misfeed in the printer. Remove the misfed paper following the instructions inside the front cover. See p.138 "When - Ricoh CL7200 | Maintenance Manual - Page 104
Troubleshooting Messages / color de- Replace the color development unit. velopment unit. Depending on your service contract, contact your sales or service repre- sentative. See p.52 "Replacing the Development Unit". Replace Color Develop.soon (B) The time to replace the color development - Ricoh CL7200 | Maintenance Manual - Page 105
It is time to replace the waste toner. Replace the waste toner bottle. Depending on your service contract, contact your sales or service representative. See p.65 "Replacing the Waste Toner Bottle". Reset Develop. Unit correctly XXX/XXX The indicated development unit(s) is/are not set correctly - Ricoh CL7200 | Maintenance Manual - Page 106
Troubleshooting input tray correctly. Reset Waste Toner correctly The waste toner bottle is not set Set the waste toner bottle correctly. correctly, or printer is receiving updated Don't turn off the printer while it is re- data. ceiving data. SC XXX-X Power Off On If Error Reoccur Call Service - Ricoh CL7200 | Maintenance Manual - Page 107
Troubleshooting Messages / Second messages Description Solution Toner is almost empty: Cyan The printer is almost out of ton- Prepare a replace the toner cartridge er (C). (C). Toner is almost empty: Magenta The printer is almost out of ton- Prepare a replace the toner cartridge er (M). - Ricoh CL7200 | Maintenance Manual - Page 108
Troubleshooting Printer Does Not Print Possible cause Solutions Is the power on? Check the cable is securely plugged into the power outlet and the printer. Turn or service representative. See "Printing a Configuration Page", Software Guide. Is the interface cable connecting the printer to - Ricoh CL7200 | Maintenance Manual - Page 109
Troubleshooting Possible cause Solutions When you use IEEE 1394 interface board. A Check the tool for IEEE 1394 interface board is stored in the following path on the CD-ROM labeled "Printer Drivers and Utilities". UTILITY\1394 ❒ For details about using the utility tool for IEEE 1394, see the - Ricoh CL7200 | Maintenance Manual - Page 110
Troubleshooting Possible cause When you use the Bluetooth interface unit. Solutions service representative. Consult with the store where the printer was purchased for information about the location of sales of service representatives. Checking the port connection When the printer is directly - Ricoh CL7200 | Maintenance Manual - Page 111
Troubleshooting Windows 95/98/Me A Click [Start], point to [Settings] and then click [Printers]. B Click to select the icon of the printer. Next, on the [File] menu, click [Prop- erties]. C Click the [Details] tab. D Check the [Print to the following port] box to confirm that the correct - Ricoh CL7200 | Maintenance Manual - Page 112
Troubleshooting E Click the [Port] tab. F Check the [Print to the following port(s).] box to confirm that the correct port is selected. Windows NT 4.0 A Click [Start], point to [Settings] and then click [Printers]. B Click to select the icon of the printer. After that, on the [File] menu, click [ - Ricoh CL7200 | Maintenance Manual - Page 113
in black and white. The printer driver is not set up for color printing. • PCL 5c/PCL 6/PostScript 3 Select [Color] for the Color/Black and White under the printer driver's [Setup] tab. • RPCS Select [Color] for the Color/Black and White under the printer driver's [Print Settings] tab. For details - Ricoh CL7200 | Maintenance Manual - Page 114
Troubleshooting Problem Printing is smudgy. Prints have smudges on the back. Printing is entirely patchy. Possible causes and solutions If "Replace Color "Adjusting Image Density". • If [Toner saving] is selected on the RPCSTM printer driver's [Print Quality] tab, printing becomes faint. For - Ricoh CL7200 | Maintenance Manual - Page 115
paper orientation you selected may conflict with that selected in the printer driver option setup. Make the settings correctly. Printing is not done in the speci- If printing is not done in the specified color, restart the printer fied color. by turning it off and back on, and then try printing - Ricoh CL7200 | Maintenance Manual - Page 116
Troubleshooting Problem Possible causes and solutions The color changes considerably when you adjust it with the RPCSTM printer driver. When you adjust the color on the [Balance Adjustments] tab of the RPCSTM printer driver [Change User Settings] dialog box, do not change the values too much. - Ricoh CL7200 | Maintenance Manual - Page 117
Troubleshooting Problem It takes too much time to complete the print job. Possible causes and solutions Photographs and other data-rich pages take a long time for the printer to process, so simply wait when printing such data. Changing the following settings may help speed up printing. • PCL 5c - Ricoh CL7200 | Maintenance Manual - Page 118
Other Media Supported by This Printer". If you are using a Windows operating system, printer driver settings override those set using the control panel. Set the desired output tray using the printer driver. See the printer driver Help. Paper misfeeds occur frequently. Check the side guide of the - Ricoh CL7200 | Maintenance Manual - Page 119
Troubleshooting Problem Possible causes and solutions The color of the printout is differ- Toner based color settings under the printer driver produce ent from the color on the com- unexpected printout colors. puter display. Changing color settings using the printer driver produces un- - Ricoh CL7200 | Maintenance Manual - Page 120
Troubleshooting Problem Possible causes and solutions PDF Direct Guide. For [RAM Disk], see the "System Menu", Software Guide Menu", Software Guide. When printing Software Guide. For Direct Print, characters are missing or misshapen. The paper size appears on the When using PDF Direct Direct Direct - Ricoh CL7200 | Maintenance Manual - Page 121
, contact your sales of service representative. No e-mail is received when an Alert occurs and after resolving an Alert. Confirm [Notify by Email] is set to [On] using the System Menu on the control panel. See "System Menu", Software Guide. Access the printer through Web Image Monitor, logging - Ricoh CL7200 | Maintenance Manual - Page 122
Troubleshooting Problems Solutions Error notification e-mail was received, but no error-solved email is printed on one side only. Restart the printer by turning it off and back on. If the problem persists, contact your sales or service representative. If the machine is still not operating - Ricoh CL7200 | Maintenance Manual - Page 123
Troubleshooting Removing Jammed Staples If "Add Staples" appears on the display, or the printer does not staple even after instructed, jammed staples might be the cause. Add Staples SR960 (2 Tray Finisher) A Open the front cover of the 2 tray finisher. The stapler is positioned in the - Ricoh CL7200 | Maintenance Manual - Page 124
Troubleshooting C Open the cartridge face plate to unlock it. D Remove jammed staples. E Close the cartridge face plate so it clicks into place. 124 - Ricoh CL7200 | Maintenance Manual - Page 125
Troubleshooting F Slant and insert the cartridge ( ), and then push in until it clicks into place ( ). G Close the front cover of the 2 tray finisher. SR950 (Booklet Finisher) A - Ricoh CL7200 | Maintenance Manual - Page 126
Troubleshooting D Push the cartridge button, and lift up while removing. E Open the cartridge's faceplate. F Remove any jammed staples. 126 - Ricoh CL7200 | Maintenance Manual - Page 127
Troubleshooting G Close the cartridge's faceplate. H Push in the cartridge until it clicks. I Close the front cover of the finisher. 127 - Ricoh CL7200 | Maintenance Manual - Page 128
Troubleshooting Adding Staples When "Add Staples" appears on the display, add a new staple refill. Add Staples SR960 (2 Tray Finisher) A Open the front cover of the 2 tray finisher. The stapler is positioned in the location as shown. B Remove the cartridge by pulling the green knob in the direction - Ricoh CL7200 | Maintenance Manual - Page 129
Troubleshooting C Push the areas labeled "PUSH", located on both sides of the stapler. The case cover on top rises. D Pull the case cover up. E Hook your finger in the hole of the empty refill case to pull it out. 129 - Ricoh CL7200 | Maintenance Manual - Page 130
Troubleshooting F Push in until the arrow on the refill case lines up with the arrow on the refill case cover. G Push the case cover down until it clicks into place. H Pull out the ribbon used for tying together the staples. ❒ Remove the entire length of the ribbon. 130 - Ricoh CL7200 | Maintenance Manual - Page 131
Troubleshooting I Slant and insert the cartridge ( ), and then push in until it clicks into place ( ). J Close the front cover of the 2 tray finisher. SR950 (Booklet Finisher) A - Ricoh CL7200 | Maintenance Manual - Page 132
Troubleshooting D Hold both sides of the cartridge, and then pull up the upper unit of the cartridge. E Remove the empty refill in the direction of the arrow. F Push in the new cartridge until it clicks. 132 - Ricoh CL7200 | Maintenance Manual - Page 133
Troubleshooting G Gently push down the upper unit. H Pull out the ribbon. I Push in the cartridge until it clicks. J Close the front cover of the finisher. 133 - Ricoh CL7200 | Maintenance Manual - Page 134
Troubleshooting Removing Punch-hole Chips When "Empty Punch Receptacle" appears on the display, the punch waste box is full. Follow these steps to remove paper chips. ❒ - Ricoh CL7200 | Maintenance Manual - Page 135
Troubleshooting ❖ If the message appears even after removing the Punch-hole chips If the "Empty Punch Receptacle" message appears on the control panel even when the - Ricoh CL7200 | Maintenance Manual - Page 136
Troubleshooting C Reinstall the punch waste box. ❒ If the message does not disappear, reinstall the punch waste box. D Attach the booklet finisher. 136 - Ricoh CL7200 | Maintenance Manual - Page 137
not to get toner on your hands or clothes. ❒ Toner on prints made after removing misfed paper may be loose (inadequately fused). Make a few test prints until smudges no longer appear. ❒ Do not forcefully remove misfed paper, it will tear. Torn pieces remaining inside the printer will cause further - Ricoh CL7200 | Maintenance Manual - Page 138
Removing Misfed Paper When "Remove Misfeed A:Internal Path" Appears A Open the bottom-right cover by pulling its lever. B Move the blue lever up and down to feed the misfed paper, and then slowly pull out the paper. C Close the right cover by pushing the area labeled "PUSH". 138 - Ricoh CL7200 | Maintenance Manual - Page 139
the 2 tray finisher or the booklet finisher is installed, detach it from the printer. p.37 "Detaching the SR960 (2 Tray Finisher)" p.38 "Detaching the SR950 ( C If the output tray is attached to the printer, raise it in the direction of the arrow ( ), and then remove it ( ). D Slowly pull - Ricoh CL7200 | Maintenance Manual - Page 140
out the misfed pa- per, and slowly pull out the paper. ❒ Always turn the blue dial in the direction of the arrow. If you turn it in the reverse direction, paper feeds into the printer, making it difficult for you to take out. ❒ Do not pull out misfed paper. Use the blue dial - Ricoh CL7200 | Maintenance Manual - Page 141
Removing Misfed Paper H If you removed the output tray in step C, reattach it to. Insert the hooks of the output tray into the printer slits, and then lower it toward you. I If the duplex unit is installed, close the duplex reversal unit. p.38 "Opening and Closing the Duplex Reversal - Ricoh CL7200 | Maintenance Manual - Page 142
Removing Misfed Paper When "Remove Misfeed R:Finisher" Appears Open the top cover ( ) and front cover ( ) of the 2 tray finisher, and then remove the misfed paper. A Fold the output tray. Raise it vertically. B Fold it over the printer top. 142 - Ricoh CL7200 | Maintenance Manual - Page 143
Removing Misfed Paper C Open the top cover for the 2 tray finisher, and then slowly pull out the misfed paper. D Close the top cover slowly. E Open the front cover for the 2 tray finisher. Check to see if there is misfed paper in areas A, B, C, and D. F Check area A of step E. Lift the lever ( ), - Ricoh CL7200 | Maintenance Manual - Page 144
it back into place. J Check area D of step E. Lift the lever in the direction of the arrow ( ), and then slowly pull out the misfed paper. K Slowly lower even after misfed paper is removed, detach the 2 tray finisher from the printer to check for misfed paper there. See p.37 "Detaching the SR960 (2 - Ricoh CL7200 | Maintenance Manual - Page 145
Removing Misfed Paper M Put the output tray back into place. Raise the tray. N Lower it slowly. 145 - Ricoh CL7200 | Maintenance Manual - Page 146
Removing Misfed Paper When "Remove Misfeed R1" Appears A Hold the release lever, and then remove the booklet finisher. B Remove the misfed paper. C Open the upper cover. 146 - Ricoh CL7200 | Maintenance Manual - Page 147
Removing Misfed Paper D Remove the misfed paper. E Close the upper cover. F Attach the booklet finisher. 147 - Ricoh CL7200 | Maintenance Manual - Page 148
Removing Misfed Paper When "Remove Misfeed R2-4" Appears A Hold the release lever, and then remove the booklet finisher. B Open the front cover. C Make suer the blue marker is visible. If not, turn knob R2 until it is visi- ble. 148 - Ricoh CL7200 | Maintenance Manual - Page 149
Removing Misfed Paper D Remove the misfed paper. E Hold lever R3, and then open the cover. F Remove the misfed paper. G Turn knob R4, and then remove the misfed paper. 149 - Ricoh CL7200 | Maintenance Manual - Page 150
Removing Misfed Paper When "Remove Misfeed Y:Paper Tray" Appears A Open the lower right cover of the paper feed unit, and then pull out the misfed paper. B Close the lower right cover of the paper feed unit. 150 - Ricoh CL7200 | Maintenance Manual - Page 151
"hot surface". Touching a "hot surface" could result in a burn. A If the 2 tray finisher or the booklet finisher is installed, detach it from the printer. p.37 "Detaching the SR960 (2 Tray Finisher)" p.38 "Detaching the SR950 (Booklet Finisher)" B Open the left cover of the duplex reversal unit, and - Ricoh CL7200 | Maintenance Manual - Page 152
Removing Misfed Paper D Slowly lower the duplex reversal unit until it stops, and remove the mis- fed paper. E Slowly raise the duplex reversal unit and insert until it clicks into place. Raise the left cover, and then close it securely by pushing the area labeled "PUSH". 152 - Ricoh CL7200 | Maintenance Manual - Page 153
You can remove misfed paper from the duplex feed unit by following the procedure below. ❒ When a paper misfeed occurs in the duplex feed unit, the printer usually sends the misfed paper to the right cover, so there is no need to execute this procedure. See p.138 "When "Remove Misfeed A:Internal Path - Ricoh CL7200 | Maintenance Manual - Page 154
Removing Misfed Paper D Pinch the upper left area of the duplex feed unit, and then slowly pull it halfway out. E Hold the duplex feed unit using both hands, place it on the vertical rail, and slide it straight out. F Slowly place the duplex feed unit on the floor. Open it slowly, and re- move the - Ricoh CL7200 | Maintenance Manual - Page 155
Removing Misfed Paper H Hold the duplex feed unit using both hands, place it on the vertical rail, and slide it slowly in until it stops. The vertical rail is in the position as shown. I Refasten the duplex feed unit using the provided screwdriver. Use the screw removed in step C. ❒ Be sure to - Ricoh CL7200 | Maintenance Manual - Page 156
Removing Misfed Paper J Slowly close the front cover by pushing the two areas on the left and right. K Plug in the power cable, and then turn on the power. 156 - Ricoh CL7200 | Maintenance Manual - Page 157
Appendix When the Front Cover Does Not Close If "Close Front Cover" appears on the display, the cover is not properly closed, even if it appears to be. Close Front Cover If the front cover does not close, check the green lever is in the locked position, as shown. A Turn off the power, and then - Ricoh CL7200 | Maintenance Manual - Page 158
Appendix C Slowly close the front cover by pushing the two areas on the left and right. D Plug in the power cable, and then turn on the power. 158 - Ricoh CL7200 | Maintenance Manual - Page 159
the outlet. If the cord is unplugged forcefully, it could become damaged. Damaged plugs or cords can cause an electrical or fire hazard. Moving the printer in the short distance A Be sure to check the following: • The power is turned off. • The power cable is unplugged from the wall outlet. • The - Ricoh CL7200 | Maintenance Manual - Page 160
Appendix ❒ Be sure to move the printer horizontally. Moving the printer slowly prevents toner scattering. ❒ If the paper feed unit(s) is installed, detach it and move the printer separately. 160 - Ricoh CL7200 | Maintenance Manual - Page 161
, if there is problem, contact the store where they were purchased. ❒ When you first use this printer, use the four toner cartridges packaged with the printer. ❒ Numbers of pages that can be printed using the toner cartridge supplied with this printer are as follows: Toner cartridge Black Cyan - Ricoh CL7200 | Maintenance Manual - Page 162
Kit Type 7200/7300D Printer Maintenance Kit Type 3800E Printer Maintenance Kit Type 7200/7300F Printer Maintenance Kit Type 3800H Consumables Color photoconductor unit × 3 Color development unit × 3 Fusing unit × 1 Black development unit × 1 Waste toner bottle × 1 Black photoconductor unit - Ricoh CL7200 | Maintenance Manual - Page 163
Mainframe ❖ Configuration: Desktop ❖ Print Process: Laser beam scanning & Electrophotographic printing Dual component toner development ❖ First Print Speed: Monochrome: 11 sec or less (A4K, 11 × 81/2 K) Color: 12 sec or less (A4K, 11 × 81/2 K) ❒ If the printer has not been used for a while, there - Ricoh CL7200 | Maintenance Manual - Page 164
7300, inches) inches) and SR960 Height 678 mm (26.7 inches) 678 mm (26.7 inches) 1060 mm (41.7 inches) ❖ Weight: • Basic model printer Approximately 83.3 kg (183.7 lb.) *1 • Duplex unit standard model printer Approximately 92.5 kg (203 lb.) *1 *1 Toner cartridges and power cord included. 164 - Ricoh CL7200 | Maintenance Manual - Page 165
-TX) • USB2.0 It requires a USB computer port and cable that support USB 2.0. Optional: • Gigabit Ethernet (1000Base-T) • IEEE 1394 (SCSI print ) • Parallel (Bidirectional IEEE 1284) • Bluetooth • USB host interface ❖ Printer Language: RPCS, PJL, PCL 5c/e/6, PostScript Level 3, PDF, PictBridge ❖ - Ricoh CL7200 | Maintenance Manual - Page 166
Appendix Options Paper Feed Unit Type 7300 (500 × 1) ❖ Dimensions (W × D × H): 540 × 600 × 172 mm (21.3 × 23.7 × 6.8 in) ❖ Paper Weight: 60 - 105 g/m2 (16 - 28 lb.) ❖ Paper Size: A5 (Long edge feed) - A3, 81/2 × 11 - 11 × 17 (Short edge feed) Paper Feed Unit Type 7300 (500 × 2) ❖ Dimensions (W × D × - Ricoh CL7200 | Maintenance Manual - Page 167
Appendix ❖ Stack Capacity: • Upper Tray: 500 sheets (A4/11 × 81/2/B5/A5 (Long edge feed) - 80 g/m2, 20 lb.) • Lower Tray 2,000 sheets (A4/11 × 81/2 (Long edge feed) - 80 g/m2, 20 lb.) 750 sheets (A3, B4, A4 (Short edge feed), B5, 81/2 × 14, 11 × 17, 81/2 × 11 (Short edge feed)) 500 sheets (A5 (Long - Ricoh CL7200 | Maintenance Manual - Page 168
fonts • Store log data ❒ You can install PostScript fonts using the optional hard disk drive. With Macintosh, supported fonts are PostScript Type 1 and PostScript Type 2. To download them, use Printer Utility for Mac. Memory Unit Type C 64/128/256MB ❖ Module Type: SO-DIMM (Small Outline Dual-in - Ricoh CL7200 | Maintenance Manual - Page 169
H ❖ Transmission Spec.: Based on IEEE 802.11b (wireless LAN) ❖ Protocol: TCP/IP, IPX/SPX, AppleTalk ❒ RPDL and Web Image Monitor are supported. ❖ Data Transfer Speed: 1 Mbps, 2 Mbps, 5.5 Mbps, 11 Mbps (auto selected) ❖ Frequency Range: • Inch version: 2412-2462 Mhz (1-11 channels) • Metric version - Ricoh CL7200 | Maintenance Manual - Page 170
10 m Gigabit Ethernet Type 7300 ❖ Interface Connector: • Ethernet (10Base-T, 100Base-TX, 1000Base-T) • USB 2.0 It requires a USB computer port and cable that support USB 2.0. ❖ Data Transmission Speed: • Ethernet: 1000 Mbps, 100 Mbps, 10 Mbps • USB: 480 Mbps(High speed: USB 2.0), 12 Mbps(Full speed - Ricoh CL7200 | Maintenance Manual - Page 171
Appendix ❖ Distance Between Devices: • Ethernet: 100 m • USB: 5 m USB Host Interface Unit Type 7300 ❖ Interface Connector: USB 2.0 host interface A type ❖ Data Transmission Speed: 12 Mbps(Full speed) ❖ Distance Between Devices: 5 m 171
-
 1
1 -
 2
2 -
 3
3 -
 4
4 -
 5
5 -
 6
6 -
 7
7 -
8
-
9
-
10
-
11
-
12
-
13
-
14
-
15
-
16
-
17
-
18
-
19
-
20
-
21
-
22
-
23
-
24
-
25
-
26
-
27
-
28
-
29
-
30
-
31
-
32
-
33
-
34
-
35
-
36
-
37
-
38
-
39
-
40
-
41
-
42
-
43
-
44
-
45
-
46
-
47
-
48
-
49
-
50
-
51
-
52
-
53
-
54
-
55
-
56
-
57
-
58
-
59
-
60
-
61
-
62
-
63
-
64
-
65
-
66
-
67
-
68
-
69
-
70
-
71
-
72
-
73
-
74
-
75
-
76
-
77
-
78
-
79
-
80
-
81
-
82
-
83
-
84
-
85
-
86
-
87
-
88
-
89
-
90
-
91
-
92
-
93
-
94
-
95
-
96
-
97
-
98
-
99
-
100
-
101
-
102
-
103
-
104
-
105
-
106
-
107
-
108
-
109
-
110
-
111
-
112
-
113
-
114
-
115
-
116
-
117
-
118
-
119
-
120
-
121
-
122
-
123
-
124
-
125
-
126
-
127
-
128
-
129
-
130
-
131
-
132
-
133
-
134
-
135
-
136
-
137
-
138
-
139
-
140
-
141
-
142
-
143
-
144
-
145
-
146
-
147
-
148
-
149
-
150
-
151
-
152
-
153
-
154
-
155
-
156
-
157
-
158
-
159
-
160
-
161
-
162
-
163
-
164
-
165
-
166
-
167
-
168
-
169
-
170
-
171
 |
 |
G1307528_1.00
EN USA G130-7509
Copyright ©
2005
1
Maintenance Guide
Read This First
Trademarks
.............................................................................................................
4
How to Read This Manual
.....................................................................................
5
Paper and Other Media
Paper and Other Media Supported by This Printer
.............................................
6
Paper Recommendations
....................................................................................
13
Loading Paper
..........................................................................................................
13
Storing Paper
...........................................................................................................
13
Types of Paper and Other Media
.............................................................................
13
Paper not supported by this printer
..........................................................................
17
Print Area
.................................................................................................................
18
Loading Paper
......................................................................................................
20
Loading Paper in Tray 1/2 and the optional paper feed unit
....................................
20
Loading Paper in the Bypass Tray
...........................................................................
28
Switching between Paper Trays
...............................................................................
34
Replacing Consumables and Maintenance Kit
Using the Screwdriver
.........................................................................................
36
Detaching and Reattaching the Options
............................................................
37
Detaching the SR960 (2 Tray Finisher)
....................................................................
37
Detaching the SR950 (Booklet Finisher)
..................................................................
38
Opening and Closing the Duplex Reversal Unit
.......................................................
38
Replacing the Toner Cartridge
...........................................................................
40
Replacing the Photoconductor Unit
...................................................................
45