Ricoh CL7200 Maintenance Manual - Page 58
Replacing the Fusing Unit
 |
UPC - 026649024115
View all Ricoh CL7200 manuals
Add to My Manuals
Save this manual to your list of manuals |
Page 58 highlights
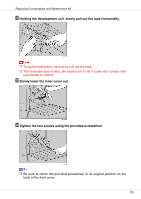
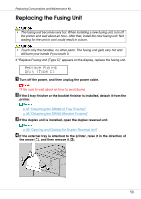
Replacing Consumables and Maintenance Kit Replacing the Fusing Unit • The fusing unit becomes very hot. When installing a new fusing unit, turn off the printer and wait about an hour. After that, install the new fusing unit. Not waiting for the unit to cool could result in a burn. • Touch only the handles, no other parts. The fusing unit gets very hot and will burn your hands if you touch it. If "Replace Fusing Unit (Type C)" appears on the display, replace the fusing unit. Replace Fusing Unit (Type C) A Turn off the power, and then unplug the power cable. ❒ Be sure to wait about an hour to avoid burns. B If the 2 tray finisher or the booklet finisher is installed, detach it from the printer. p.37 "Detaching the SR960 (2 Tray Finisher)" p.38 "Detaching the SR950 (Booklet Finisher)" C If the duplex unit is installed, open the duplex reversal unit. p.38 "Opening and Closing the Duplex Reversal Unit" D If the external tray is attached to the printer, raise it in the direction of the arrow ( ), and then remove it ( ). 58
-
 1
1 -
2
-
3
-
4
-
5
-
6
-
7
-
8
-
9
-
10
-
11
-
12
-
13
-
14
-
15
-
16
-
17
-
18
-
19
-
20
-
21
-
22
-
23
-
24
-
25
-
26
-
27
-
28
-
29
-
30
-
31
-
32
-
33
-
34
-
35
-
36
-
37
-
38
-
39
-
40
-
41
-
42
-
43
-
44
-
45
-
46
-
47
-
48
-
49
-
50
-
51
-
52
-
 53
53 -
 54
54 -
 55
55 -
 56
56 -
 57
57 -
 58
58 -
 59
59 -
 60
60 -
 61
61 -
 62
62 -
 63
63 -
64
-
65
-
66
-
67
-
68
-
69
-
70
-
71
-
72
-
73
-
74
-
75
-
76
-
77
-
78
-
79
-
80
-
81
-
82
-
83
-
84
-
85
-
86
-
87
-
88
-
89
-
90
-
91
-
92
-
93
-
94
-
95
-
96
-
97
-
98
-
99
-
100
-
101
-
102
-
103
-
104
-
105
-
106
-
107
-
108
-
109
-
110
-
111
-
112
-
113
-
114
-
115
-
116
-
117
-
118
-
119
-
120
-
121
-
122
-
123
-
124
-
125
-
126
-
127
-
128
-
129
-
130
-
131
-
132
-
133
-
134
-
135
-
136
-
137
-
138
-
139
-
140
-
141
-
142
-
143
-
144
-
145
-
146
-
147
-
148
-
149
-
150
-
151
-
152
-
153
-
154
-
155
-
156
-
157
-
158
-
159
-
160
-
161
-
162
-
163
-
164
-
165
-
166
-
167
-
168
-
169
-
170
-
171
 |
 |