Ricoh CL7200 Maintenance Manual - Page 116
Gray reproduction Text/Line Art
 |
UPC - 026649024115
View all Ricoh CL7200 manuals
Add to My Manuals
Save this manual to your list of manuals |
Page 116 highlights
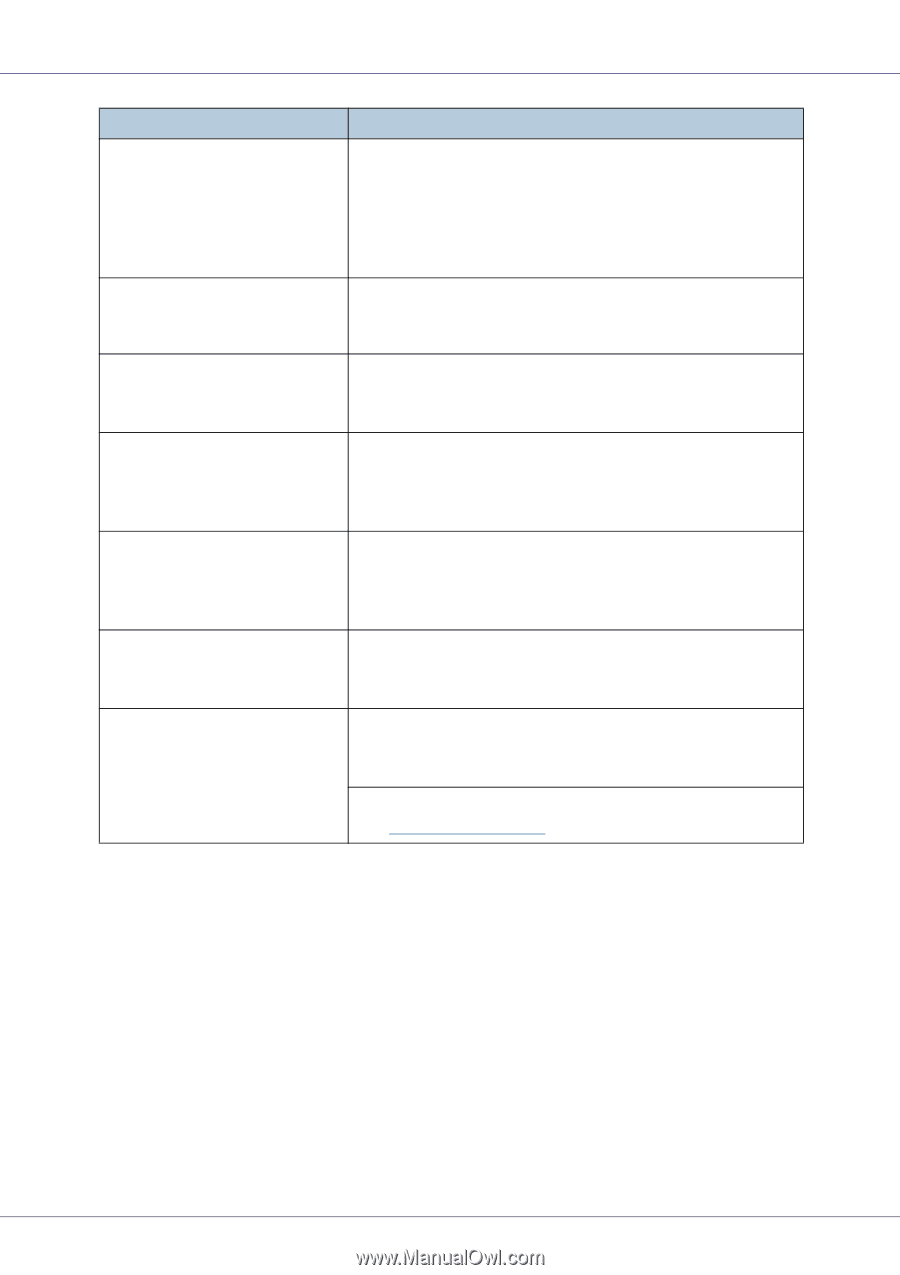
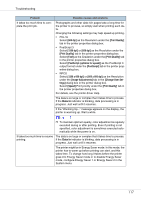
Troubleshooting Problem Possible causes and solutions The color changes considerably when you adjust it with the RPCSTM printer driver. When you adjust the color on the [Balance Adjustments] tab of the RPCSTM printer driver [Change User Settings] dialog box, do not change the values too much. Note that the printed colors will not be exactly the same as those in the sample image. For details, see the printer driver Help. Photographs are grainy. Some applications require the resolution to be reduced when printing. On the [Print Quality] tab, set [Print priority] to [Quality]. For details, see the printer driver Help. Fine dot patterns do not come out. In the RPCSTM printer driver [Change User Settings] dialog box, change the [Dithering:] setting on the [Image Adjustments] tab. For details, see the printer driver Help. Black areas and lines are not pure black In the RPCSTM printer driver [Change User Settings] dialog box, set [Gray reproduction (Text/Line Art):] on the [Image Adjustments] tab to [K (Black)]. For details, see the printer driver Help. The black areas in the gradation are not pure black. In the RPCSTM printer driver [Change User Settings] dialog box, set [Gray reproduction (Text/Line Art):] on the [Image Adjustments] tab to [CMY + K]. For details, see the printer driver Help. Solid lines are printed as broken In the RPCSTM printer driver [Change User Settings] dialog box, lines. change the [Dithering:] setting on the [Image Adjustments] tab. For details, see the printer driver Help. Two or more sheets are fed together. In the RPCSTM printer driver [Change User Settings] dialog box, change the [Dithering:] setting on the [Image Adjustments] tab. For details, see the printer driver Help. Fan the sheets well before loading them. See p.20 "Loading Paper". 116
-
 1
1 -
2
-
3
-
4
-
5
-
6
-
7
-
8
-
9
-
10
-
11
-
12
-
13
-
14
-
15
-
16
-
17
-
18
-
19
-
20
-
21
-
22
-
23
-
24
-
25
-
26
-
27
-
28
-
29
-
30
-
31
-
32
-
33
-
34
-
35
-
36
-
37
-
38
-
39
-
40
-
41
-
42
-
43
-
44
-
45
-
46
-
47
-
48
-
49
-
50
-
51
-
52
-
53
-
54
-
55
-
56
-
57
-
58
-
59
-
60
-
61
-
62
-
63
-
64
-
65
-
66
-
67
-
68
-
69
-
70
-
71
-
72
-
73
-
74
-
75
-
76
-
77
-
78
-
79
-
80
-
81
-
82
-
83
-
84
-
85
-
86
-
87
-
88
-
89
-
90
-
91
-
92
-
93
-
94
-
95
-
96
-
97
-
98
-
99
-
100
-
101
-
102
-
103
-
104
-
105
-
106
-
107
-
108
-
109
-
110
-
 111
111 -
 112
112 -
 113
113 -
 114
114 -
 115
115 -
 116
116 -
 117
117 -
 118
118 -
 119
119 -
 120
120 -
 121
121 -
122
-
123
-
124
-
125
-
126
-
127
-
128
-
129
-
130
-
131
-
132
-
133
-
134
-
135
-
136
-
137
-
138
-
139
-
140
-
141
-
142
-
143
-
144
-
145
-
146
-
147
-
148
-
149
-
150
-
151
-
152
-
153
-
154
-
155
-
156
-
157
-
158
-
159
-
160
-
161
-
162
-
163
-
164
-
165
-
166
-
167
-
168
-
169
-
170
-
171
 |
 |