Ricoh CL7200 Maintenance Manual - Page 118
K Black, Advanced, Print Quality, Image, Adjustments, Change User Set, tings, Dithering, Image - paper tray parts
 |
UPC - 026649024115
View all Ricoh CL7200 manuals
Add to My Manuals
Save this manual to your list of manuals |
Page 118 highlights
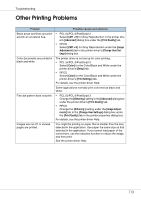
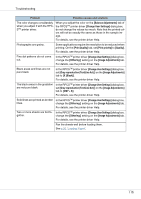
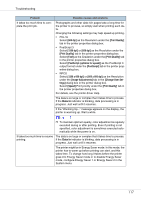
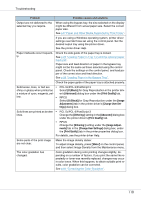
Troubleshooting Problem Possible causes and solutions Output are not delivered to the selected tray you require. When using the bypass tray, the size selected on the display might be different from actual paper size. Select the correct paper size. See p.6 "Paper and Other Media Supported by This Printer". If you are using a Windows operating system, printer driver settings override those set using the control panel. Set the desired output tray using the printer driver. See the printer driver Help. Paper misfeeds occur frequently. Check the side guide of the paper tray is locked. See p.20 "Loading Paper in Tray 1/2 and the optional paper feed unit". Paper size and feed direction of paper in the bypass tray might not be the same as those selected using the control panel. Check the settings on the control panel, and load paper of the correct size and feed direction. See p.28 "Loading Paper in the Bypass Tray". Check the paper guide of the paper tray is attached properly. Solid areas, lines, or text are • shiny or glossy when printed as a mixture of cyan, magenta, yel- low. • PCL 5c/PCL 6/PostScript 3 Select [K (Black)] for Gray Reproduction in the printer driver's [Advanced] dialog box under the [Print Quality] tab. RPCS Select [K (Black)] for Gray Reproduction under the [Image Adjustments] tab in the printer driver's [Change User Settings] dialog box. Solid lines are printed as broken lines. • PCL 5c/PCL 6/PostScript 3 Change the [Dithering:] setting in the [Advanced] dialog box under the printer driver's [Print Quality] tab. • RPCS Change the [Dithering:] setting under the [Image Adjustments] tab in the [Change User Settings] dialog box, under the [Print Quality] tab in the printer properties dialog box. For details, see the printer driver Help. Some parts of the print image are not clear. Make the image density darker. To adjust image density, press {Menu} on the control panel, and then select Image Density from the Maintenance menu. The color gradation has changed. Color gradation during color printing changes slightly, depending on a number of factors. If you print the same file repeatedly or toner was recently replaced, changes may occur in color tones. When this happens, to obtain suitable print results, color gradation can be corrected. See p.84 "Correcting the Color Gradation". 118
-
 1
1 -
2
-
3
-
4
-
5
-
6
-
7
-
8
-
9
-
10
-
11
-
12
-
13
-
14
-
15
-
16
-
17
-
18
-
19
-
20
-
21
-
22
-
23
-
24
-
25
-
26
-
27
-
28
-
29
-
30
-
31
-
32
-
33
-
34
-
35
-
36
-
37
-
38
-
39
-
40
-
41
-
42
-
43
-
44
-
45
-
46
-
47
-
48
-
49
-
50
-
51
-
52
-
53
-
54
-
55
-
56
-
57
-
58
-
59
-
60
-
61
-
62
-
63
-
64
-
65
-
66
-
67
-
68
-
69
-
70
-
71
-
72
-
73
-
74
-
75
-
76
-
77
-
78
-
79
-
80
-
81
-
82
-
83
-
84
-
85
-
86
-
87
-
88
-
89
-
90
-
91
-
92
-
93
-
94
-
95
-
96
-
97
-
98
-
99
-
100
-
101
-
102
-
103
-
104
-
105
-
106
-
107
-
108
-
109
-
110
-
111
-
112
-
 113
113 -
 114
114 -
 115
115 -
 116
116 -
 117
117 -
 118
118 -
 119
119 -
 120
120 -
 121
121 -
 122
122 -
 123
123 -
124
-
125
-
126
-
127
-
128
-
129
-
130
-
131
-
132
-
133
-
134
-
135
-
136
-
137
-
138
-
139
-
140
-
141
-
142
-
143
-
144
-
145
-
146
-
147
-
148
-
149
-
150
-
151
-
152
-
153
-
154
-
155
-
156
-
157
-
158
-
159
-
160
-
161
-
162
-
163
-
164
-
165
-
166
-
167
-
168
-
169
-
170
-
171
 |
 |
